Blog
Insights, tutorials, and best practices for network administrators and developers.
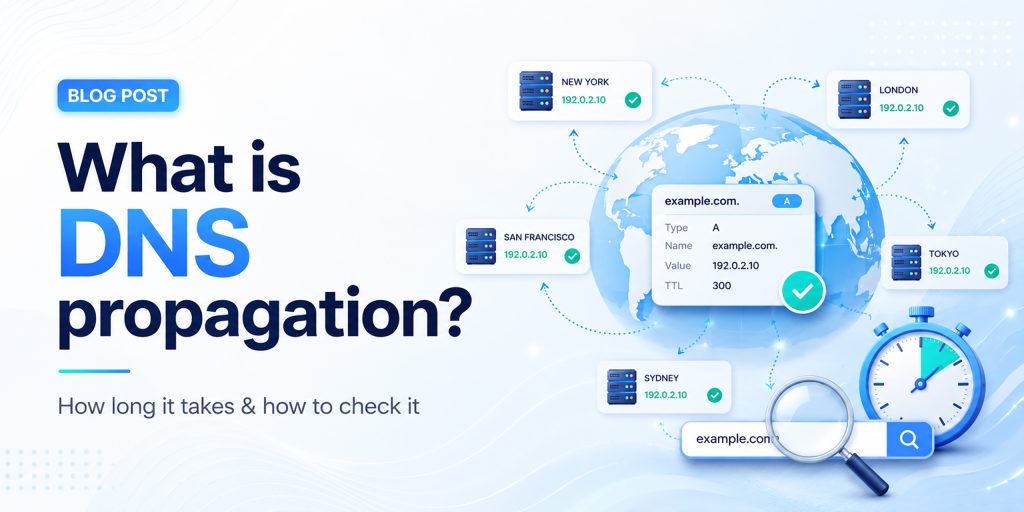
You’ve just updated your nameservers, pointed your domain to a new host, or changed a DNS record, and now you’re waiting. Your website might be showing the old version, or visitors in different countries see something different from you. This is DNS propagation in action. In this complete guide, we explain everything: what DNS propagation is, why it takes time, how long it takes worldwide, and the fastest ways to check and troubleshoot it.
What is DNS Propagation?
DNS propagation is the process by which updates to your domain’s DNS records spread across all DNS servers worldwide after you make a change. When you update your DNS settings, such as changing your nameservers, modifying an A record, or updating your MX records, those changes do not appear instantly for everyone on the internet. Instead, they travel gradually from server to server across the global DNS network. This global DNS propagation time can range from a few minutes to 72 hours.
Think of the internet as a massive phone book system. Your domain name (like example.com) is the name in the book, and the DNS record is the phone number. When you “change your number,” every phone operator (DNS server) around the world needs to update their local copy of the book. Until they do, some people will still be calling the old number.
DNS Propagation Flow
| Your Domain (DNS Updated) |
→ | Root DNS Server |
→ | TLD Server (.com/.net) |
→ | ISP Resolver (Cache) |
→ | End User (Sees New IP) |
How DNS Works (and Why Propagation Happens)
To understand DNS propagation, you first need to understand how the Domain Name System works. DNS translates human-readable domain names into machine-readable IP addresses that servers use to communicate. Here’s the step-by-step DNS lookup process:
- Step 1 – Browser checks its local cache: Your browser stores recently visited DNS records. If it has the record cached (and it hasn’t expired), it uses that directly without any external request.
- Step 2 – OS checks its DNS cache: If the browser has no cached entry, it asks your operating system, which maintains its own DNS cache.
- Step 3 – Query sent to ISP’s recursive resolver: Your Internet Service Provider operates DNS resolver servers. These receive your DNS query and check their cache. This is where most propagation delays occur. ISP resolvers cache records aggressively.
- Step 4 – Resolver contacts root and authoritative servers: If the resolver doesn’t have a cached answer, it queries the root DNS servers, then TLD servers, then the authoritative nameserver for your domain, which has the latest record.
- Step 5 – Answer is cached and returned: The resolver stores the answer based on the TTL value and sends it back to your browser. The next request within the TTL window is answered from cache, which is why DNS propagation takes time.
How Long Does DNS Propagation Take?
How long does DNS propagation take? It varies, but here’s a practical breakdown of global DNS propagation time:
| Scenario | Typical Propagation Time | Speed |
| Low TTL records (300s / 5 min) | 5 – 30 minutes | Fast |
| Standard TTL records (3600s) | 1 – 4 hours | Moderate |
| A record / CNAME changes | 1 – 24 hours | Variable |
| MX record (email) changes | 4 – 24 hours | Variable |
| Nameserver changes | 12 – 48 hours | Slow |
| Domain transfer | 24 – 72 hours | Slowest |
| Full global propagation | Up to 72 hours | Maximum |
Key Factors That Affect DNS Propagation Time
TTL (Time to Live) Value
The TTL is the most important factor in DNS propagation time. It tells resolvers how long they should cache a record before checking for a fresh copy. A TTL of 86400 means 24 hours; a TTL of 300 means 5 minutes. If your TTL was 24 hours before your change, resolvers will serve the old record for up to 24 hours after your update.
ISP DNS Cache Behavior
Different ISPs refresh their DNS caches at different rates. Some respect the TTL exactly; others refresh less frequently. This means users on different ISPs may see your new DNS records at different times, creating inconsistent propagation across the globe.
Type of DNS Record Changed
Not all DNS records propagate at the same speed. A and CNAME changes propagate faster, while MX and nameserver updates take longer because they involve more layers of the DNS hierarchy.
Domain Registrar and Hosting Provider
Some registrars push nameserver updates to root servers faster than others. DNS hosting providers like Cloudflare or AWS Route 53 have infrastructure optimized for faster propagation.
Geographic Location
DNS propagation speed varies by location. Major internet hubs in North America and Western Europe typically see changes faster, while some regions in Asia and Africa may experience longer delays.
How to Check DNS Propagation Status
Knowing how to check DNS propagation is essential after making any DNS change. The goal is to verify that your new DNS records are being returned by resolvers around the world, not just on your local network.
Method 1: Use an Online DNS Propagation Checker
The easiest method is to use a dedicated DNS propagation checker tool that queries multiple DNS servers from locations worldwide and shows you the current record values from each. HasheTools offers a free online DNS propagation checker at hashetools.com that checks your domain against dozens of global resolvers simultaneously.
Method 2: Use Command Line Tools
For developers and sysadmins, command-line tools offer precise DNS lookup results:
• Windows (nslookup): nslookup example.com 8.8.8.8
• Mac/Linux (dig): dig @8.8.8.8 example.com A
Query different resolvers (8.8.8.8 = Google, 1.1.1.1 = Cloudflare, 9.9.9.9 = Quad9) to check propagation across multiple providers.
Method 3: Use Multiple Devices and Networks
Try accessing your website from different devices, your phone on mobile data, a friend’s computer, or a VPN, to see if different networks are serving the new or old DNS records.
Method 4: Clear Your Local DNS Cache
Before checking anything, clear your local DNS cache so you’re not seeing an outdated cached result:
- Windows: ipconfig /flushdns
- Mac: sudo dscacheutil -flushcache; sudo killall -HUP mDNSResponder
- Linux: sudo systemd-resolve –flush-caches
- Chrome: Visit chrome://net-internals/#dns and click ‘Clear host cache.’
DNS Propagation Troubleshooting
If your DNS changes are not reflecting, here are the most common causes and solutions:
| Problem | Likely Cause | Fix |
| The website shows old content | Local DNS or browser cache | Flush DNS cache; clear browser cache |
| Some users see new, others don’t | Propagation is still in progress | Wait for the full TTL to expire |
| DNS is correct, but the site won’t load | Firewall, SSL, or server config | Check server logs and SSL certificate |
| Email not working after MX change | MX propagation is still in progress | Wait 24 hrs; verify MX with dig |
| Nameserver change not taking effect | Registrar delay or wrong NS records | Confirm NS at registrar; wait 48 hrs |
| DNS propagated, but SSL error | SSL cert not yet on new host | Provision SSL cert on new server |
COMMON MISTAKE
Many users assume that because their DNS change is correct in the registrar panel, it has already propagated. This is wrong. The registrar is only the authoritative source; all caching resolvers in between need to expire their old cache before picking up the new record. Always check propagation with an external tool like HasheTools DNS Checker.
How to Speed Up DNS Propagation
While you cannot force instant global propagation, these proven strategies minimize DNS propagation delay and help your changes go live as quickly as possible:
- Lower your TTL before making changes: 48 hours before your planned DNS change, reduce your TTL to 300 seconds (5 minutes). Resolvers worldwide will cache the old record for only 5 minutes, drastically reducing propagation wait time when you make the actual change.
- Use a premium DNS provider with global anycast: Providers like Cloudflare, AWS Route 53, and Google Cloud DNS use anycast networks with nodes in hundreds of cities. Their DNS infrastructure propagates changes much faster than traditional shared hosting DNS.
- Clear your local DNS cache immediately: Flush the DNS cache on your machine and browser right after making changes. This lets you verify the new records are live without waiting for your local cache to expire.
- Switch to Google or Cloudflare DNS resolvers: Change your network’s DNS servers to 8.8.8.8 (Google) or 1.1.1.1 (Cloudflare). These resolvers typically refresh their caches faster than ISP resolvers.
- Plan migrations during low-traffic periods: Schedule DNS changes during off-peak hours (nights or weekends) so fewer users are affected during the transition period when some see the old site and others see the new one.
DNS Record Types and Their Propagation Times
Different DNS records (A, CNAME, MX, and others) have different propagation characteristics. Understanding these helps you set realistic expectations for each type of change:
| Record Type | Purpose | Typical Propagation | Impact |
| A Record | Maps the domain to an IPv4 address | 1 – 24 hours | Website accessibility |
| AAAA Record | Maps the domain to an IPv6 address | 1 – 24 hours | IPv6 accessibility |
| CNAME | Alias from one domain to another | 1 – 8 hours | Subdomains, CDN pointing |
| MX Record | Email server routing | 4 – 24 hours | Email delivery |
| TXT Record | SPF, DKIM, domain verification | 1 – 12 hours | Email authentication |
| NS Record | Defines authoritative nameservers | 12 – 48 hours | Entire DNS authority |
| SOA Record | Zone authority information | 24 – 72 hours | Zone administration |
| PTR Record | Reverse DNS lookup | 24 – 48 hours | Email reputation, security |
Frequently Asked Questions
What is DNS propagation and why does it happen?
DNS propagation is the time it takes for updated DNS records to spread across the Internet. It happens because DNS servers cache old records and only update them after the TTL (time to live) expires.
How long does DNS propagation take?
DNS propagation usually takes 24–72 hours worldwide, but many users see updates within a few hours. Timing depends on TTL, ISP caching, and location.
How can I check DNS propagation?
You can use tools like HasheTools DNS Checker or commands like nslookup and dig to see how your domain resolves in different locations.
Can DNS propagation be instant?
No, it cannot be fully instant worldwide. However, lowering your TTL before making changes can make updates much faster.
Why is my website not updating after DNS changes?
Your ISP or browser may still be using cached DNS data. Try clearing your cache, switching networks, or waiting for propagation to complete.
Does DNS propagation affect email?
Yes. Changes to MX records can temporarily affect email delivery. Keep your old mail server active for 48-72 hours to avoid issues.
Does clearing the DNS cache speed up propagation?
No, it only updates DNS on your device. It does not affect global propagation.
How can I verify DNS changes are correct?
Check your domain’s authoritative nameserver using tools like dig. If it shows the updated record, the change is correct and propagating.
Conclusion
DNS propagation is one of those technical realities of the internet that affects everyone who manages a website, email system, or online service. It’s not a bug or a failure; it’s simply how the distributed, cached DNS system keeps billions of lookups fast and efficient worldwide.

How to Find Every Domain Hosted on the Same Server
Have you ever wondered how many websites are hosted on the same server as your domain? Whether you are managing a website, auditing hosting performance, checking security risks, or researching competitors, finding every domain hosted on the same server can reveal valuable technical insights.
Many websites, especially those using shared hosting, run on the same IP address as dozens, hundreds, or even thousands of other domains. By identifying these domains, you can better understand your hosting environment, detect suspicious neighbors, troubleshoot server-related issues, and make smarter decisions about website security and performance.
With HasheTools, you can run fast DNS, IP, email, network, and web checks from one platform. HasheTools provides free online utilities for DNS, IP, email, network, and web analysis, helping developers, IT teams, domain owners, and website administrators diagnose technical issues quickly.
What Does “Domains Hosted on the Same Server” Mean?
Every website is connected to an IP address that directs visitors to the server where the site’s files are stored.
When multiple domains share the same IP address, they are often hosted on the same server or hosting environment.
For example:
example1.com → 192.0.2.10
example2.com → 192.0.2.10
example3.com → 192.0.2.10
In this example, all three domains use the same IP address. However, this does not necessarily mean they have the same owner. They may simply be using the same shared hosting provider, cloud platform, CDN, proxy service, or server infrastructure.
Why Would You Want to Find Domains on the Same Server?
Finding domains hosted on the same server can help with security audits, SEO analysis, competitor research, and hosting troubleshooting. By identifying websites that share an IP address, you can gain valuable insights into your hosting environment and server infrastructure.
1. Website Security Audits
If your website shares a server with spammy, compromised, or poorly maintained websites, there may be indirect risks to server reputation, performance, and security.
This is especially important for:
- WordPress websites
- Shared hosting accounts
- Small business websites
- Agency-managed client sites
- E-commerce stores
- SaaS websites
A same-server domain check can help determine whether your website is hosted in a trustworthy environment.
2. SEO and Server Reputation
Although search engines evaluate websites individually, poor hosting quality can negatively affect SEO through slow page speeds, downtime, malware warnings, or a poor IP reputation.
If many suspicious or low-quality websites share the same IP address, it may be worth reviewing your hosting setup.
3. Competitor and Market Research
A reverse IP lookup can reveal websites using the same infrastructure, helping you identify:
- Sister websites
- Regional domain variations
- Campaign landing pages
- White-label platforms
- Staging or test environments
- Related business websites
This information can support competitor analysis, digital marketing research, and domain intelligence.
4. Troubleshooting Hosting Issues
If multiple domains on the same IP address are experiencing downtime or performance problems, the issue may be server-wide rather than limited to a single website.
Common causes include:
- DNS configuration issues
- Hosting server outages
- Shared IP misconfigurations
- SSL certificate problems
- Firewall restrictions
- CDN or proxy issues
- Server overload
5. Detecting Unauthorized Domains
For VPS and dedicated server owners, checking domains hosted on the same IP can help identify unknown or unauthorized websites connected to your infrastructure.
This can help system administrators maintain better visibility, security, and server control.
How Domains Are Connected to a Server
To understand how to find domains on the same server, you need to understand a few basic DNS concepts.
A Record
An A record connects a domain name to an IPv4 address.
Example:
example.com → 192.0.2.10
AAAA Record
An AAAA record connects a domain name to an IPv6 address.
Example:
example.com → 2001:db8::1
CNAME Record
A CNAME record points one domain or subdomain to another hostname.
Example:
www.example.com → example.com
PTR Record
A PTR record is used for reverse DNS. It maps an IP address back to a hostname.
HasheTools’ All DNS Records Lookup can retrieve multiple DNS records, including A, AAAA, CNAME, MX, TXT, NS, SOA, and PTR records, which helps users review a domain’s full DNS configuration in one place.
The Best Ways to Find Every Domain Hosted on the Same Server
There are several ways to identify domains hosted on the same server. The most common methods include IP lookup, DNS record lookup, reverse IP lookup, and hosting analysis.
Method 1: Find the Domain’s IP Address
The first step is to find the IP address of the domain you want to investigate.
You can do this using a DNS lookup tool.
Steps:
- Go to HasheTools.
- Open a DNS lookup or all DNS records tool.
- Enter the domain name.
- Check the A record or AAAA record.
- Copy the IP address shown in the result.
Example:
yourdomain.com → 203.0.113.25
Once you have the IP address, you can use it to search for other domains connected to the same server.
Method 2: Use a Reverse IP Lookup
A reverse IP lookup checks which domains are associated with a specific IP address.
Instead of asking:
What IP does this domain use?
Reverse IP asks:
What domains use this IP?
This is the most direct method to find websites hosted on the same server.
Example:
IP Address: 203.0.113.25
Possible hosted domains:
– example.com
– example.net
– samplebusiness.com
– clientsite.org
Reverse IP lookup is especially useful for checking shared hosting environments.
Method 3: Check All DNS Records
Sometimes, a domain may not directly point to a simple hosting IP. It may use:
- CDN services
- Cloud hosting
- Load balancers
- Proxy services
- Multiple A records
- IPv6 records
- CNAME chains
That is why checking all DNS records is important.
Using HasheTools’ All DNS Records Lookup, you can retrieve a complete overview of a domain’s DNS records instead of checking A, MX, TXT, CNAME, or NS records separately. The tool is designed for domain administrators, network engineers, and security specialists who need to audit or troubleshoot DNS configurations. (HasheTools)
Look for:
- A records
- AAAA records
- CNAME records
- NS records
- PTR records
- MX records
- TXT records
This gives you a better understanding of how the domain is configured and where it may be hosted.
Method 4: Use Command Line Tools
If you are comfortable using a terminal, you can also find the IP address of a domain manually.
Using nslookup
nslookup example.com
Using dig
dig example.com A
Using host
host example.com
These commands help you identify the IP address behind a domain. After that, you can use a reverse IP lookup tool to discover other domains connected to the same IP.
Method 5: Check the Hosting Provider
Once you have the IP address, you can also check which hosting provider owns it.
This can help you understand whether the domain is hosted on:
- Shared hosting
- VPS hosting
- Dedicated server
- Cloud infrastructure
- CDN network
- Managed WordPress hosting
- Enterprise hosting
For example, if the IP belongs to a common shared hosting provider, you may find many unrelated websites on the same server. If it belongs to a private server or dedicated infrastructure, there may be fewer domains.
Method 6: Analyze Nameservers
Nameservers can also reveal hosting or DNS provider information.
Example:
ns1.hostingprovider.com
ns2.hostingprovider.com
If many domains use the same nameservers and IP address, they may be connected through the same hosting environment.
However, nameservers alone do not always prove that websites are hosted on the same server. They only show where DNS is managed.
Method 7: Check SSL Certificate Data
Some domains hosted together may appear in SSL certificate records, especially when multiple domains are included in the same certificate.
This can reveal:
- Alternative domain names
- Subdomains
- Related websites
- Brand-owned domains
- Development or staging domains
However, SSL certificate data should be used carefully. It may not show every domain on the server, and many modern websites use separate certificates.
Step-by-Step: How to Find Domains Hosted on the Same Server
Here is a simple workflow you can follow.
Step 1: Enter the Domain
Start with the domain you want to investigate.
Example:
example.com
Step 2: Find Its IP Address
Use HasheTools to check DNS records and identify the domain’s A record or AAAA record.
Step 3: Copy the IP Address
Copy the IP address returned in the DNS result.
Example:
203.0.113.25
Step 4: Run a Reverse IP Lookup
Use a reverse IP lookup method to find other domains connected to the same IP address.
Step 5: Review the Domain List
Check the returned domains carefully. Look for:
- Suspicious websites
- Unrelated websites
- Competitor domains
- Client websites
- Staging domains
- Old or abandoned websites
Step 6: Verify the Results
Not every result will always be current. DNS changes over time, and some reverse IP databases may contain outdated records.
Verify important domains by checking their current DNS records.
Step 7: Take Action
Depending on your findings, you may decide to:
- Move to better hosting
- Upgrade to VPS or dedicated hosting
- Improve website security
- Review DNS configuration
- Remove unknown domain mappings
- Contact your hosting provider
- Audit neighboring domains
What to Look for in Same-Server Domain Results
When you find domains hosted on the same IP, do not just count them. Review their quality and relevance.
Check for Spammy Domains
If the server hosts many spam, adult, phishing, gambling, or malware-related websites, it may be a warning sign.
Check for Too Many Websites
A very high number of domains may indicate overcrowded shared hosting, which can affect performance.
Check for Similar Ownership
If several domains appear to belong to the same company, it may indicate a network of related websites.
Check for Old or Abandoned Sites
Outdated sites on the same server may create security risks if they are not maintained.
Check for Blacklist Issues
If the shared IP address is blacklisted, email deliverability and server reputation may suffer.
Shared Hosting vs Dedicated Hosting
Shared Hosting vs VPS vs Dedicated vs Cloud Hosting
Understanding your hosting type is important when evaluating domains hosted on the same server. Different hosting environments affect performance, security, resource allocation, and the number of websites sharing an IP address.
| Hosting Type | Description | Advantages | Disadvantages |
| Shared Hosting | Multiple websites share the same server and IP address. | Low cost, easy setup, provider-managed maintenance. | Shared resources, less control, potential performance issues. |
| VPS Hosting | Virtualized server resources provide greater isolation than shared hosting. | Better performance, more control, improved security. | Higher cost and more technical management. |
| Dedicated Hosting | A single organization uses an entire server. | Maximum control, strong performance, better isolation. | Expensive and requires server administration expertise. |
| Cloud Hosting | Resources are distributed across scalable cloud infrastructure. | Scalable, reliable, flexible, and highly available. | Can be more complex, and pricing may vary based on usage. |
Which Hosting Type Is Best?
- Shared Hosting is suitable for personal websites, blogs, and small businesses.
- VPS Hosting is ideal for growing websites that need more control and resources.
- Dedicated Hosting is best for high-traffic websites, e-commerce stores, and business-critical applications.
- Cloud Hosting is a popular choice for modern applications that require scalability and reliability.
When analyzing domains hosted on the same server, remember that shared hosting environments often contain many unrelated websites, while dedicated and VPS hosting typically provide greater isolation and control.
Does Sharing a Server Affect SEO?
Sharing a server does not automatically hurt SEO. Many websites use shared hosting without any problem.
However, SEO can be affected indirectly if the shared server causes:
- Slow loading speed
- Frequent downtime
- Poor uptime
- Malware infections
- Bad IP reputation
- Email deliverability issues
- Security warnings
- Crawl errors
Search engines care about user experience, reliability, and website quality. If your hosting environment creates technical problems, your SEO performance may suffer.
Common Misconceptions About Domains Hosted on the Same Server
When analyzing domains that share the same IP address, it’s important to avoid some common misconceptions.
Same IP Address Means the Same Owner
Not necessarily. Many hosting providers place hundreds or even thousands of unrelated websites on the same IP address through shared hosting services.
Domains on the Same IP Are Part of the Same Website Network
Sharing an IP address does not automatically mean websites are connected. They may simply use the same hosting provider, cloud platform, CDN, or server infrastructure.
Reverse IP Lookup Results Are Always Complete
Reverse IP lookup tools rely on publicly available DNS data and third-party databases. As a result, some domains may be missing, outdated, or hidden behind CDN and proxy services.
Shared Hosting Is Always a Bad Choice
Shared hosting is a cost-effective option for blogs, personal websites, and small businesses. Problems typically arise only when servers are overcrowded, poorly maintained, or hosting suspicious websites.
Key Takeaway
Finding domains hosted on the same server can provide valuable insights, but the results should always be interpreted carefully. Shared IP addresses do not prove common ownership, and reverse IP data may not always reflect the complete hosting environment.
Limitations of Finding Domains on the Same Server
Reverse IP lookup is a useful way to identify domains that share an IP address, but the results are not always complete or perfectly accurate. Several factors can limit visibility into a website’s actual hosting environment.
CDN and Proxy Services Can Hide the Origin Server
Websites that use Cloudflare, Akamai, or other CDN and proxy services often display the CDN’s IP address rather than the origin server’s real IP. As a result, reverse IP lookups may show domains sharing the CDN infrastructure instead of the actual hosting server.
Load Balancers and Multiple IP Addresses
Large websites frequently use load balancers and multiple IP addresses to distribute traffic. This can make it difficult to determine all domains associated with a specific server.
DNS Records Change Over Time
Domains can move between hosting providers or servers. Some reverse IP databases may contain outdated information, resulting in domains that are no longer hosted on the same infrastructure.
Shared IP Pools
Many hosting providers assign websites to shared IP pools. In these environments, a single IP address may represent hundreds or even thousands of websites rather than a single physical server.
Private and Internal Domains May Not Be Visible
Staging sites, development environments, internal systems, and private domains are often not publicly indexed, which means they may not appear in reverse IP lookup results.
Best Practices Before Making Decisions
Reverse IP lookup results should not be the only factor when evaluating a hosting environment. Before making any hosting, SEO, or security decisions, follow these best practices:
- Verify DNS Records: Check the current A and AAAA records for important domains.
- Test Server Performance: Review page speed, uptime, and server response times.
- Review Website Security: Scan for malware, outdated software, and security vulnerabilities.
- Check IP Reputation: Verify whether the shared IP address appears on spam or blacklist databases.
- Consult Your Hosting Provider: Ask about server isolation, resource allocation, and security measures.
- Evaluate Hosting Needs: Consider upgrading to VPS, cloud, or dedicated hosting if your website requires greater performance, security, or control.
How HasheTools Helps with Domain and Server Analysis
Investigating domains hosted on the same server often requires checking DNS records, IP addresses, and other network-related data. HasheTools simplifies this process by providing a collection of free online tools for DNS, IP, email, network, and website analysis.
With HasheTools, you can:
- Check DNS records for any domain
- Find A and AAAA records
- Review complete DNS configurations
- Validate domain settings
- Investigate IP and network information
- Troubleshoot DNS-related issues
- Support hosting, migration, and security audits
For this use case, the All DNS Records Lookup tool is particularly useful because it retrieves multiple DNS record types in a single search, including A, AAAA, CNAME, MX, TXT, NS, SOA, and PTR records. This provides a comprehensive view of a domain’s DNS configuration, helping website owners, developers, and IT teams diagnose hosting and connectivity issues more efficiently.
Practical Use Cases
Domain hosting on the same server analysis can be valuable for different professionals and organizations:
- Website Owners: Evaluate hosting quality and identify whether a crowded shared server may be affecting performance.
- SEO Professionals: Investigate IP reputation, hosting-related SEO issues, and server reliability.
- Developers: Troubleshoot DNS, hosting, staging, and deployment problems.
- Agencies: Audit client websites and assess hosting performance and security risks.
- Security Teams: Identify suspicious neighboring domains and potential infrastructure exposure.
- Domain Investors: Research related websites, domain networks, and parked domains.
When Should You Move Away from Shared Hosting?
Shared hosting is suitable for many websites, but there are situations where upgrading may be beneficial.
Consider moving to VPS, cloud, or dedicated hosting if:
- Your website experiences slow loading times.
- Server downtime is affecting reliability.
- Your IP address is associated with suspicious or spammy domains.
- You run an e-commerce or business-critical website.
- You handle sensitive customer or business data.
- Your traffic and resource requirements are growing.
- You need greater control over security and server configuration.
- Email deliverability issues are linked to a shared IP reputation.
For personal websites and low-traffic blogs, shared hosting is often sufficient. However, growing businesses, SaaS platforms, and online stores may benefit from more isolated and scalable hosting environments.
FAQs
1. What is a reverse IP lookup?
A reverse IP lookup identifies domains associated with a specific IP address. It is commonly used to discover websites that may share the same server or hosting infrastructure.
2. Can I find every domain hosted on the same server?
Not always. Reverse IP lookup can identify many domains sharing an IP address, but CDN services, private networks, load balancers, and outdated DNS records can limit visibility.
3. How do I find a website’s IP address?
You can use a DNS lookup tool to view a domain’s A record (IPv4) or AAAA record (IPv6), which reveals the IP address associated with the website.
4. Why do multiple domains share the same IP address?
Multiple domains often share the same IP because they use shared hosting, cloud infrastructure, CDN services, or the same hosting provider.
5. Can domains on the same server affect SEO?
Sharing a server does not directly affect SEO. However, poor server performance, downtime, malware issues, or a bad IP reputation can indirectly impact search rankings and user experience.
6. Can Cloudflare hide a website’s real server IP?
Yes. Cloudflare and other CDN providers can mask the origin server’s IP address by displaying their own network IPs instead.
Conclusion
Finding domains hosted on the same server can provide valuable insights for website audits, SEO analysis, security assessments, and hosting evaluations. By identifying a domain’s IP address and using reverse IP lookup techniques, you can discover other websites sharing the same infrastructure and gain a better understanding of your hosting environment.
However, it’s important to interpret the results carefully. Shared IP addresses do not necessarily indicate common ownership, and factors such as CDN services, proxy networks, load balancers, and outdated DNS data can affect the accuracy of reverse IP results. For the most reliable analysis, combine reverse IP lookups with DNS records, hosting research, security checks, and performance testing.
With HasheTools, you can quickly analyze DNS records, IP addresses, and domain configurations from a single platform. Whether you’re a website owner, developer, SEO professional, or IT administrator, these tools can help you make more informed decisions about your hosting, security, and online infrastructure.

IPv4 vs IPv6 in 2026: Which One Is Taking Over?
Every website visit, email, video stream, and DNS lookup relies on an IP address. For more than four decades, IPv4 has been the foundation of internet communication, connecting billions of devices worldwide. However, as the number of internet-connected devices grew, the limited supply of IPv4 addresses became exhausted.
To address this challenge, IPv6 was introduced with a vastly larger address space and several networking improvements. Although IPv6 was standardized in 1998, adoption has been gradual, and both protocols continue to coexist in 2026. Today, IPv6 usage has surpassed 45% globally, while IPv4 still powers a significant portion of internet traffic.
Understanding the differences between IPv4 and IPv6 is important for website owners, developers, network administrators, and businesses. In this guide, we’ll compare IPv4 vs IPv6, explain how they work, examine their advantages and limitations, and explore what the ongoing transition means for websites, DNS, email deliverability, security, and network infrastructure.
What Are IP Addresses? A Quick Primer
An IP (Internet Protocol) address is a unique numerical identifier assigned to a device connected to a network. Its primary purpose is to identify devices and ensure data is routed to the correct destination across the internet.
You can think of an IP address as a postal address for your device. When you visit a website, send an email, or perform a DNS lookup, routers use IP addresses to deliver data between devices accurately.
Today, two versions of the Internet Protocol are in use: IPv4, the original protocol introduced in the 1980s, and IPv6, its successor designed to address IPv4’s address limitations. The differences between them affect address availability, network architecture, security, performance, and DNS resolution.
IPv4 Explained: The Original Internet Address
IPv4 (Internet Protocol version 4) was defined in RFC 791 in 1981 and has served as the foundation of internet communication for more than four decades. Every device connected to the internet uses an IP address, and historically, those addresses have been IPv4.
IPv4 Address Format
An IPv4 address is a 32-bit number written as four decimal numbers separated by dots, a format known as dotted-decimal notation.
| IPv4 address examples |
| 192.168.1.1 # Private network (your home router)
8.8.8.8 # Google’s public DNS server 104.21.45.67 # A web server’s public IP 203.0.113.0/24 # A subnet (network block of 256 addresses) # Structure: four 8-bit octets, each 0-255 # Total address space: 2^32 = 4,294,967,296 addresses (~4.3 billion) |
While 4.3 billion addresses seemed enormous when IPv4 was designed, the growth of smartphones, cloud computing, IoT devices, and internet-connected services eventually exhausted the available supply. As a result, IPv4 address scarcity became one of the primary reasons for the development of IPv6.
Common IPv4 Special Ranges
Some IPv4 ranges serve specific purposes:
| Range | Class / Type |
| 10.0.0.0/8 | Private networks |
| 172.16.0.0/12 | Private networks |
| 192.168.0.0/16 | Private networks |
| 127.0.0.0/8 | Loopback (localhost) |
| 169.254.0.0/16 | Link-local addressing |
| 224.0.0.0/4 | Multicast traffic |
The IPv4 Exhaustion Crisis
IPv4 address exhaustion is no longer a future concern; it has already happened. With only about 4.3 billion available addresses, IPv4 could not keep pace with the rapid growth of internet users, mobile devices, cloud services, and IoT technologies. As a result, the global supply of new IPv4 addresses has been exhausted, driving the adoption of IPv6.
Timeline of IPv4 Exhaustion
| Year | Event |
| 1981 | IPv4 defined in RFC 791. |
| 1992 | IETF recognizes IPv4 exhaustion as a future challenge. |
| 1996 | Private IP addressing and NAT introduced. |
| 1998 | IPv6 standardized as the long-term replacement. |
| 2011 | IANA exhausts its global IPv4 address pool. |
| 2012–2020 | Regional Internet Registries gradually exhaust available IPv4 allocations. |
| 2026 | IPv4 addresses remain scarce and are actively traded on the secondary market. |
NAT: The IPv4 Life-Extension Hack
Network Address Translation (NAT) is the primary reason IPv4 remains usable despite address exhaustion. NAT allows multiple devices on a private network to share a single public IPv4 address.
For example, your home router receives one public IP address from your ISP while assigning private addresses to devices inside your network. The router translates traffic between private and public addresses, allowing multiple devices to access the internet simultaneously.
While NAT helped delay IPv4 exhaustion, it was never intended as a permanent solution. It adds complexity, can interfere with peer-to-peer applications, online gaming, VoIP services, and video conferencing, and reduces the end-to-end connectivity that the internet was originally designed to provide.
Many ISPs now use Carrier-Grade NAT (CGNAT), where thousands of customers share a limited pool of public IPv4 addresses. Although effective as a temporary workaround, CGNAT further increases network complexity and highlights the need for widespread IPv6 adoption.
IPv6 Explained: The Next-Generation Protocol
IPv6 (Internet Protocol version 6) is the successor to IPv4. It was developed to solve IPv4 address exhaustion while also improving network scalability, routing efficiency, and device autoconfiguration.
IPv6 Address Format
An IPv6 address is a 128-bit number written as eight groups of hexadecimal characters separated by colons.
Examples of IPv6 addresses:
2001:db8:85a3::8a2e:370:7334 # Example public IPv6 address
::1 # Loopback address (similar to 127.0.0.1)
fe80::1 # Link-local address
2001:db8::/32 # Documentation prefix
# Total address space: 2^128
# Approximately 340 undecillion unique addresses
Unlike IPv4’s 32-bit address space, IPv6 provides an enormous number of unique addresses, ensuring that the internet can continue to grow without running out of available IP addresses. This larger address space also reduces the need for Network Address Translation (NAT) and supports more efficient network scalability.
What IPv6 Improves Beyond Just Addresses
Virtually Unlimited Addresses: IPv6 provides a massive address space, eliminating the address shortage that affects IPv4.
Reduced Reliance on NAT: With abundant public addresses available, IPv6 restores end-to-end connectivity without depending heavily on Network Address Translation (NAT).
Modern Network Design: IPv6 supports features such as automatic address configuration, improved routing efficiency, and enhanced support for modern internet infrastructure.
IPv4 vs IPv6: Side-by-Side Comparison
| Attribute | IPv4 | IPv6 |
| Address size | 32-bit | 128-bit |
| Address format | Dotted decimal (192.168.1.1) | Colon-hexadecimal (2001:db8::1) |
| Total addresses | ~4.3 billion | 340 undecillion |
| Address exhaustion | Global pool exhausted | Practically inexhaustible |
| Header size | Variable (20–60 bytes) | Fixed (40 bytes) |
| NAT required? | Commonly used due to address scarcity | Generally not required |
| IPsec support | Optional | Supported natively (not mandatory in practice) |
| Auto-configuration | Manual or DHCP | SLAAC and/or DHCPv6 |
| Broadcast | Supported | Not supported (uses multicast) |
| Fragmentation | Routers and hosts | Source host only |
| DNS record type | A record | AAAA record |
| Header checksum | Present | Removed |
| Year defined | 1981 (RFC 791) | 1998 (RFC 2460) |
How IPv6 Adoption Looks in 2026
IPv6 adoption has reached a major milestone in 2026. According to Google’s IPv6 statistics, global IPv6 usage has surpassed 45%, up from roughly 30% in 2021 and just 5% in 2015. While IPv4 remains widely used, IPv6 now carries a substantial share of internet traffic and is expected to become the dominant protocol within the next decade.
IPv6 Adoption by Country (2026)
| Country / Region | IPv6 % |
|---|---|
| India | 70%+ |
| Belgium | 65%+ |
| United States | 55%+ |
| Germany | 50%+ |
| Japan | 50%+ |
| Brazil | 45%+ |
| United Kingdom | 40%+ |
| Global Average | 45%+ |
Who Is Driving Adoption
Mobile Networks: Mobile carriers are the largest driver of IPv6 growth. Operators such as Reliance Jio, T-Mobile, and other major providers have deployed IPv6 at scale because supporting hundreds of millions of devices with IPv4 alone is increasingly impractical.
Cloud Platforms: AWS, Google Cloud, Microsoft Azure, and Cloudflare all provide native IPv6 support, making deployment easier for businesses and developers.
Major Websites and Services: Companies including Google, Netflix, Apple, Amazon, Meta, and Microsoft serve content over IPv6 whenever a user’s network supports it.
Government Initiatives: Governments and public-sector organizations worldwide continue to encourage IPv6 adoption as part of long-term internet infrastructure modernization efforts.
Why IPv4 Is Still Dominant Despite Running Out
IPv4 address exhaustion does not mean IPv4 suddenly stopped working. Although the global pool of new IPv4 addresses has been depleted, the protocol remains deeply embedded in the internet’s infrastructure. As a result, IPv4 continues to carry a large share of internet traffic even as IPv6 adoption grows. Several factors explain why the transition has taken far longer than many experts originally expected.
Legacy Infrastructure
Billions of devices, routers, firewalls, servers, and software applications were originally designed around IPv4. Replacing or upgrading this infrastructure can take years or even decades, particularly in enterprise environments, industrial networks, and embedded systems where equipment often remains in service for long periods.
NAT Reduces the Pressure to Migrate
Network Address Translation (NAT) allows multiple devices to share a single public IPv4 address. This technology has helped extend the life of IPv4 by enabling homes, businesses, and internet service providers to support large numbers of devices without requiring a unique public IP address for each one. For many users, NAT effectively masks the address shortage.
Cost and Complexity
Moving to IPv6 involves more than simply enabling a new protocol. Organisations often need to update network hardware, review software compatibility, retrain staff, revise security policies, and thoroughly test systems before deployment. For businesses with stable IPv4 networks, the migration cost can appear difficult to justify.
The IPv4 Address Market
Although new IPv4 allocations are no longer available from regional internet registries, existing address blocks can still be bought and sold. The secondary IPv4 market allows organisations to acquire additional addresses when needed, reducing the immediate pressure to transition entirely to IPv6.
Application and Software Compatibility
Many applications, monitoring platforms, security tools, and legacy systems were developed with IPv4 assumptions built into their design. Supporting IPv6 may require code changes, configuration updates, and extensive testing. In large organisations, addressing these compatibility issues can be a significant undertaking.
Dual-Stack Networks Delay Full Migration
Many internet service providers and organisations operate dual-stack environments where IPv4 and IPv6 run simultaneously. This approach improves compatibility and eases the transition, but it also reduces the urgency to retire IPv4 completely. As long as both protocols can coexist, IPv4 remains an important part of internet operations.
IPv6 and DNS: What Changes for Domain Owners
DNS is the bridge between domain names and IP addresses. When your visitors use IPv6, their DNS resolver needs to find an IPv6 address for your domain, not just an IPv4 address. This requires a different DNS record type and some important configuration considerations.
A Records vs AAAA Records
| Record Type | IP Version | Example |
|---|---|---|
| A record | IPv4 only | hashetools.com. 300 IN A 104.21.45.67 |
| AAAA record | IPv6 only | hashetools.com. 300 IN AAAA 2606:4700:3037::6815:2d43 |
Publishing both an A record and an AAAA record for your domain is called dual-stack DNS. When a client performs a DNS lookup:
- If the client supports IPv6 (most modern devices do), it uses the AAAA record and connects over IPv6
- If the client only supports IPv4, it uses the A record and connects over IPv4
- If both records exist and IPv6 fails, modern clients fall back to IPv4 using Happy Eyeballs (RFC 8305), a technique that races IPv4 and IPv6 connections and uses whichever responds first
| Check IPv6 DNS records for a domain |
| # Check IPv4 A record
dig hashetools.com A +short # Check IPv6 AAAA record dig hashetools.com AAAA +short # Check both A and AAAA simultaneously dig hashetools.com ANY +short # Test if a domain is reachable over IPv6 specifically ping6 hashetools.com # macOS / Linux ping -6 hashetools.com # Windows |
IPv6 and Reverse DNS (PTR Records)
Reverse DNS for IPv6 uses ip6.arpa instead of IPv4’s in-addr.arpa. The format reverses all 32 hex digits of the full IPv6 address:
| IPv6 reverse DNS (PTR) record format |
| # IPv6 address: 2001:db8::1
# For PTR lookup, expand fully and reverse each nibble: # 2001:0db8:0000:0000:0000:0000:0000:0001 # Reversed nibble-by-nibble: # 1.0.0.0.0.0.0.0.0.0.0.0.0.0.0.0.0.0.0.0.0.0.0.0.8.b.d.0.1.0.0.2.ip6.arpa dig -x 2001:db8::1 # Reverse lookup for an IPv6 address |
IPv6 and Email Security
IPv6 adoption introduces several considerations for email administrators and DNS managers. While email authentication standards remain the same, proper IPv6 configuration is important to maintain deliverability and sender reputation.
SPF and IPv6
SPF records must explicitly authorize IPv6 sending addresses using the ip6: mechanism. If your SPF record only includes IPv4 addresses, emails sent over IPv6 may fail SPF validation.
Example:
# IPv4-only SPF
v=spf1 ip4:203.0.113.10 include:_spf.google.com -all
# Dual-stack SPF (recommended)
v=spf1 ip4:203.0.113.10 ip6:2001:db8::1/64 include:_spf.google.com -all
If you use a third-party email provider, verify that its SPF configuration also supports IPv6 sending ranges.
DKIM and DMARC
DKIM and DMARC work the same way over IPv6 as they do over IPv4. DKIM validates message authenticity through cryptographic signatures, while DMARC relies on SPF and DKIM alignment to protect domains from spoofing. No special IPv6-specific configuration is typically required beyond ensuring your existing authentication records are correctly configured.
IPv6 Reputation Considerations
Email reputation in IPv6 environments is still less mature than in IPv4. New IPv6 ranges often have little or no sending history, which can cause some providers to treat messages more cautiously until reputation is established.
Unlike IPv4, reputation is frequently evaluated at the IPv6 prefix level (such as /48 or /64) rather than a single IP address. For this reason, organizations often introduce new IPv6 sending ranges gradually and monitor deliverability closely while building reputation.
IPv6 Security: New Protocol, New Risks
IPv6 introduces several security considerations that differ from traditional IPv4 networks. While it improves scalability and modernizes internet addressing, organizations must ensure their security controls are updated to support IPv6 alongside IPv4.
One major difference is network reconnaissance. In IPv4, attackers can quickly scan small address ranges to identify active devices. In IPv6, a standard /64 subnet contains an enormous number of addresses, making large-scale brute-force scanning far less practical. However, targeted attacks and misconfigurations can still expose systems.
IPv6 also introduces privacy features such as temporary addresses (RFC 4941), which help reduce user tracking by periodically changing device identifiers. While beneficial for privacy, these changing addresses can complicate logging, monitoring, and forensic investigations.
Another important change is the replacement of ARP with the Neighbor Discovery Protocol (NDP). Although NDP performs similar functions, it introduces new risks such as neighbor spoofing and rogue router advertisements. Proper network security controls and router advertisement filtering are important for mitigating these threats.
Unlike IPv4 environments where ICMP is often heavily restricted, ICMPv6 is essential for core IPv6 functionality, including Neighbor Discovery, Path MTU Discovery, and address autoconfiguration. Blocking ICMPv6 can disrupt network operations, so firewall rules should be configured carefully rather than disabling it entirely.
Finally, dual-stack deployments increase the attack surface. When IPv4 and IPv6 run simultaneously, attackers may attempt to exploit the less-monitored protocol. Organizations should ensure that monitoring, logging, firewall policies, and intrusion detection systems provide equal visibility and protection for both IPv4 and IPv6 traffic.
How to Check Your IPv4 and IPv6 Addresses
Check Your Public IP Address
| Find your current public IPv4 and IPv6 addresses |
| # macOS / Linux, show all network interfaces
ifconfig # Shows all interfaces including IPv4 and IPv6 ip addr show # Linux alternative # Windows ipconfig # Shows IPv4 and IPv6 for all adapters # Check your PUBLIC IPv4 (as seen by the internet) curl -4 https://api.ipify.org # Check your PUBLIC IPv6 (as seen by the internet) curl -6 https://api6.ipify.org # Check BOTH at once curl https://api64.ipify.org # Returns IPv6 if available, IPv4 otherwise # Using HasheTools: visit hashetools.com and use the “My IP” tool # Shows your current public IP, whether IPv4 or IPv6 |
Check If a Server Has IPv6
| Verify IPv6 connectivity and AAAA records |
| # Check if a domain has an IPv6 address (AAAA record)
dig google.com AAAA +short # Returns: 2607:f8b0:4004:c07::65 (IPv6 address) # Test IPv6 connectivity to a server ping6 google.com # macOS / Linux ping -6 google.com # Windows # Full IPv6 traceroute traceroute6 google.com # macOS / Linux tracert -6 google.com # Windows # Check if your ISP gives you an IPv6 address curl -6 https://api64.ipify.org # If this fails or returns an IPv4 address, your ISP may not support IPv6 |
Using HasheTools for IP lookups: HasheTools provides free IP Lookup, Reverse DNS Lookup, and DNS Lookup tools that work for both IPv4 and IPv6 addresses. You can look up AAAA records for any domain, perform reverse DNS on any IPv6 address, and check your own current IP address, with no login or installation required.
Dual-Stack, Tunnelling, and Transition Mechanisms
Because the internet cannot flip from IPv4 to IPv6 overnight, several transition mechanisms allow the two protocols to coexist and interoperate:
| Mechanism | How It Works | Use Case / Status |
|---|---|---|
| Dual Stack | Device and network support both IPv4 and IPv6 simultaneously. Most widely deployed transition method. | Current standard. All modern OSes, routers, and cloud infrastructure support this. Recommended for all new deployments. |
| 6to4 | Encapsulates IPv6 packets inside IPv4 packets (protocol 41). Uses 2002::/16 prefix. | Deprecated. Security issues and performance problems led to its abandonment. Still found in legacy equipment. |
| Teredo | Tunnels IPv6 over IPv4 UDP for NAT traversal. Microsoft developed. | Deprecated. Replaced by native IPv6 from ISPs and cloud providers. |
| DS-Lite | Carrier-Grade NAT (CGN) for IPv4 with native IPv6. ISPs give customers IPv6 natively, IPv4 via CGN. | Common in European ISP deployments (Deutsche Telekom, BT). Good for new residential broadband. |
| MAP-T / MAP-E | Stateless IPv4-over-IPv6 mapping. Scales better than DS-Lite for large ISPs. | Growing ISP adoption for large-scale deployments, particularly mobile networks. |
| Happy Eyeballs v2 | Client-side algorithm that races IPv4 and IPv6 connections, uses whichever connects first. | RFC 8305. Built into all major OSes and browsers. Makes dual-stack transparent to users. |
| NAT64 + DNS64 | Translates between IPv4 and IPv6 at the network level. Allows IPv6-only clients to reach IPv4 servers. | Used in IPv6-only mobile networks. iOS and Android support it natively. |
How to Add IPv6 to Your Website
- Check your hosting provider: Confirm IPv6 support with your provider. Most major platforms support it, including Cloudflare (automatic), AWS (per resource), Google Cloud (via load balancers), DigitalOcean, and Linode.
- Get an IPv6 address: Once enabled, your hosting provider will assign an IPv6 address or prefix for your server or load balancer.
- Add an AAAA DNS record: In your DNS settings, add an AAAA record pointing your domain to the assigned IPv6 address. A TTL of 3600 seconds is typically sufficient.
- Verify the setup: Use tools like:
- dig yourdomain.com AAAA +short
- ping6 yourdomain.com
You can also use tools like HasheTools DNS Lookup to confirm global propagation.
- Monitor performance: Check that both IPv4 and IPv6 connections are working correctly and serving consistent responses.
When You Might Not Need IPv6 Immediately
Legacy internal systems: Closed enterprise environments that do not serve public traffic may defer IPv6 migration until a planned infrastructure upgrade.
Limited or embedded IoT systems: Some older or constrained devices may not support IPv6 without hardware or firmware updates.
Small websites behind CDNs: If you’re using Cloudflare or a similar CDN, your site is already IPv6-enabled at the edge, even if your origin server is not.
Frequently Asked Questions
Is IPv6 replacing IPv4?
Yes, but gradually. IPv6 was created to address IPv4 address exhaustion and is steadily gaining adoption worldwide. However, IPv4 remains widely used, and most networks currently operate in dual-stack mode, supporting both protocols simultaneously.
Is IPv4 being turned off?
No. There is no planned date to retire IPv4. While IPv6 adoption continues to grow, IPv4 remains an essential part of internet infrastructure and will likely coexist with IPv6 for many years.
How do I know if I’m using IPv4 or IPv6?
You can use the HasheTools My IP tool to check your current public IP address. IPv4 addresses appear in dotted-decimal format (for example, 192.168.1.1), while IPv6 addresses use hexadecimal notation separated by colons (for example, 2001:db8::1).
Does IPv6 make the internet faster?
Not necessarily. IPv6 can improve efficiency in some scenarios by reducing dependence on NAT and simplifying routing, but most users will not notice a significant speed difference. Its primary benefits are scalability, address availability, and long-term internet growth.
Do I need an AAAA record for IPv6?
Yes. An AAAA record maps a domain name to an IPv6 address, just as an A record maps a domain to an IPv4 address. If your server supports IPv6, publishing an AAAA record allows IPv6-enabled visitors and search engine crawlers to connect over IPv6.
Do I need to update my firewall rules for IPv6?
Yes. Enabling IPv6 without applying equivalent security controls is a common mistake. Your IPv6 firewall rules, access control lists (ACLs), and monitoring systems should provide the same level of protection as your IPv4 configuration.
Can I still get an IPv4 address for my server?
Yes. Most hosting providers still offer IPv4 addresses, although they may charge additional fees because IPv4 addresses are limited. Many providers also support IPv6, allowing websites to run in dual-stack mode.
Does IPv6 affect my domain’s email deliverability?
Potentially. Mail servers sending over IPv6 should have proper reverse DNS (PTR) records, SPF records that include IPv6 ranges, and correctly configured DKIM and DMARC policies. Proper configuration helps maintain email deliverability and sender reputation.
Conclusion
IPv4 built the modern internet, but its limited address space means it can no longer support long-term growth on its own. IPv6 solves this challenge with an almost unlimited address pool, improved routing efficiency, and native support for modern networking requirements.
While IPv4 remains widely used in 2026, IPv6 adoption continues to accelerate across mobile networks, cloud platforms, and major websites. For domain owners, developers, and businesses, the best approach today is dual-stack deployment, supporting both IPv4 and IPv6 while preparing for a future where IPv6 becomes the dominant protocol.
Whether you’re migrating a website, configuring DNS records, troubleshooting email deliverability, or checking IPv6 connectivity, HasheTools provides free DNS Lookup, IP Lookup, Reverse DNS Lookup, SPF Lookup, and DMARC Lookup tools to help verify your configuration quickly.

What Is LLMS.TXT and Does Your Website Need It in 2026?
Search is changing. People are no longer relying only on Google to find information, products, and services. AI tools like ChatGPT, Claude, Perplexity, and Gemini are increasingly being used to answer questions and recommend resources.
As AI-powered search grows, many website owners are asking a new question: How do AI systems understand and prioritize website content?
One proposed solution is LLMS.TXT, a file designed to help large language models identify a website’s most important pages, resources, and documentation.
But does your website actually need LLMS.TXT in 2026? Does it improve SEO? Does Google use it? And how is it different from robots.txt?
In this guide, we’ll explain what LLMS.TXT is, how it works, its potential benefits and limitations, and whether it’s worth implementing on your website.
What Is LLMS.TXT?
LLMS.TXT is a plain text or Markdown file placed at the root of a website, typically:
https://yourdomain.com/llms.txt
Its purpose is to provide AI systems with a clear overview of a website’s most important content, resources, and pages.
According to the original LLMS.TXT proposal, the file helps large language models quickly identify relevant information when processing website content.
In simple terms, LLMS.TXT tells AI systems:
“This is what our website is about, and these are the key resources you should focus on.”
A typical LLMS.TXT file may include:
- A brief website description
- Important pages and resources
- Product or service information
- Documentation and help center links
- Blog categories or cornerstone content
- API documentation
- Notes about priority content
Unlike a sitemap, which focuses on URL discovery, LLMS.TXT is designed to provide context and highlight the most valuable content on a website.
Why Is LLMS.TXT Being Discussed in 2026?
LLMS.TXT has gained attention because AI-powered search is changing how people discover information online. Instead of browsing multiple search results, users increasingly ask tools like ChatGPT, Claude, Perplexity, and Gemini for direct answers.
For example, rather than searching for “best CRM tools for small businesses,” a user might ask:
“What are the best CRM tools for a small real estate agency with a limited budget?”
AI systems can then summarize options, compare features, and recommend resources.
This shift has created a new challenge for website owners. Traditional SEO focuses on search engine rankings, while AI visibility focuses on making content easy for AI systems to understand, summarize, and reference.
However, Google has stated that websites do not need LLMS.TXT or other special AI-specific files to appear in its AI-powered search experiences. As a result, LLMS.TXT should be viewed as an optional AI-readability layer rather than a replacement for SEO.
How Does LLMS.TXT Work?
LLMS.TXT provides AI systems with a structured overview of a website’s most important content.
When an AI crawler, assistant, or retrieval system accesses your website, it may check for an LLMS.TXT file to quickly identify key pages, documentation, services, and resources. Rather than analyzing hundreds of URLs, the file highlights the content you consider most important.
A simplified example might look like this:
# Website Name
Short description of the website.
## Important Pages
– Home
– Services
– Blog
– Contact
## Key Resources
– SEO Guide
– Documentation
– Help Center
This structure helps AI systems understand your website’s purpose and prioritize important content. The proposed LLMS.TXT specification uses Markdown formatting and organized links to make information easier to interpret.
LLMS.TXT vs Robots.txt: What Is the Difference?
Many people confuse LLMS.TXT with robots.txt, but they serve different purposes.
Robots.txt
Robots.txt tells crawlers which parts of a website they can or cannot access.
Example:
User-agent: GPTBot
Disallow: /private/
LLMS.TXT
LLMS.TXT does not control crawler access. Instead, it provides AI systems with a structured overview of a website’s most important content.
Example:
## Best Resources
– Pricing Guide
– Product Documentation
– Case Studies
Key Difference
| Robots.txt | LLMS.TXT |
| Controls crawler access | Provides content context |
| Helps manage crawling | Helps AI understand content |
| Can restrict bots | Cannot block bots |
If you want to limit AI crawler access, use robots.txt or other crawler-control tools. If you want to help AI systems understand your website’s key resources, LLMS.TXT may be useful.
LLMS.TXT vs Sitemap.xml
A sitemap.xml file helps search engines discover URLs on your website.
An LLMS.TXT file helps AI systems understand which pages are most important and what your website is about.
Sitemap.xml is for discovery
It tells search engines:
“Here are the URLs on my website.”
LLMS.TXT is for understanding
It tells AI systems:
“Here are the most meaningful resources on my website.”
For SEO, sitemap.xml is still more important. LLMS.TXT is an additional layer, not a substitute.
Does Google Use LLMS.TXT?
As of Google’s 2026 documentation, website owners do not need an LLMS.TXT file to appear in Google’s AI-powered search experiences. Google has stated that special AI-specific files like LLMS.TXT are not required for visibility in Google Search. (Google for Developers)
This is important because LLMS.TXT is sometimes presented as a new SEO ranking factor. It is not.
Google continues to emphasize the same fundamentals that have long supported search visibility:
- High-quality, helpful content
- Fast website performance
- Crawlable pages
- Strong internal linking
- Mobile-friendly design
- Schema markup where appropriate
- Clear author and brand signals
If your primary goal is improving Google SEO, focus on these foundations first. LLMS.TXT should be viewed as an optional AI-readability enhancement rather than a replacement for traditional SEO.
Do AI Companies Use LLMS.TXT?
Adoption of LLMS.TXT is still evolving. Some organizations and documentation-heavy platforms have started implementing LLMS.TXT or similar files. For example, Cloudflare provides LLMS.TXT-style documentation resources, and Yoast SEO offers a feature that can automatically generate and update an LLMS.TXT file for WordPress websites.
However, support across major AI platforms is not yet universal. As a result, LLMS.TXT should be viewed as a future-focused optimization that may improve AI readability, rather than a proven method for increasing traffic or search visibility.
Does LLMS.TXT Improve SEO Rankings?
No direct evidence shows that LLMS.TXT improves traditional Google rankings.
Google has stated that LLMS.TXT is not required for appearing in its AI-powered search experiences and is not a confirmed ranking factor.
However, LLMS.TXT may support a broader AI visibility strategy by helping AI systems identify and understand your most important content more efficiently.
Think of it as an organizational layer rather than an SEO ranking signal. While it is unlikely to improve rankings directly, it can make your website’s key resources easier for AI systems to discover, interpret, and reference.
Does Your Website Need LLMS.TXT in 2026?
Not every website needs LLMS.TXT in 2026, but it can be useful for websites that want to improve how AI systems understand and interpret their content. It works best as an additional layer for AI visibility rather than a core SEO requirement.
LLMS.TXT is most useful for websites that have structured or content-heavy platforms such as SaaS products, blogs, documentation sites, or service-based businesses.
Should Blogs Use LLMS.TXT?
Yes, blogs can benefit from LLMS.TXT, especially if they have a large number of articles. It helps highlight cornerstone and evergreen content so AI systems can better identify the most important guides instead of scanning every post equally.
For blogs, focus on including:
- Pillar or cornerstone posts
- In-depth guides
- Category pages
- High-performing evergreen content
Avoid listing every blog post, as it reduces clarity and effectiveness.
Should Small Business Websites Use LLMS.TXT?
Small business websites can use LLMS.TXT, but it should not be a priority over core SEO practices.
For small businesses, it is better to first focus on:
- Service pages
- Local SEO
- Google Business Profile
- Reviews and trust signals
- Fast and mobile-friendly design
Once these foundations are strong, LLMS.TXT can be added as a simple enhancement to improve AI readability by including key pages like services, contact, and core information.
The Main Benefits of LLMS.TXT
1. Helps AI Systems Understand Your Website
AI systems do not always need every page on your website. LLMS.TXT provides a curated overview of your most important content, making it easier to identify key resources and understand your site’s structure.
2. Improves Content Prioritization and AI Visibility
Websites often contain service pages, blog posts, documentation, case studies, and support resources. LLMS.TXT helps highlight the content that matters most, making it easier for AI systems to identify, understand, and reference valuable information. While it is not a ranking factor, it can support broader AI visibility and GEO efforts when combined with strong content and website structure.
3. Easy to Implement
Creating an LLMS.TXT file is relatively simple. Most websites can create a Markdown file, add links to important resources, and place it in the website root directory. Some WordPress tools are also beginning to support automated generation.
4. Future-Proofs Your Website
LLMS.TXT is still an emerging standard, but adopting it now can help prepare your website for future AI search and content discovery developments.
The Limitations of LLMS.TXT
LLMS.TXT can be useful, but it is not a complete solution.
1. It Does Not Control AI Crawlers
LLMS.TXT does not block or restrict bots. If you want to manage crawler access, use robots.txt, server-side controls, or AI crawler management tools.
2. It Does Not Replace SEO
LLMS.TXT cannot fix poor content, slow pages, weak technical SEO, or a poor user experience. Strong SEO fundamentals remain essential.
3. Adoption Is Still Limited
LLMS.TXT is a proposed standard, and support across AI platforms is not yet universal. Its long-term role is still evolving.
4. It Requires Maintenance
An outdated LLMS.TXT file can point AI systems to old or less relevant content. Review and update it whenever you publish major content or change your site structure.
What Should Be Included in an LLMS.TXT File?
A good LLMS.TXT file should be simple, focused, and easy to understand. Rather than listing every page on your website, include only the resources that best represent your business, products, services, and expertise.
Recommended Structure
# Website Name
Short description of your website and its purpose.
## Core Pages
– Home
– About
– Services
– Contact
## Key Resources
– Important service pages
– Product pages
– Documentation
– Help center articles
## Best Guides
– Cornerstone blog posts
– Tutorials
– Research-based content
## Optional
– Case studies
– Pricing page
– FAQs
Best Practices
When creating an LLMS.TXT file:
- Include only important pages
- Keep the file concise and organized
- Use clear Markdown formatting
- Link to evergreen resources when possible
- Avoid keyword stuffing
- Review and update the file regularly
How to Create an LLMS.TXT File
Creating an LLMS.TXT file is straightforward and only requires a few steps:
1. Identify Your Most Important Pages
Start by selecting the pages that best represent your website and expertise. These may include your homepage, service or product pages, documentation, key blog guides, FAQs, case studies, and contact page. Focus on the content you want AI systems to understand and prioritize.
2. Organize and Describe Your Resources
Group related pages under clear headings such as Services, Products, Documentation, Resources, or Blog Guides. Where helpful, add short descriptions to explain the purpose of important pages and resources. Keep the structure simple, organized, and easy to understand.
3. Publish and Maintain the File
Save the file as llms.txt and upload it to your website’s root directory so it is accessible at yourdomain.com/llms.txt. Review and update the file regularly whenever you publish important content, launch new services, update documentation, or make significant changes to your website structure.
LLMS.TXT and AI Crawlers: What Website Owners Should Know
As AI-powered search continues to grow, many website owners want more control over how AI systems interact with their content. It is important to understand that LLMS.TXT is not a crawler control tool.
If you want to allow, block, or manage AI crawlers such as GPTBot, you should use robots.txt or other bot management solutions. Robots.txt controls crawler access, while LLMS.TXT provides context by highlighting your website’s most important pages and resources.
In simple terms:
- robots.txt = Controls crawler access
- sitemap.xml = Helps discover URLs
- LLMS.TXT = Helps AI understand your content
For most websites, these tools work best together. Robots.txt manages access, sitemap.xml supports content discovery, and LLMS.TXT provides additional context about your website’s key information.
Common LLMS.TXT Mistakes to Avoid
Treating It as a Ranking Hack: LLMS.TXT is not a shortcut to better Google rankings. It should not be expected to deliver direct SEO gains.
Adding Too Many Links: A bloated file reduces clarity and usefulness. Keep only the most important and relevant pages.
Keyword Stuffing: Avoid turning LLMS.TXT into a keyword-heavy or spammy file. It should be simple and natural.
Not Updating It Regularly: An outdated LLMS.TXT can mislead AI systems by pointing to old or irrelevant content.
Replacing Sitemap.xml: LLMS.TXT is not a replacement for sitemap.xml. Both serve different purposes and should be used together.
Using It for Bot Blocking: LLMS.TXT does not control or block crawlers. Use robots.txt or server-side tools for access control.
Is LLMS.TXT Part of GEO?
LLMS.TXT can be considered a small part of Generative Engine Optimization (GEO), but it is not the core of it.
GEO focuses on making content easier for AI systems to understand, trust, summarize, and cite. It is about improving overall content quality and structure, so AI models can use it effectively.
A strong GEO strategy includes:
- Expert, experience-driven content
- Clear and direct answers to user questions
- Entity optimization (brands, topics, and relationships)
- Schema markup for structured data
- Original insights and data
- Strong author credibility
- Regularly updated information
- Internal linking and topical clusters
- Consistent brand signals
- Crawlable and well-structured pages
LLMS.TXT fits into this ecosystem as a supporting layer, helping AI systems quickly identify important pages, but it does not replace high-quality content, SEO fundamentals, or structured data.
FAQs About LLMS.TXT
1. Is LLMS.TXT the same as robots.txt?
No. Robots.txt controls crawler access. LLMS.TXT provides context and guidance for AI systems.
2. Does LLMS.TXT improve Google rankings?
No direct evidence shows that LLMS.TXT improves Google rankings. Google says LLMS.TXT is not needed for appearing in its generative AI search features.
3. Should every website have LLMS.TXT?
Not every website needs it. It is most useful for websites with important content, documentation, guides, product information, or service pages.
4. Can LLMS.TXT block AI crawlers?
No. LLMS.TXT does not block crawlers. Use robots.txt, server controls, or AI crawler management tools for that.
5. What should I include in LLMS.TXT?
Include your most important pages, service pages, documentation, guides, resources, and short descriptions of your website’s key content.
Conclusion
LLMS.TXT is not essential for every website in 2026, but it can help AI systems better understand your most important content and resources. While it supports AI visibility and GEO efforts, it should be used alongside—not instead of—strong SEO fundamentals such as high-quality content, technical optimization, and structured data.
If you’re planning to implement LLMS.TXT, use the HasheTools LLMS.TXT Checker to quickly analyze your file, identify issues, and ensure it follows current best practices. As AI-powered search continues to grow, small optimizations like LLMS.TXT can help keep your website future-ready.
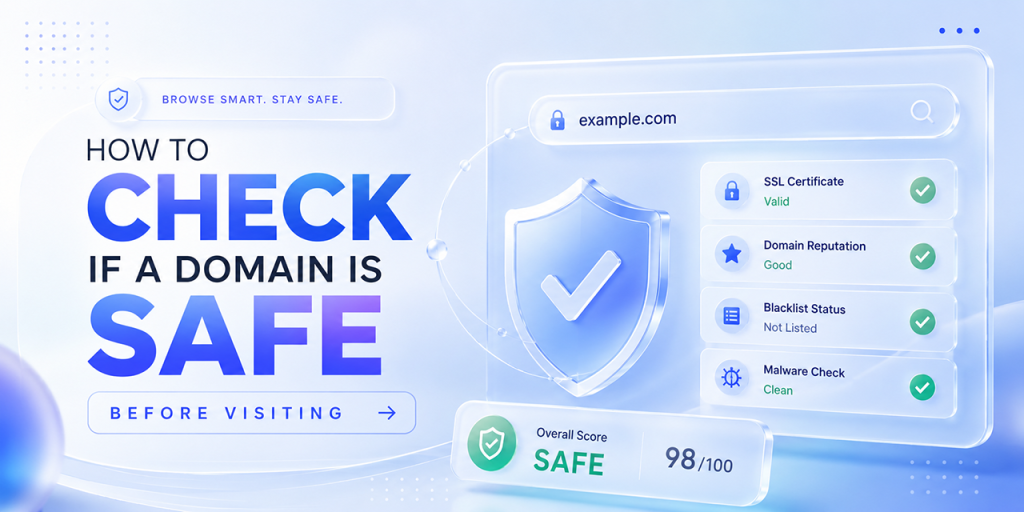
How to Check if a Domain is Safe Before Visiting: Complete 2026 Guide
A website can look completely legitimate and still be dangerous. In 2026, phishing sites use valid HTTPS certificates, AI-generated designs, cloned login pages, and lookalike domains that are often impossible to spot at first glance.
That’s why checking whether a domain is safe before visiting is more important than ever. A quick safety check can help you avoid phishing attacks, malware downloads, fake online stores, and credential theft.
In this guide, you’ll learn how to verify a domain using practical checks like:
- URL and domain inspection
- WHOIS and domain age lookup
- SSL certificate verification
- DNS and DMARC analysis
- Blacklist and reputation checks
You’ll also discover how to use free tools from HasheTools.com to investigate suspicious domains, detect phishing websites, and verify website legitimacy before clicking any link.
Why Checking a Domain’s Safety Matters in 2026
Every link you click, every URL you type, and every domain you visit involves a trust decision. In 2026, that trust decision is more consequential than ever. Cybercriminals have access to AI-powered phishing tools that generate convincing lookalike websites at scale, buy aged domains with established reputations, and obtain valid SSL certificates for malicious sites within minutes of registering them.
The old indicators of safety no longer work in isolation. A website can have a padlock (HTTPS), look exactly like your bank, use a domain name that’s only one character different from the real one, and still be a sophisticated phishing site designed to steal your credentials, install malware, or hijack your session.
The solution: a systematic, multi-layer domain safety check that goes beyond the padlock icon and looks at DNS records, registration details, blacklist status, certificate details, and behavioural signals together. This guide walks you through every layer.
How Attackers Use Malicious Domains in 2026
Understanding the attack types helps you know what to look for during a safety check:
Typosquatting
Registering domains with common misspellings of legitimate brands: paypa1.com, arnazon.com, micros0ft.com. Victims type or click slightly wrong and land on a fake site that looks identical to the real one.
Lookalike Domains
Domains that use different TLDs or subdomains to appear legitimate: paypal.com.verify-account.net (the real domain here is verify-account.net, not paypal.com), or support.apple.com.phish.xyz.
Homoglyph Attacks
Using characters that look visually identical to legitimate letters, Cyrillic ‘a’ instead of Latin ‘a’, or Unicode lookalikes. The domain appears correct even on close inspection, but it is a completely different domain.
Aged Domain Abuse
Buying domains with years of legitimate history, then repurposing them for malware or phishing. These domains pass age-based reputation checks because they were genuinely used for something benign previously.
HTTPS Abuse
Obtaining a valid SSL certificate for a phishing domain. The padlock is real, the site is encrypted, but the certificate only proves identity to that domain name, not that the site is legitimate.
AI-Generated Phishing Sites
In 2026, AI tools can clone a website’s appearance in seconds. Attackers scrape a legitimate site’s HTML, CSS, and images, then serve a perfect copy from a malicious domain to harvest credentials.
Step 1: Check the URL Carefully
The domain name itself is the first and most important thing to inspect. This sounds obvious, but it is surprisingly easy to get wrong, especially on mobile devices where the full URL is often hidden or truncated.
Anatomy of a URL
| URL structure: know what each part means |
| https://secure.paypal.com/signin/confirm?token=abc123
^ ^ ^ ^ | | | | Protocol | Domain Path/Query Subdomain | TLD (.com) # The REAL domain is always the part immediately before the first single / # after the protocol in this case: paypal.com # # DANGER EXAMPLES: # paypal.com.login.verify-now.net <- real domain is verify-now.net # http://192.168.1.1/paypal/login <- IP address, not a domain # paypa1.com <- digit 1 replacing letter l # pаypal.com <- Cyrillic ‘a’ (looks identical) |
What to Check in the URL
- Identify the real domain: Find the part just before the first lone slash (/) that is the actual domain you’re visiting. Everything before it (subdomains) does not change who owns the domain.
- Check the TLD: Legitimate businesses use .com, .org, .net, .gov, .edu, and country TLDs. Be wary of unusual TLDs (.xyz, .click, .loan, .top, .gq) on sites claiming to be major brands, though note many legitimate sites also use modern TLDs.
- Look for character substitution: Check for 0 (zero) instead of O, 1 (one) instead of l or I, rn instead of m, vv instead of w.
- Copy to a text editor: Paste the URL into Notepad or a similar text editor to see it in a plain font where homoglyphs are easier to spot.
- Check for extra subdomains: apple.com.account.verify.ru is NOT apple.com. The domain is verify.ru.
- Hover before clicking: On desktop, hover over a link to see the real URL in the browser status bar before clicking.
Step 2: Check HTTPS and the SSL Certificate
HTTPS and a padlock icon are necessary but not sufficient for safety. A padlock only means the connection between your browser and the server is encrypted; it says nothing about whether the server belongs to a legitimate organisation or is run by an attacker.
Let’s Encrypt and other free SSL providers issue certificates automatically to any domain, including phishing sites. In 2026, over 80% of phishing sites have valid HTTPS certificates. The padlock is not a safety badge.
What to Check in the SSL Certificate
- Click the padlock icon (or the information icon on Chrome) in your browser’s address bar.
- View the certificate details (look for ‘Certificate’ or ‘More information’)
- Check the ‘Issued to’ or ‘Common Name’ field; it should match the exact domain you’re visiting.
- Check the Certificate Authority (CA): recognised CAs: DigiCert, Sectigo, GlobalSign, Let’s Encrypt, Amazon, Microsoft. Unknown or self-signed CAs are red flags.
- Check the certificate type: DV (Domain Validated) only proves domain control. OV (Organisation Validated) and EV (Extended Validation) verify the organisation’s legal identity and provide higher trust for banking and financial sites.
| Certificate Type | What It Proves | When to Expect It |
|---|---|---|
| DV: Domain Validated | Domain owner controls the domain | Free; any site, including phishing sites, can get this |
| OV: Organisation Validated | Legal organisation identity verified | Small to mid-size businesses, SaaS companies |
| EV: Extended Validation | Rigorous legal entity verification | Banks, financial institutions, e-commerce leaders |
| Self-Signed | Nothing anyone can create these | Internal tools only, never on a public website; you should trust it |
Step 3: Look Up the Domain Age and WHOIS Data
Domain registration data is publicly available through WHOIS, a database that records when a domain was registered, who registered it, through which registrar, and when it expires. This information is one of the most reliable indicators of domain legitimacy.
How to Run a WHOIS Lookup
Use HasheTools WHOIS Lookup at hashetools.com, enter the domain, and instantly see registration details, registrar, creation date, expiry date, and nameservers.
| WHOIS lookup via command line |
| # macOS / Linux
whois yourdomain.com # Look for these key fields: # Creation Date: 2024-03-15T08:00:00Z <- when domain was registered # Expiry Date: 2025-03-15T08:00:00Z <- when domain expires # Registrar: NameCheap, Inc. <- who it was registered through # Registrant: [REDACTED] <- owner (often privacy-protected) # Name Server: ns1.example.com <- where DNS is hosted |
What to Look for in WHOIS Data
- Registration date: A domain registered within the last 30 days claiming to be a major brand or financial institution is an immediate red flag. Legitimate brands register domains years or decades before you encounter them.
- Expiry date: A domain set to expire very soon (days or weeks away) may be a throwaway attack domain. Legitimate businesses renew for years in advance.
- Registrar: Phishing domains frequently use budget registrars (Namecheap, GoDaddy, Porkbun, all legitimate registrars but also popular with attackers due to low cost and easy registration). Note: Using these registrars doesn’t make a domain malicious, but combined with other signals, it contributes to a risk profile.
- Registrant details: Most legitimate businesses have organisation details in WHOIS (or use registrar privacy protection). Be wary of domains with obviously fake registrant information (gibberish names, fake addresses).
- Nameservers: Check if the nameservers are consistent with what you’d expect from the claimed organisation’s hosting infrastructure.
| WHOIS Signal | Suspicious | Legitimate |
|---|---|---|
| Domain age | Registered < 30 days ago | Registered years ago, matching brand history |
| Expiry date | Expiring soon or < 1 year registration | Renewed for multiple years |
| Registrant name | Privacy-protected + brand claim | Organisation name matches brand |
| Registrar | Offshore/unknown registrar | Well-known registrar |
| Name servers | Free DNS provider or unknown NS | NS matching claimed organisation’s infrastructure |
Step 4: Run a Blacklist Check
DNS-based blacklists (DNSBLs) and web reputation databases maintain constantly updated lists of domains and IP addresses known to be involved in spam, malware distribution, phishing, and other malicious activity. Checking a domain against these lists is one of the fastest safety signals you can get.
How Blacklists Work
Security researchers, ISPs, and automated honeypot systems continuously report malicious domains and IPs to blacklist operators. When a domain is reported for phishing, it is added to the blacklist, and email servers, DNS resolvers, and security tools worldwide query these lists to block or flag traffic from blacklisted sources.
How to Check a Blacklist with HasheTools
- Go to hashetools.com and open the Blacklist Check tool
- Enter the domain name or IP address you want to check
- HasheTools queries dozens of major blacklists simultaneously and shows which ones flag the domain
- A domain listed on any spam/malware blacklist should be treated as dangerous until investigated further
| Blacklist Type | What It Flags | Examples |
|---|---|---|
| Email spam blacklists | IPs/domains that send spam | Spamhaus SBL, SURBL, Barracuda |
| Malware/phishing | Sites distributing malware or harvesting credentials | Google Safe Browsing, PhishTank, OpenPhish |
| DNS-based blocklists | Domains/IPs flagged by DNS resolvers | Quad9, Cloudflare RADAR, Comodo |
| Botnet/C2 lists | Command-and-control infrastructure for malware | Feodo Tracker, Abuse.ch URLHaus |
| Reputation scores | Composite trust score across multiple signals | Cisco Talos, Fortinet FortiGuard |
Step 5: Inspect DNS Records
DNS records reveal a significant amount of information about a domain’s infrastructure, purpose, and configuration. Inspecting them is a layer of safety analysis that most users skip, but it’s one of the most revealing steps for technical users.
What DNS Records to Check
- A record: The IP address the domain resolves to. Check it against known cloud/hosting providers. A domain claiming to be a UK bank but resolving to an IP in a country with no connection to that bank is suspicious.
- MX records: Mail server records. Legitimate organisations have MX records matching their email provider (Google, Microsoft, etc.). A domain with no MX records but claiming to be a business that would send email is odd.
- TXT records: Check for SPF, DKIM, and DMARC records. Legitimate organisations sending emails have these configured. A domain with no SPF or DMARC claiming to be a major brand is likely a spoofing domain.
- NS records: Nameservers. Check whether the nameservers match what you’d expect from the organisation’s hosting. A ‘bank’ using free DNS hosting is a red flag.
- WHOIS nameservers vs. DNS NS records: These should match. A mismatch can indicate a hijacking attempt or misconfiguration.
| Inspect DNS records using dig key safety checks |
| # Check what IP the domain resolves to
dig suspicious-domain.com A +short # Then search the IP: is it in a country consistent with the claimed org? # Check MX records: Does a ‘business’ have professional mail setup? dig suspicious-domain.com MX +short # Check TXT records legitimate senders have SPF/DMARC dig suspicious-domain.com TXT +short # Red flag: no SPF record for a domain claiming to be a major brand # Red flag: no DMARC for a domain that sends email to customers # Check nameservers dig suspicious-domain.com NS +short # Red flag: free DNS provider (freedns.afraid.org, etc.) for a ‘bank’ |
Step 6: Check Website Reputation
Multiple free tools and databases aggregate reputation signals for domains, combining blacklist data, user reports, scan results, and historical behaviour into a reputation score. Use these as an additional layer of verification:
| Tool / Service | What It Checks | How to Use |
|---|---|---|
| Google Safe Browsing | Malware and phishing detection (Google’s database) | transparencyreport.google.com/safe-browsing/search |
| VirusTotal | 70+ antivirus and URL scanners simultaneously | virustotal.com paste URL, instant multi-scanner result |
| URLScan.io | Full page screenshot, DNS, network, and behaviour scan | urlscan.io scans any URL without visiting it |
| Cisco Talos | Email and web reputation based on threat intelligence | talosintelligence.com/reputation_center |
| Sucuri SiteCheck | Malware, blacklist status, and security config | sitecheck.sucuri.net |
| MXToolbox | Blacklist check, DNS health, and MX analysis | mxtoolbox.com/blacklists.aspx |
| Whois.domaintools.com | Domain age, registrant, and reputation scoring | whois.domaintools.com |
| HasheTools | DNS Lookup, WHOIS, Blacklist Check, DMARC, CNAME | hashetools.com all DNS-based checks in one place |
URLScan.io is particularly useful because it visits the suspicious URL in a sandboxed environment and returns a screenshot, letting you see what the site looks like without exposing your own browser or device. If you’re unsure about a link, scan it with URLScan.io before clicking it yourself.
Step 7: Analyse the Page Content and Behaviour
If you’ve decided to visit the domain (ideally in a sandboxed browser or after completing all prior checks), the page itself provides additional safety signals:
Content Red Flags
- Immediate login prompt: A page that shows nothing but a login form before providing any context is a common phishing pattern, especially if it pre-populates your email address (scraped from the link)
- Urgency language: “Your account has been suspended”, “Verify within 24 hours or lose access”, “Unusual activity detected,” high-pressure language designed to bypass critical thinking
- Broken links and images: Cloned phishing sites often have broken internal links, missing images, or non-functional navigation. The attacker only built the login page.
- Mismatched branding: Slightly wrong fonts, colours, logos, or layout compared to the real brand’s website
- Unusual form fields: Asking for information a legitimate site would never request at login, Social Security Number, full credit card details on a non-payment page, mother’s maiden name
- Immediate download prompts: Being asked to download a file immediately upon visiting is a major malware distribution signal
Browser Behaviour Red Flags
- Browser warning: If Chrome, Firefox, Safari, or Edge displays a red ‘Dangerous Site’ or ‘Deceptive Site Ahead’ warning, leave immediately. These warnings are based on Google Safe Browsing and are accurate the vast majority of the time
- Redirect chains: Being redirected through multiple domains before landing on a page can indicate a malicious redirect chain designed to obscure the final malicious destination
- Pop-ups demanding action: Fake virus warnings, fake browser update prompts, fake captchas that ask you to download something
- Console errors: Opening browser dev tools (F12) and seeing JavaScript errors or requests to suspicious third-party domains can reveal malicious infrastructure
Red Flags: Signs a Domain Is Almost Certainly Dangerous
If you observe any combination of the following signals, treat the domain as malicious until proven otherwise:
| Registered < 30 days ago | Claiming to be an established brand or financial institution. Legitimate companies don’t appear overnight. |
| The domain appears on any blacklist. | Security researchers have specifically flagged this domain for phishing, malware, or spam. Treat as confirmed dangerous. |
| The browser shows a security warning. | Google Safe Browsing or equivalent has already flagged the site. Leave immediately; the warning is rarely wrong. |
| URL contains brand name as subdomain | paypal.com.verify.net ‘paypal.com’ is the subdomain, ‘verify.net’ is the real domain. Classic phishing structure. |
| No DMARC / no email auth records. | A domain claiming to be a major brand but with no SPF, DKIM, or DMARC configured is likely a spoofing domain, not the real brand. |
| SSL certificate issued the same day as registration | A domain registered today with a same-day SSL certificate is almost certainly a phishing site. Attackers automate this process. |
| Homoglyph characters in a domain name | Any Unicode or non-ASCII characters in a domain claiming to be a well-known brand, such as paypał.com, for example, is an impersonation attack. |
| Domain resolves to an IP in an unexpected country. | Your bank’s domain resolving to an IP in Eastern Europe or Southeast Asia, with no established presence there, is a hijacking indicator. |
| Asks for credentials not appropriate to the context | Requesting your bank password on a page reached via a text message link, or asking for full card details to ‘verify identity’. |
Green Flags: Signs a Domain Is Likely Safe
No single signal guarantees safety, but the following signals in combination provide strong evidence of legitimacy:
| Domain registered years ago | A domain with 5+ years of registration history matching the claimed brand’s founding date is a strong legitimacy signal. |
| Consistent WHOIS organisation details | Registrant organisation name matches the claimed brand, with a business address consistent with their known headquarters. |
| OV or EV SSL certificate | An organisation-validated or Extended Validation certificate confirms that the Certificate Authority verified a legal entity. |
| DMARC at p=reject | A strict DMARC policy indicates that the organisation actively manages its email authentication in a manner consistent with legitimate business operations. |
| Clean blacklist status | No appearance on any major spam, malware, or phishing blacklist across dozens of databases. |
| MX records matching the claimed email provider | A business using Google Workspace, Microsoft 365, or a professional email provider and MX records to match. |
| Nameservers from the enterprise DNS provider | DNS hosted on Cloudflare, AWS Route 53, Google Cloud DNS, or an enterprise provider, consistent with a properly managed organisation. |
| Domain matches official brand communications. | URL matches exactly what appears in the company’s official printed materials, social media profiles, and app store listings. |
| No security warnings from the browser | Google Safe Browsing, Mozilla, and Microsoft SmartScreen all have clean records for this domain. |
How to Check Specific Domain Types
Email Links
| 1
Check sender domain Does From: match the brand? |
2
DMARC Lookup Is email auth enforced? |
3
Hover link Does URL match claim? |
4
Blacklist Check Any malicious history? |
5
VirusTotal Scan the link before clicking |
Email is the primary delivery mechanism for malicious domains. Before clicking any link in an email: verify the sender’s domain matches the claimed brand exactly, run a DMARC lookup to confirm the brand has email authentication enforced (and therefore this email was authenticated), hover the link to inspect the URL, and scan it with VirusTotal if you’re still unsure.
Social Media Links
- URL shorteners: Links shared on Twitter/X, Instagram, and other platforms are often shortened (bit.ly, t.co, etc.). Use a URL expander to reveal the final destination before visiting.
- Verify official accounts: Check the blue verification badge and account age before trusting links shared by accounts claiming to be official brands.
- Cryptocurrency and giveaway scams: Any post promising cryptocurrency rewards, giveaways, or investment returns from a link is almost always a scam, regardless of how legitimate the account appears.
E-Commerce Domains
- Check for secure checkout: Payment pages must be on the same domain you browsed to, not redirected to a different domain.
- Verify with company registration: For unknown online stores, search the company name + ‘scam’ or check Companies House (UK), BBB (US), or ASIC (Australia)
- Unrealistic pricing: Products priced 80-90% below retail are almost always either counterfeit, non-existent, or a payment credential harvesting operation
File Download Links
- Domain must match the software vendor: Software downloads must come from the official vendor’s domain, not a ‘mirror’ site you’ve never heard of
- Scan with VirusTotal: For any downloadable file, scan the URL with VirusTotal before downloading, and scan the file itself after
- Check the file extension: A file named ‘document.pdf.exe’ or ‘invoice.zip’ contains an executable disguised as a document.
Frequently Asked Questions
Does HTTPS mean a website is safe?
No. HTTPS only encrypts the connection between your browser and the website. It does not guarantee the website itself is legitimate. Many phishing sites use valid HTTPS certificates, so always verify the domain name, WHOIS age, and blacklist status before trusting a site.
How can I check a link without clicking it?
On desktop, hover over the link to preview the real URL in your browser’s status bar. On mobile, press and hold the link to view the full destination. You can also paste the URL into tools like VirusTotal or URLScan.io to analyse it safely without visiting the site.
What should I do if I accidentally click a suspicious link?
Do not enter any information or download files. Close the tab immediately and run a malware scan on your device. If you entered credentials, change your password immediately from the official website and enable two-factor authentication where possible.
Can a domain that is 10 years old still be dangerous?
Yes. Attackers often purchase aged domains because they already have a reputation history and may bypass basic trust checks. Always combine domain age with blacklist checks, DNS analysis, and website behaviour before trusting a site.
How do I check if a shortened URL is safe?
Avoid clicking shortened URLs directly. Use a URL expander tool to reveal the final destination first, then check the full URL using blacklist, WHOIS, and reputation tools before visiting.
Is it safe to visit a site that fails one safety check?
Not always. A blacklist warning is a major red flag, even if other checks appear normal. If multiple checks raise concerns, such as a new domain, suspicious DNS setup, or a phishing-style URL, avoid visiting the site until verified.
How do I report a phishing or malicious domain?
You can report suspicious domains to Google Safe Browsing, Microsoft Defender SmartScreen, PhishTank, ICANN, or your national cybersecurity authority. Reporting helps security providers block malicious websites faster.
Is it safe to visit a website without HTTPS?
Generally, no. Websites without HTTPS do not encrypt data between your browser and the server. Never enter passwords, payment details, or sensitive information on a non-HTTPS website.
Can scammers create fake websites that look real?
Yes. Modern phishing websites can closely imitate legitimate brands using copied layouts, logos, and even valid SSL certificates. This is why checking the domain name, WHOIS data, and blacklist status is critical before trusting a site.
Conclusion
Checking whether a domain is safe before visiting is no longer optional in 2026. Modern phishing websites can look almost identical to legitimate brands, use valid HTTPS certificates, and even operate from aged domains with existing reputations. A glance at the padlock icon is not enough to determine whether a website can be trusted.
The safest approach is to combine multiple checks, inspect the URL carefully, verify WHOIS and domain age data, review SSL certificate details, check blacklist and reputation databases, and analyse DNS records such as SPF, DKIM, and DMARC. Even a few seconds of verification can help prevent credential theft, malware infections, financial fraud, and phishing attacks.
Whether you are checking an email link, verifying an online store, analysing a vendor website, or investigating a suspicious domain, following a structured safety-check process dramatically reduces your risk.
With free tools from HasheTools.com, you can quickly perform DNS lookups, blacklist checks, WHOIS analysis, DMARC verification, and other essential domain security checks, all from one place, without creating an account.
Before clicking any unfamiliar link, remember: if a domain feels suspicious, investigate first and trust later.
SPF Flattening: How to Fix the 10-Lookup Limit and Stop SPF Failures
If your business uses more than two email platforms, say, Google Workspace for internal mail and Mailchimp for campaigns, there is a strong chance your SPF record is silently failing authentication. The culprit is almost always the SPF 10-lookup limit: a hard ceiling built into the SPF specification that causes authentication errors the moment your record requires more than ten DNS queries to resolve.
This guide, written by the HasheTools team, explains exactly what SPF flattening is, why the lookup limit exists, how exceeding it breaks your email delivery, and most importantly, how to fix it permanently. We also cover the risks of naïve flattening and how dynamic flattening tools solve the maintenance problem that catches most teams off guard.
What is SPF, and why does it matter?
SPF (Sender Policy Framework) is an email authentication standard defined in RFC 7208. It allows a domain owner to publish a list of IP addresses and mail servers that are authorised to send email on behalf of that domain. When a receiving mail server gets a message claiming to be from your domain, it checks your SPF record in DNS to verify whether the sending IP is on your approved list.
Without a valid SPF record, your domain is an open target for email spoofing and phishing attacks. Worse, major email providers like Gmail and Outlook use SPF results as one of the primary signals for spam filtering; a failing SPF record sends your legitimate marketing emails straight to the junk folder.
A basic SPF record looks like this:
| v=spf1 include:_spf.google.com include:spf.protection.outlook.com -all |
The v=spf1 tag identifies this as an SPF record. The include: mechanisms tell receiving servers to also check the SPF records of the listed domains. The -all at the end means: reject any mail that doesn’t match the above.
The SPF 10-lookup limit: what it is and why it exists
The SPF specification imposes a hard limit of ten DNS lookups during SPF record evaluation. This limit exists for a practical reason: every DNS query adds latency to the email authentication process. If a single SPF check could trigger dozens of recursive lookups, it would slow down mail servers and open a potential vector for denial-of-service attacks against DNS infrastructure.
The following SPF mechanisms each count as one lookup toward the limit:
- include: fetches another domain’s SPF record
- a: resolves a domain’s A/AAAA records
- mx: resolves a domain’s MX records
- exists: checks whether a domain exists in DNS
- redirect= redirects evaluation to another SPF record (counts as one lookup)
Crucially, lookups are recursive: when you include _ spf.google.com, that record itself may include further domains, each adding to your count. There is also a void lookup limit of two DNS queries that return no results (NXDOMAIN or empty responses), which are capped at just two before authentication fails with a PermError.
Why modern SPF records exceed the lookup limit
A decade ago, most organisations sent all their email through a single provider. Today, the average mid-sized business uses five or more email platforms simultaneously. Each platform requires its own include statement, and most of those platforms have complex SPF records of their own with multiple nested lookups.
Consider a common setup:
| v=spf1
include:_spf.google.com; Google Workspace up to 4 lookups include:spf.protection.outlook.com; Microsoft 365 1-2 lookups include:sendgrid.net; SendGrid 2 lookups include:servers.mcsv.net; Mailchimp 2 lookups include:_spf.salesforce.com; Salesforce 2 lookups -all ; Total: ~11-13 lookups exceeds the limit |
None of the above services is an unusual choice. Yet together they breach the limit before you’ve added your transactional email provider, your CRM, or your customer support tool. The problem isn’t any one platform; it’s the compounding effect of a modern multi-vendor email stack.
What is SPF flattening?
SPF flattening is the process of resolving all include: mechanisms and nested SPF records down to their underlying IP addresses, then replacing the include: chains with direct ip4: and ip6: entries. Because IP address references require zero DNS lookups to validate, a fully flattened SPF record can stay well within the 10-lookup limit regardless of how many email providers you use.
Before flattening
| v=spf1
include:_spf.google.com include:spf.protection.outlook.com include:sendgrid.net -all ; Lookup count: ~8 (and growing as providers update their records) |
After flattening
| v=spf1
ip4:35.190.247.0/24 ip4:64.233.160.0/19 ip4:66.102.0.0/20 ip4:74.125.0.0/16 ip4:40.92.0.0/15 ip4:40.107.0.0/16 ip4:167.89.0.0/17 ip4:192.254.112.0/20 ip4:198.37.144.0/20 ip4:198.153.192.0/19 -all ; Lookup count: 1 (only the initial TXT lookup for your own record) |
The result is functionally identical; the same IP ranges are authorised, but the authentication process now completes in a single DNS query instead of eight or more.
How SPF flattening works step by step
Whether you use a tool or do it manually, the flattening process follows the same logic:
- Retrieve your current SPF record from your DNS zone (query your domain’s TXT records).
- Recursively resolve each include: mechanism. For example, resolving _ spf.google.com reveals further includes, which resolve to CIDR IP ranges.
- Collect all resulting IP addresses across every include chain, both IPv4 (ip4:) and IPv6 (ip6:) ranges.
- Deduplicate and consolidate overlapping or adjacent CIDR ranges where possible to reduce record length.
- Write the new TXT record using only ip4:/ip6: entries plus your termination qualifier (-all, ~all, etc.).
- Publish and test the new record using an SPF validator tool before removing the old one.
The risks of static SPF flattening and how to avoid them
Flattening sounds simple, but there is a critical problem with the naive approach: the IP addresses belonging to providers like Google, SendGrid, and Microsoft change regularly. When SendGrid adds a new sending range, your static flattened record won’t include it, and legitimate emails sent through that new IP will fail SPF authentication.
Static flattening risks
- IP drift: Providers rotate or expand their sending IP ranges without notifying customers.
- Record length: A fully flattened enterprise record can exceed 255 characters (the DNS TXT record string limit) or 512 bytes (the UDP DNS response limit). This requires careful CIDR aggregation or record splitting.
- Maintenance burden: Manual re-flattening every time a provider changes IPs is tedious and error-prone.
Dynamic SPF flattening: the better solution
Dynamic SPF flattening tools solve the maintenance problem by automating the entire process. Instead of publishing IP addresses directly in your TXT record, they give you a managed include statement that points to their DNS infrastructure. Their system continuously monitors your providers for IP changes and updates the underlying resolution automatically.
Your SPF record becomes something like:
| v=spf1 include:spf.hashetools.com -all
; One lookup. Their infrastructure handles all the IP resolution. When Google adds a new range, its system updates automatically. |
This gives you the deliverability benefits of flattening with none of the maintenance risk.
SPF flattening tools: a practical comparison
Choosing the right tool depends on whether you need a simple one-time fix or ongoing automated management. Here is how the leading options compare:
| Tool | Pricing | SPF flattening | Notable features |
|---|---|---|---|
| EasyDMARC | Free + paid | Dynamic auto-update | Full DMARC dashboard, alerting |
| dmarcian | Paid tiers | Manual + guided | Visualization, team features |
| Mimecast | Enterprise | Automatic | Integrated email security suite |
| HasheTools SPF Checker | Free | Manual only | Instant lookup count, syntax validation, error highlighting |
| PowerDMARC | Free + paid | Dynamic auto-update | AI-powered threat analysis |
For most organisations sending more than 10,000 emails per month, a dynamic flattening tool is worth the investment. The cost of a single deliverability incident, lost revenue, and damaged sender reputation typically exceeds a year of tool subscription fees.
Common SPF errors explained
SPF PermError: too many DNS lookups
The most common error. Exceeding ten lookups during SPF evaluation causes a permanent failure. It cannot be retried; the message is treated as definitively unauthenticated. Fix: flatten your record or reduce the number of include mechanisms.
SPF SoftFail (~all)
The sending IP is not listed as authorised, but the domain owner has not issued a hard rejection. Receiving servers may accept the message but mark it as suspicious. If your record ends in ~all instead of -all, a softfail will not block delivery but will hurt your sender’s reputation over time.
SPF HardFail (-all)
The sending IP is explicitly not authorised. Combined with a strict DMARC policy (p=reject), this causes outright rejection of the message. This is the correct configuration once your SPF record is fully validated.
SPF None
No SPF record was found for the domain. This is treated as authentication, not a missed opportunity, but rather a failure, which means the domain does not protect against spoofing.
Multiple SPF records
A domain must have exactly one SPF TXT record. If you have two (a common mistake when migrating providers), SPF validation returns PermError. Delete the old record when publishing a new one.
How to fix SPF failures: a step-by-step process
- Check your current record. Use the HasheTools SPF Checker (hashetools.com) or Google’s Admin Toolbox to retrieve your current record and count the actual number of DNS lookups it triggers.
- Identify which includes are driving the count. Most tools will show a recursive tree of lookups. Find the deepest chains; these are your main targets for flattening.
- Remove redundant or outdated includes. Do you still use every service in your SPF record? Old CRMs, discontinued email tools, and deprecated IP ranges are common culprits. Audit each include against your current email stack.
- Consolidate where possible. If you’re using both Outlook and Microsoft 365, you may only need one include. Check for overlapping ranges.
- Choose a flattening approach. Manual one-time flattening for simple setups; a dynamic flattening tool for any organisation with three or more active email providers.
- Publish the new record and test. Use an SPF validator to confirm the lookup count is below 10 and that all expected IPs are covered. Send test emails through each of your email platforms.
- Monitor. Set a reminder to re-audit your SPF record quarterly, or use a dynamic tool with automated alerting.
SPF vs DKIM vs DMARC: how they work together
SPF alone is not sufficient for complete email security. It is one layer of a three-part authentication stack. Understanding how each protocol contributes helps you configure them correctly and interpret failures accurately.
| Feature | SPF | DKIM | DMARC |
|---|---|---|---|
| Purpose | Authorizes sending IPs | Verifies message integrity | Enforces auth policy |
| DNS record type | TXT | TXT (DKIM key) | TXT |
| Protects against | IP spoofing | Content tampering | Both (policy layer) |
| Lookup limit | 10 lookups max | None | Depends on SPF/DKIM |
| Required for DMARC | Yes | Yes | N/A is the policy |
DMARC is the enforcement layer that ties SPF and DKIM together. Even if your SPF record is perfectly flattened, a p=none DMARC policy means failures have no consequence. Work toward quarantine and eventually reject once you are confident your SPF and DKIM configurations are solid.
SPF record best practices
- One record per domain. Never publish two SPF TXT records. Merge everything into a single record.
- End with -all, not ~all. SoftFail provides false security. Once your configuration is verified, use a hard fail qualifier.
- Monitor for provider IP changes. At a minimum, check your main providers’ SPF records every quarter. Better yet, use a dynamic flattening tool.
- Test after every DNS change. Any DNS update, even unrelated to SPF, warrants a re-check of your SPF lookup count.
- Document your email stack. Keep a record of every service authorised to send email on your domain, with the corresponding include: mechanism and the person responsible for it.
- Don’t include providers you no longer use. Every legacy includes a security risk and a wasted lookup.
- Align SPF with DMARC. Ensure the domain in your SPF record’s envelope sender aligns with your From: header domain, or DMARC will still fail even if SPF passes.
How SPF flattening improves email deliverability
Email deliverability is ultimately about sender reputation. Gmail, Outlook, Yahoo Mail, and other major providers evaluate every inbound message against a set of signals, and authentication results sit near the top of that list.
A correctly configured, flattened SPF record contributes to deliverability in several concrete ways:
- Eliminates authentication errors that trigger spam filters regardless of content quality.
- Strengthens your DMARC pass rate, which feeds directly into sender reputation scoring at major inbox providers.
- Reduces soft bounces caused by SPF failures on messages that should have been delivered.
- Protects your domain reputation by preventing spoofed emails (which would fail your strict SPF) from damaging how providers perceive your domain.
For transactional emails, especially password resets, order confirmations, and account notifications, a deliverability failure is not just a metric problem. It has a direct impact on user experience and business continuity.
Frequently asked questions
What is SPF flattening?
SPF flattening is the process of converting SPF include: mechanisms into direct IP address entries (ip4:/ip6:). This eliminates recursive DNS lookups and keeps the SPF record within the 10-lookup limit required by the SPF specification (RFC 7208).
What exactly counts toward the 10-lookup limit?
The following mechanisms each count as one lookup: include:, a:, mx:, exists:, and redirect=. The ptr: mechanism also triggers lookups, but is deprecated and should never be used. IP4: and IP6: entries do not trigger any DNS lookups and therefore do not count.
Can SPF flattening break my email delivery?
Yes, if done incorrectly. Static flattening that is not kept up to date will break delivery when email providers change their sending IPs. The solution is either to use a dynamic flattening tool that automatically updates or to schedule regular audits (at least quarterly) if managing the record manually.
My SPF record has only 8 includes. Am I safe?
Not necessarily. The count is on DNS lookups, not including statements. A single include can trigger three or four additional lookups through its own nested includes. Use the HasheTools SPF Checker (hashetools.com), which counts actual recursive lookups, not just surface-level mechanisms.
Do I need both SPF and DKIM?
Yes. DMARC requires at least one of SPF or DKIM to pass, but best practice is to have both configured correctly. DKIM is particularly important because it survives email forwarding (where SPF often fails), and it verifies message content integrity in a way SPF cannot.
How often should I audit my SPF record?
At a minimum, every quarter, or immediately after adding or removing any email service from your stack. Major providers (Google, Microsoft, Twilio/SendGrid) update their sending infrastructure periodically. If you use a dynamic flattening tool, it handles this automatically.
What is the difference between SPF SoftFail and HardFail?
SoftFail (~all) means the domain owner believes the sending IP is not authorised, but has not issued a hard rejection; receiving servers may still accept the message. HardFail (-all) is a firm declaration that the IP is not authorised, and combined with DMARC p=reject, it causes outright message rejection.
Conclusion
SPF flattening is an essential solution for fixing the 10 DNS lookup limit and preventing SPF authentication failures in modern email systems. As businesses use multiple email platforms like Google Workspace, Microsoft 365, Mailchimp, and SendGrid, SPF records often become complex and exceed the allowed lookup limit, leading to delivery issues and PermError failures.
By flattening your SPF record, you reduce DNS lookups, improve email deliverability, and ensure your messages consistently reach inboxes instead of spam folders. It also strengthens your overall email authentication setup when combined with DKIM and DMARC.
For long-term reliability, especially in dynamic email environments, using an SPF flattening tool or automated solution like HasheTools helps keep your records optimized and up to date.
In short, SPF flattening is not just a fix; it’s a best practice for maintaining secure, stable, and high-performing email delivery.
MTA-STS & TLS-RPT: How to Enforce Email Encryption & Monitor TLS Failures
Email remains one of the most critical communication channels for businesses, and one of the most targeted by attackers. While SPF, DKIM, and DMARC protect email identity, they do not secure email while it travels between mail servers.
This is where MTA-STS (Mail Transfer Agent Strict Transport Security) and TLS-RPT (TLS Reporting) become essential. Together, they enforce encryption in transit and give you full visibility into SMTP delivery failures, making them indispensable for any business that takes email security seriously.
Modern businesses also rely on tools like HasheTools to simplify email authentication, DNS validation, and security monitoring. With the right setup and proper visibility into your email infrastructure, you can prevent misconfigurations and ensure your emails are always delivered securely.
What is MTA-STS?
MTA-STS (Mail Transfer Agent Strict Transport Security) is an email security standard that forces SMTP connections between mail servers to use TLS encryption. It prevents attackers from intercepting messages or forcing a downgrade to an unencrypted connection.
Without MTA-STS: The Risks
- Emails may silently fall back to unencrypted SMTP
- Attackers can perform SMTP downgrade attacks to strip encryption
- Sensitive business data is exposed during transit
- No mechanism to reject insecure delivery attempts
With MTA-STS: The Benefits
- All inbound emails must arrive over TLS-encrypted connections
- Insecure connections are rejected, not just logged
- Man-in-the-middle attacks are blocked at the protocol level
- Works seamlessly alongside SPF, DKIM, and DMARC
What is TLS-RPT?
TLS-RPT (TLS Reporting) is a complementary protocol that automatically delivers failure reports to your inbox whenever a TLS-encrypted connection cannot be established. Think of it as the monitoring dashboard for MTA-STS.
Without TLS-RPT
- TLS failures happen silently; you have no visibility
- Email delivery problems are nearly impossible to debug
- Misconfigurations can go undetected for weeks
With TLS-RPT
- You receive structured JSON reports detailing every TLS failure
- Identify misconfigured mail servers before they cause delivery issues
- Monitor SMTP security posture in real time
- Supports compliance auditing and security documentation
MTA-STS vs. TLS-RPT: Key Differences
Although they work together, they serve fundamentally different purposes:
| Feature | MTA-STS | TLS-RPT |
|---|---|---|
| Purpose | Enforce TLS encryption | Report TLS failures |
| Function | Security enforcement | Monitoring & reporting |
| Action Taken | Blocks insecure email | Sends structured reports |
| Visibility | Silent enforcement | Detailed failure logs |
| Required? | Recommended | Strongly recommended |
Together, they form a complete email transport security system, one enforces, the other reports.
How MTA-STS Works: Step by Step
Step 1: Publish Your MTA-STS Policy File
Host a plain-text policy file at the following URL on your domain:
https://mta-sts.yourdomain.com/.well-known/mta-sts.txt
Example policy file content:
version: STSv1
mode: enforce
mx: mail.yourdomain.com
max_age: 86400
Step 2: Add the MTA-STS DNS TXT Record
Create a DNS TXT record to signal that MTA-STS is active on your domain:
_mta-sts.yourdomain.com TXT “v=STSv1; id=20260101”
The ID value must be updated whenever your policy file changes; it tells the sending servers that the policy has been refreshed.
Step 3: Send Mail Server Checks Your Policy
When another mail server attempts to deliver email to you, it automatically checks your DNS for the MTA-STS record, fetches the policy file from your subdomain, validates your mail server’s TLS certificate, and then proceeds only if everything matches.
Step 4: Secure Delivery or Rejection
- If TLS is valid and verified → email is delivered securely
- If TLS fails or the certificate is invalid → email is rejected (in enforce mode)
How TLS-RPT Works: Step by Step
Step 1: Add the TLS-RPT DNS Record
_smtp._tls.yourdomain.com TXT “v=TLSRPTv1; rua=mailto:reports@yourdomain.com”
Replace reports@yourdomain.com with any mailbox you monitor regularly. You can also send reports to a dedicated analytics service.
Step 2: Mail Servers Generate Reports
Whenever a sending mail server encounters a TLS issue when delivering to your domain, it automatically sends a structured JSON report to your specified address. Reports are sent once per day, per sending domain.
Step 3: Analyze the Reports
Each report contains detailed data, including:
- Number of successful and failed TLS connections
- Certificate validation errors (expired, mismatched, untrusted)
- STARTTLS negotiation failures
- MTA-STS policy violations
- Details of the sending mail server
How to Configure MTA-STS & TLS-RPT: Full Setup Guide
Step 1: Create the MTA-STS Subdomain
Create a subdomain in your DNS and point it to a web server that can serve HTTPS content:
mta-sts.yourdomain.com → your web server (HTTPS required)
Step 2: Upload the Policy File
Create and upload mta-sts.txt to your web server at the exact path:
/.well-known/mta-sts.txt
Full example policy:
version: STSv1
mode: enforce
mx: mail.yourdomain.com
mx: mail2.yourdomain.com
max_age: 604800
Step 3: Add MTA-STS DNS Record
_mta-sts.yourdomain.com TXT “v=STSv1; id=20260108”
Step 4: Add TLS-RPT DNS Record
_smtp._tls.yourdomain.com TXT “v=TLSRPTv1; rua=mailto:reports@yourdomain.com”
Step 5: Validate Your Setup
Use free tools to verify your configuration before going live:
- MXToolbox: check DNS record propagation
- Google Admin Toolbox: test MTA-STS policy retrieval
- dmarcian TLS-RPT analyzer: validate TLS report parsing
- Wait 24–48 hours for DNS propagation globally
MTA-STS vs. STARTTLS: Why the Upgrade Matters
| Feature | STARTTLS | MTA-STS |
|---|---|---|
| Encryption Type | Opportunistic | Enforced |
| Downgrade Protection | None easily bypassed | Strong rejects insecure |
| Certificate Validation | Optional | Mandatory |
| Attack Resistance | Vulnerable to MITM | Protected |
| Delivery Monitoring | None | Full (with TLS-RPT) |
STARTTLS upgrades connections to TLS if available, but an attacker can silently strip it and force plaintext delivery. MTA-STS eliminates this vulnerability.
Common MTA-STS & TLS-RPT Issues and How to Fix Them
1. Certificate Mismatch
Your MX server’s TLS certificate must match the hostname listed in your MTA-STS policy. Mismatches will cause legitimate emails to be rejected in enforce mode.
| Fix: Ensure your SSL certificate covers the exact MX hostnames in your policy file. Use wildcard certs or SAN certificates if needed. |
2. Incorrect or Missing MX Records
If your policy file lists MX hostnames that don’t match your actual DNS MX records, senders will be unable to validate your configuration.
| Fix: Run nslookup -type=MX yourdomain.com and verify every host listed in your mta-sts.txt matches exactly. |
3. Policy File Not Accessible Over HTTPS
The mta-sts.txt file must be served over HTTPS (not HTTP) with a valid certificate. If it returns a 404 or an HTTP redirect, MTA-STS will not activate.
| Fix: Test by visiting https://mta-sts.yourdomain.com/.well-known/mta-sts.txt in a browser; you should see the plain-text policy. |
4. Forgetting to Update the Policy ID
If you update your policy file but forget to change the ID value in the DNS TXT record, mail servers will continue caching the old policy.
| Fix: Always increment the ID (e.g., use a date like 20260108) whenever you make any change to your policy file. |
Best Practices for Email Transport Security
- Always start with mode: testing, collect data before enforcing
- Move to mode: enforce only after verifying reports show no legitimate failures
- Use valid, non-expired SSL/TLS certificates on all MX servers
- Monitor TLS-RPT reports weekly, set calendar reminders
- Update the policy ID value every time you modify the policy file
- Combine MTA-STS with SPF, DKIM, and DMARC for full email security coverage
- Keep MX server software updated to support modern TLS versions (1.2 minimum, 1.3 preferred)
- Audit DNS records quarterly to catch drift and misconfigurations early
Real-World Use Case: Financial Services Company
Consider a financial company sending invoices, contracts, and sensitive client data via email every day.
| Scenario | Without MTA-STS + TLS-RPT | With MTA-STS + TLS-RPT |
|---|---|---|
| Email Security | Vulnerable to interception | Fully encrypted in transit |
| Attack Exposure | MITM attacks possible | Downgrade attacks blocked |
| Issue Visibility | Problems invisible | Failures reported instantly |
| Compliance Risk | High audit failures are likely | Low documented & auditable |
| Client Trust | No verifiable assurance | Provable encryption standard |
For regulated industries, financial services, healthcare, legal, and government, MTA-STS and TLS-RPT are not optional enhancements. They are baseline security requirements.
Frequently Asked Questions (FAQ)
Does MTA-STS replace DMARC, SPF, or DKIM?
No. MTA-STS operates at a different layer. SPF, DKIM, and DMARC verify email identity and prevent spoofing. MTA-STS ensures the transport channel itself is encrypted. You need all of them for comprehensive protection.
How long does it take for MTA-STS to take effect?
DNS propagation typically takes 24–48 hours globally. However, sending mail servers also cache your policy for the duration of max_age (in seconds) specified in your policy file. Use a lower max_age during testing.
Will MTA-STS cause legitimate emails to be blocked?
Only if your TLS configuration is incorrect. This is why starting with mode: testing is critical; it lets you identify any misconfigurations before switching to enforce mode, where non-TLS connections are actively rejected.
Can I use TLS-RPT without MTA-STS?
Yes. TLS-RPT works independently and will report TLS failures even if MTA-STS is not implemented. However, the two protocols are designed to work together and provide maximum value when used in combination.
What format are TLS-RPT reports delivered in?
Reports are delivered as JSON files, often compressed as .gz attachments. You can parse them manually, use a spreadsheet, or use dedicated tools like DMARCian or Valimail to visualize the data.
Does MTA-STS affect outbound email?
MTA-STS only governs how other mail servers deliver email to your domain (inbound). However, if you send an email to domains that have MTA-STS enabled, your outgoing mail server must support TLS, or delivery will fail.
Conclusion
MTA-STS and TLS-RPT represent a major step forward in modern email security. While traditional protocols like STARTTLS rely on opportunistic encryption, they still leave room for downgrade attacks, misconfigurations, and a lack of visibility. MTA-STS solves the enforcement problem by ensuring that all inbound email connections are securely encrypted, while TLS-RPT provides the monitoring layer needed to detect and analyze any TLS-related delivery issues.
Together, these protocols create a strong, transparent, and enforceable email transport security system that works alongside SPF, DKIM, and DMARC to protect both identity and data in transit. For businesses that depend on email for sensitive communication, such as contracts, invoices, and client data, this is no longer optional; it is a required security standard in 2026.
Implementing and managing these configurations can be complex, especially when dealing with DNS records, policy files, and TLS validation. This is where HasheTools helps simplify the process by providing essential tools for DNS checks, email authentication validation, and security troubleshooting in one place. It allows businesses to quickly identify issues, validate configurations, and maintain a strong email security posture without unnecessary complexity.

DNSSEC Explained: Why Most Domains Are Still Vulnerable in 2026
DNS is one of the most critical systems on the internet, yet it remains one of the least protected. Every time someone visits your website, sends you an email, or connects to your services, they rely on DNS to get the correct destination. The problem? Traditional DNS offers no built-in way to verify whether the response it returns is legitimate or forged.
This is exactly the gap DNSSEC (Domain Name System Security Extensions) was designed to fill. By adding cryptographic signatures to DNS records, DNSSEC allows resolvers to verify that the data they receive is authentic and hasn’t been tampered with. It transforms DNS from a trust-based system into a verifiable one.
And yet, despite being available for over 20 years, most domains in 2026 are still vulnerable. In this guide, we’ll break down how DNSSEC works, why adoption remains low, and what risks you face if your domain isn’t protected.
What is DNSSEC?
DNSSEC stands for Domain Name System Security Extensions. It is an additive security layer for DNS that uses public-key cryptography to sign DNS records, allowing resolvers to verify that the records they receive are authentic and unaltered.
The core problem DNSSEC solves: DNS was designed to be fast and lightweight, not secure. A standard DNS response carries no proof of authenticity; a resolver receiving an answer has no built-in way to tell whether it came from the legitimate authoritative nameserver or from an attacker who injected a forged response. DNSSEC fixes this by turning DNS records into signed, verifiable data.
DNSSEC does NOT encrypt DNS traffic (that’s DNS-over-HTTPS or DNS-over-TLS). What it does instead is provide data integrity and origin authentication; you can verify what the answer says and who it came from, even though the data travels in plaintext.
The Analogy: DNSSEC as a Wax Seal: Imagine sending a letter through the postal system in medieval times. Anyone handling the letter could open it and replace its contents. Adding a wax seal doesn’t stop anyone from reading the letter, but it does let the recipient verify that the seal is unbroken, confirming the letter hasn’t been tampered with and truly came from the claimed sender. DNSSEC’s cryptographic signatures work on the same principle: they don’t hide the DNS data, but they make tampering detectable.
The DNS Vulnerability DNSSEC Solves
To understand why DNSSEC matters, you first need to understand how DNS can be attacked without it.
The Kaminsky Attack: DNS’s Worst Nightmare
In 2008, security researcher Dan Kaminsky revealed a fundamental vulnerability in DNS that sent shockwaves through the industry. His technique, now called the Kaminsky Attack, could poison a recursive resolver’s cache in seconds using a simple but devastating exploit.
How the Kaminsky Attack Works
- Attacker targets: Picks the victim’s resolver and a target domain
- Floods with queries: Queries for random.target.com subdomains
- Sends fake replies: Races to answer with forged DNS response
- Guesses txn ID: 16-bit space = 65,536 possibilities
- Poisons the cache: Fake record cached for full TTL duration
Why was it so dangerous? DNS transaction IDs are only 16 bits, meaning there are only 65,536 possible values. By querying for non-existent subdomains (which the resolver had to look up fresh each time) and flooding with forged responses, an attacker could statistically expect to guess the right transaction ID within seconds. Once poisoned, the forged record would be served to every user of that resolver for the duration of its TTL, potentially for hours or days.
The emergency patch, randomising source ports to add another ~16 bits of randomness, bought time but didn’t fundamentally solve the problem. DNSSEC is the definitive fix.
What an Unprotected DNS Response Looks Like
| Standard DNS response, no authentication, no verification |
| $ dig hashetools.com A
;; ANSWER SECTION: hashetools.com. 300 IN A 104.21.45.67 # This response contains: # ✓ The IP address (104.21.45.67) # ✗ No signature, could be from a legitimate server OR an attacker # ✗ No proof that the data hasn’t been modified in transit # ✗ No chain of trust back to any verified root # A forged response looks identical. The resolver cannot tell the difference. |
Who Is Actively Exploiting Unprotected DNS in 2026? Nation-state actors (documented campaigns from Iran, Russia, China, and North Korea targeting government and critical infrastructure domains), ransomware operators using DNS hijacking for initial access and C2 communication, phishing campaigns using lookalike domains that exploit unprotected resolvers, and malware using DNS cache poisoning to redirect software update servers to deliver malicious payloads. If your domain lacks DNSSEC, any of these actors can forge records for your domain against unvalidating resolvers.
How DNSSEC Works: Cryptographic Signatures Explained
DNSSEC adds digital signatures to DNS records using asymmetric public-key cryptography, the same mathematical foundation used in HTTPS certificates and code signing.
The Basic Mechanism
- The zone owner (your DNS provider or authoritative server) generates a key pair: a private signing key and a public verification key
- Every DNS record set (all A records for your domain, all MX records, etc.) is signed using the private key, producing a digital signature stored in an RRSIG record
- The public key is published in the DNS zone itself, in a DNSKEY record, so anyone can retrieve and use it to verify signatures
- When a resolver receives a DNS response, it retrieves the DNSKEY and verifies the RRSIG signature. If the signature is valid, the data is authentic; if the signature is invalid or missing, the response is rejected
- The public key itself is verified by a digital signature from the parent zone, creating a chain of trust all the way back to the signed DNS root
What a DNSSEC-Protected Response Looks Like
| DNSSEC-enabled DNS response, with cryptographic proof |
| $ dig hashetools.com A +dnssec
;; ANSWER SECTION: hashetools.com. 300 IN A 104.21.45.67 hashetools.com. 300 IN RRSIG A 13 2 300 20261231000000 ( 20261201000000 12345 hashetools.com. Xy9zABCDEFGH1234… ) # Digital signature ;; ADDITIONAL SECTION: hashetools.com. 3600 IN DNSKEY 257 3 13 ( mdsswUyr3DPW132mOi8V9xESWE8jTo0d… ) # Zone’s public key # This response contains: # ✓ The IP address (104.21.45.67) # ✓ RRSIG: cryptographic signature over the A record # ✓ DNSKEY: public key to verify the signature # ✓ Chain of trust verified back to the DNS root # ✓ Any tampering invalidates the signature, immediately detectable |
The Two Key Types in DNSSEC
DNSSEC uses two types of keys in a two-layer signing architecture:
| Key Type | Abbreviation | What It Signs / Purpose |
|---|---|---|
| Key Signing Key | KSK | Signs the ZSK DNSKEY record. Longer-lived. Its hash (DS record) is stored in the parent zone to create the chain of trust. |
| Zone Signing Key | ZSK | Signs all the actual DNS records in the zone (A, MX, TXT, CNAME, etc.). Rotated more frequently than the KSK. |
Why two keys? Separating the roles allows the ZSK (which signs many records and must be used frequently) to be rotated often without changing the KSK (which is anchored in the parent zone via a DS record and is more complex to rotate). This is analogous to having a master key and working keys; the working key can be changed without replacing the master.
The DNSSEC Record Types You Need to Know
DNSSEC introduces four new DNS record types that work together to provide authentication. Understanding them is essential for troubleshooting and configuration.
| Record Type | Full Name | What It Contains / Does |
|---|---|---|
| DNSKEY | DNS Public Key | Stores the zone’s public keys (ZSK and KSK). Published in the DNS zone itself. Resolvers use this to verify RRSIG signatures. |
| RRSIG | Resource Record Signature | The digital signature over a set of DNS records (called an RRset). One RRSIG per record type per zone. Signed with the ZSK. |
| DS | Delegation Signer | A hash of the child zone’s KSK DNSKEY. Published in the PARENT zone. Creates the link between parent and child in the chain of trust. |
| NSEC / NSEC3 | Next Secure / Next Secure v3 | Proves that a domain or record type does NOT exist. Prevents attackers from returning forged NXDomain responses. NSEC3 hashes the names for privacy. |
DNSKEY Record Anatomy
| DNSKEY record: your zone’s public key |
| Flags: 257 # 257 = KSK (Zone Signing Key + SEP flag), 256 = ZSK |
| Protocol: 3 # Always 3 for DNSSEC |
| Algorithm: 13 # 13 = ECDSA P-256 with SHA-256 (recommended in 2026) |
| PublicKey: mdsswUyr3… # Base64-encoded public key, used to verify RRSIG signatures |
RRSIG Record Anatomy
| RRSIG records the digital signature over your DNS records |
| TypeCovered: A # Record type this signature covers |
| Algorithm: 13 # Must match the DNSKEY algorithm |
| Labels: 2 # Number of domain labels in the name |
| TTL: 300 # Original TTL of the signed records |
| Expiration: 20261231000000 # Signature validity end (YYYYMMDDHHMMSS) |
| Inception: 20261201000000 # Signature validity start |
| KeyTag: 12345 # Identifies which DNSKEY was used to sign |
| Signature: Xy9zABCD… # The base64-encoded digital signature |
DS Record Anatomy
| DS record: published in the PARENT zone (your registrar / TLD) |
| KeyTag: 12345 # Matches the KeyTag in the child’s KSK DNSKEY |
| Algorithm: 13 # Hash algorithm (13 = ECDSA) |
| DigestType: 2 # 2 = SHA-256 (recommended) |
| Digest: AB12CD34… # SHA-256 hash of the child zone’s KSK DNSKEY |
The Chain of Trust: From Root to Your Domain
DNSSEC’s power comes from a hierarchical chain of trust that extends from a single globally trusted root, the DNS Root Zone, all the way down to your individual domain records. Every link in this chain is cryptographically verified.
| DNS Root Zone ( . )
Trust Anchor, maintained by ICANN, signed by the Root KSK (rotated by ICANN, last major rotation 2018, upgraded 2026) |
| │ Root KSK signs Root ZSK │ Root ZSK signs .com DS record |
| TLD Zone ( .com / .org / .net / etc. )
Operated by Verisign (.com), PIR (.org), etc. Contains DS records for registered domains. |
| │ TLD nameserver publishes DS record → links to your domain’s KSK |
| Your Domain ( yourdomain.com )
Your DNS zone contains DNSKEY records (KSK + ZSK) and RRSIG signatures over every record set. |
| │ ZSK signs every DNS record in your zone (A, MX, TXT, CNAME, NS, SOA…) |
| Individual DNS Records (A, MX, TXT, CNAME…)
Each record set has a corresponding RRSIG. Resolver validates RRSIG → DNSKEY → DS → TLD → Root. Chain complete. |
Breaking the chain: If any link in this chain is missing or invalid, if your registrar didn’t submit your DS record to the TLD, if your RRSIG has expired, if the algorithm in your DNSKEY doesn’t match your RRSIG, the entire DNSSEC validation fails. DNSSEC-validating resolvers will refuse to serve the response, resulting in SERVFAIL errors for your users.
Why Most Domains Still Don’t Have DNSSEC in 2026
DNSSEC was standardised in RFC 4033–4035 in 2005. In 2026, two decades later, fewer than 25% of registered domains have it enabled. This is one of the most persistent adoption failures in cybersecurity. Here’s why:
Operational Complexity
DNSSEC requires managing key pairs, signing zones, submitting DS records to registrars, coordinating key rollovers, and monitoring signature expiry. For organisations without dedicated DNS expertise, this is daunting.
Signature Expiry Risk
RRSIG records have an expiration date, typically 30 days. If signatures aren’t refreshed before expiry (automatically by the DNS provider or manually), the domain goes into SERVFAIL for all validating resolvers. This ‘break everything’ failure mode makes operations teams reluctant to enable it.
Key Rollover Complexity
Rotating DNSSEC keys safely requires a precise multi-step dance between the child zone and the parent (registrar). A mistimed rollover breaks the chain of trust. Automated key management has improved but remains error-prone in many environments.
Registrar / Provider Support Gaps
Not all DNS providers and registrars support DNSSEC, or support it well. Many budget hosting providers, legacy DNS platforms, and smaller registrars offer no DNSSEC support at all, leaving their customers unable to enable it regardless of intent.
Invisible Protection
DNSSEC protects against attacks that most domain owners have never personally experienced. The risk is real but invisible; unlike an SSL error (which shows a red browser warning), a DNS cache poisoning attack is completely invisible to the victim. Low perceived urgency → low adoption.
No Direct Business Incentive
SSL certificates have a visible browser padlock that drives adoption through customer-facing consequences. DNSSEC has no equivalent visible signal. There is no ranking boost, no browser warning for its absence, and no direct customer-facing benefit that organisations can point to when justifying the operational cost.
Global Coordination Required
DNSSEC requires both the domain owner, the registrar, and the TLD operator to support and correctly configure it. A failure at any party breaks the chain. Coordinating across these three separate entities, especially for legacy domains, creates inertia.
2026 Adoption Trends: A Reason for Optimism: While overall adoption remains low, the trajectory is improving. Cloud-managed DNS providers (Cloudflare, AWS Route 53, Google Cloud DNS) now enable DNSSEC with a single click and handle all key management automatically. The ccTLD adoption rate is much higher than that of commercial domains. .gov domains in the US are mandated to use DNSSEC. ICANN’s 2026 root zone upgrades are prompting renewed attention to DNSSEC at all levels of the hierarchy.
DNSSEC Advantages and Limitations
| Advantages of DNSSEC | Challenges & Limitations |
| Eliminates DNS cache poisoning attacks against your domain | Does NOT encrypt DNS traffic (use DoH/DoT for that) |
| Provides cryptographic proof of DNS record authenticity | Does NOT prevent DNS hijacking at the registrar level |
| Protects against Kaminsky-style forged response injection | Misconfiguration causes a complete domain outage (SERVFAIL) |
| Enables DANE, binding TLS certificates to DNS records | RRSIG signatures expire and require active maintenance |
| Enables SSHFP, verifying SSH host keys via DNS | Key rollovers require careful coordination with the registrar |
| Provides authenticated denial of existence (NSEC/NSEC3) | Increases DNS response size (adds RRSIG + DNSKEY records) |
| Required for some government and compliance frameworks | Not all DNS providers/registrars support it |
| Free to enable, no ongoing certificate cost | NSEC records can enable zone enumeration (use NSEC3) |
| Increasingly automated by major DNS providers | Amplification: larger responses can be abused in DDoS |
| Protects users even when they can’t see it working | Low validator adoption limits end-to-end protection |
How to Check if Your Domain Has DNSSEC
Before configuring DNSSEC, verify your current status. There are multiple ways to check:
Method 1: HasheTools DNS Lookup
The quickest method for most users: go to hashetools.com, open the DNS Lookup tool, enter your domain, and look for DNSKEY and RRSIG records in the results. If they appear, DNSSEC is enabled. If they don’t, it is not.
Method 2: Command Line (dig)
| Check for DNSSEC records using dig |
| # Check for DNSKEY record (your zone’s public key)
dig yourdomain.com DNSKEY +short # If DNSSEC is enabled, you’ll see output like: # 257 3 13 mdsswUyr3DPW132mOi8V9xESWE8jTo0d… (KSK) # 256 3 13 oJMRESz5E4gYzS/q6XDrvU1/6STjwd1D… (ZSK) # Check for RRSIG records (signatures over your A record) dig yourdomain.com A +dnssec +short # DNSSEC enabled: returns A record AND RRSIG record # DNSSEC not enabled: returns only A record, no RRSIG # Check DS record (published at your registrar / TLD) dig yourdomain.com DS +short # If no DS record: chain of trust is broken, DNSSEC not propagated |
Method 3: DNSSEC Analyser Tools
| Full DNSSEC chain validation: online tools |
| # ICANN DNSSEC Analyser:
# https://dnssec-analyzer.verisignlabs.com/yourdomain.com # DNSViz, detailed visual chain of trust analysis: # https://dnsviz.net/d/yourdomain.com/dnssec/ # Cloudflare DNSSEC Debugger: # https://dnssec-debugger.verisignlabs.com/ # Look for: # Green checkmarks = valid chain of trust # Red X = broken link in chain # Yellow warning = configuration issue (often expiring signatures) |
Interpreting Your Results
| What You See | What It Means |
|---|---|
| DNSKEY + RRSIG records present, DS record in TLD | DNSSEC is fully enabled, and the chain of trust is intact. |
| DNSKEY + RRSIG records present, no DS record | DNSSEC is configured in the zone, but the DS record is not submitted to the registrar. Chain of trust broken, not validated. |
| No DNSKEY, no RRSIG records | DNSSEC is not enabled on your domain. All DNS responses are unauthenticated. |
| RRSIG records present but expired | Signatures have passed their validity date. Validating resolvers return SERVFAIL. The domain is effectively unreachable. |
| SERVFAIL when querying your domain | DNSSEC is configured but broken, expired signatures, missing DS record, algorithm mismatch, or failed key rollover. Urgent fix required. |
How to Enable DNSSEC: Step-by-Step Guide
The exact steps vary by DNS provider and registrar, but the fundamental process is the same for everyone. Here is the complete workflow:
Before You Start: Confirm that both your DNS provider (who hosts your DNS zone) and your domain registrar (where you registered the domain) support DNSSEC. They may be the same company (e.g., if you use Cloudflare for both) or different companies (e.g., GoDaddy as registrar, AWS Route 53 as DNS provider). If your DNS provider doesn’t support DNSSEC, you’ll need to migrate your DNS before enabling it.
Step 1: Enable DNSSEC Signing in Your DNS Provider
- Log in to your DNS provider’s dashboard
- Navigate to the DNS settings for your domain
- Find the DNSSEC option (usually labelled ‘DNSSEC’, ‘DNS Security’, or ‘DNSSEC Signing’)
- Enable DNSSEC signing, the provider will generate a KSK and ZSK, and begin signing your zone.
- The provider will display a DS record (containing the KeyTag, Algorithm, DigestType, and Digest). Copy this exactly; you’ll need it in Step 2
Step 2: Submit the DS Record to Your Registrar
- Log in to your domain registrar (where you purchased the domain)
- Navigate to the DNS or DNSSEC settings for your domain
- Find the ‘Add DS Record’ or ‘DNSSEC’ section
- Enter the DS record values provided by your DNS provider: Key Tag, Algorithm, Digest Type, Digest.
- Save the DS record; the registrar will publish it in the TLD zone
- Wait for propagation, DS records typically propagate within 1–48 hours
Step 3: Verify the Chain of Trust
| Verify your complete DNSSEC chain after configuration |
| # Step 1: Confirm DNSKEY is published
dig yourdomain.com DNSKEY +short # Should return 2 records: one KSK (flags=257), one ZSK (flags=256) # Step 2: Confirm DS record is in the TLD zone dig yourdomain.com DS +short # Should return your DS record, matches the KSK hash # Step 3: Confirm RRSIG is present on your A record dig yourdomain.com A +dnssec # Should return: A record + RRSIG record # Step 4: Full chain validation dig yourdomain.com A +sigchase +trusted-key=/etc/trusted-key.key # Or use DNSViz online for a visual chain check |
Step 4: Set Up Monitoring
- Monitor RRSIG expiry: RRSIG records have an expiration date. Your DNS provider should auto-renew them, but set up an alert in case auto-renewal fails.
- Monitor DS record consistency: Periodically verify that the DS record at your registrar matches your current KSK.
- Set up DNSSEC failure alerts: Tools like Zabbix, Nagios, or cloud monitoring services can alert you if your domain starts returning SERVFAIL.
- Use HasheTools DNS Lookup regularly: Quick periodic checks confirm DNSKEY and RRSIG records remain present and valid.
Key Rollover: The Critical Ongoing Operation: ZSK rotation should happen every 30–90 days. KSK rotation is less frequent (annually or as needed) but more complex; it requires updating the DS record at your registrar. Most managed DNS providers handle ZSK rotation automatically. KSK rotation typically requires manual action: generate new KSK → publish both old and new DNSKEY simultaneously (pre-publication) → update DS record at registrar → remove old DNSKEY after DS has propagated. Never remove the old DNSKEY before the new DS record has propagated globally.
DNSSEC by DNS Provider: Quick Reference
DNSSEC support and ease of configuration vary significantly by provider. This table covers the most commonly used DNS providers and registrars as of 2026:
| Provider | DNSSEC Support | Auto Key Mgmt | How to Enable |
|---|---|---|---|
| Cloudflare | Full | Automatic | DNS → DNSSEC tab → Enable DNSSEC. The DS record is displayed automatically. |
| AWS Route 53 | Full | Automatic | Hosted Zone → Enable DNSSEC Signing → Register DS with registrar. |
| Google Cloud DNS | Full | Automatic | Cloud DNS → Zone → DNSSEC → Enable. DS record provided. |
| Cloudflare Registrar | Full | Automatic | One-click if DNS is also on Cloudflare, DS is submitted automatically. |
| GoDaddy DNS | Partial | Manual keys | Domain Settings → DNS → DNSSEC. Must manage key rotation manually. |
| Namecheap | Partial | Limited | Advanced DNS → DNSSEC. Key management support varies by plan. |
| Name.com | Supported | Manual | Manage Domain → DNS Records → DNSSEC Records. |
| Porkbun | Supported | Auto if Porkbun DNS | Domain → Edit → DNSSEC. Auto if using Porkbun DNS. |
| cPanel / WHM | Depends | Provider-dependent | Depends on the hosting provider’s DNS server configuration. |
| Generic BIND | Full (manual) | Manual only | Use dnssec-keygen + dnssec-signzone. Requires significant expertise. |
| PowerDNS | Full | Auto-signing | pdnsutil secure-zone yourdomain.com, then submit the DS record. |
Recommendation: Use a Provider That Automates DNSSEC: The biggest cause of DNSSEC-related outages is expired RRSIG signatures that weren’t refreshed in time. Choosing a DNS provider that handles key generation, zone signing, and signature renewal automatically (Cloudflare, AWS Route 53, Google Cloud DNS) eliminates the most dangerous operational risks. If your current provider doesn’t support automatic DNSSEC management, consider migrating your DNS before enabling DNSSEC.
DNSSEC and Email Security: The Connection
DNSSEC has a direct and important relationship with email security, specifically through DANE (DNS-based Authentication of Named Entities), an extension that allows you to publish your mail server’s TLS certificate fingerprint in DNS and have it validated via DNSSEC.
What is DANE?
DANE (RFC 7671) allows you to publish a TLSA record in DNS that specifies which TLS certificate or Certificate Authority your mail server uses. Receiving mail servers that support DANE can verify this record, and reject connections if the certificate doesn’t match, even if the presented certificate is ‘valid’ according to traditional CA verification.
This closes a significant gap in email security: traditional STARTTLS encryption for email is opportunistic and can be stripped by a man-in-the-middle attacker. DANE makes TLS enforcement mandatory and verifiable.
| DANE TLSA record for email: published in DNSSEC-signed zone |
| # TLSA record for your mail server (MX record host)
# Format: _port._protocol.hostname TLSA usage selector matchingtype hash _25._tcp.mail.yourdomain.com. IN TLSA 3 1 1 ( AB12CD34EF56… ) # Usage 3 1 1 = DANE-EE: Domain-issued cert, SubjectPublicKeyInfo, SHA-256 # Requires: DNSSEC enabled on yourdomain.com + STARTTLS on your mail server |
DNSSEC + Email Authentication Stack
| Protocol | Role in Email Security |
|---|---|
| SPF | Authorises sending IPs for your domain (DNS TXT record, benefits from DNSSEC authentication) |
| DKIM | Cryptographically signs email messages (DNS TXT record, DNSSEC prevents forging of public key) |
| DMARC | Enforces SPF/DKIM policy and alignment (DNS TXT record, DNSSEC prevents policy tampering) |
| BIMI | Displays brand logo in inbox (DNS TXT record, DNSSEC prevents logo URL hijacking) |
| DANE / TLSA | Pins TLS certificate for SMTP, requires DNSSEC. Makes opportunistic TLS into verified TLS. |
| MTA-STS | Alternative to DANE for enforcing SMTP TLS, does not require DNSSEC, but is complementary |
The key insight: SPF, DKIM, DMARC, and BIMI records are all DNS TXT records. Without DNSSEC, an attacker with access to a poisoned resolver could forge any of these records, serving a modified SPF record that authorises their own servers, or a modified DKIM public key that lets them forge signed messages. DNSSEC protects the integrity of your entire email authentication infrastructure.
DNSSEC vs. DNS-over-HTTPS: Understanding the Difference
These two technologies are frequently confused because they both improve DNS security. They are complementary, not competing; they solve different problems at different layers.
| Attribute | DNSSEC | DNS-over-HTTPS (DoH) |
|---|---|---|
| What it protects | DNS data integrity and origin authenticity | DNS query privacy in transit |
| What it prevents | Cache poisoning, forged responses | Eavesdropping, on-path query manipulation |
| Encryption | No, data travels in plaintext | Yes, full encryption of DNS query and response |
| Authentication | Yes, cryptographic proof of record origin | No, doesn’t verify record authenticity |
| Where configured | DNS zone (server-side) + registrar | Client device or resolver |
| Failure mode | SERVFAIL (breaks resolution) | Falls back to standard DNS if DoH is unavailable |
| Protects against the ISP | No, ISP can still see (not forge) records | Yes, ISP cannot see or modify queries |
| Required by | DANE, SSHFP, some compliance frameworks | Privacy regulations, some enterprise policies |
| 2026 adoption | < 25% of domains | ~35% of DNS queries globally (Mozilla/Cloudflare) |
Use both: DNSSEC validates that the DNS records themselves are authentic. DoH ensures that nobody on the network path can observe or tamper with your DNS queries. Together, they provide comprehensive DNS security: authenticated data delivered over an encrypted channel.
The Complete DNS Security Stack for 2026: Enable DNSSEC on your domain (protects your DNS records from forgery) + Enable DoH/DoT on your resolver and endpoints (protects query privacy and on-path manipulation) + Enable DANE/TLSA for your mail servers (cryptographically binds your TLS certificates to DNSSEC) + Monitor continuously with HasheTools (catches misconfigurations and attacks early). This four-layer approach closes the major DNS attack surfaces described in this guide.
Frequently Asked Questions
What happens if DNSSEC is misconfigured?
Validating resolvers like Google (8.8.8.8), Cloudflare (1.1.1.1), and Quad9 will return SERVFAIL, making your website, email, and all DNS-dependent services completely unreachable. This is why monitoring RRSIG expiry and DS record consistency is critical after enabling DNSSEC.
Will DNSSEC slow down my DNS resolution?
Marginally. It adds a few milliseconds of cryptographic validation and slightly larger responses, but in practice, the impact is negligible. Responses are still cached normally, and the security benefit far outweighs the cost.
Do I need DNSSEC if I already use Cloudflare or a CDN?
Yes. CDNs protect at the application layer, but they can’t stop DNS cache poisoning at the resolver level. An attacker who poisons a resolver redirects users before they ever reach your CDN. DNSSEC stops the attack before that happens.
What algorithm should I use?
ECDSA P-256 with SHA-256 (Algorithm 13) is the 2026 recommendation, strong security, small keys, and fast validation. Ed25519 (Algorithm 15) is a great alternative. Avoid RSA-SHA1; SHA-1 is cryptographically deprecated.
How do I fix a broken DNSSEC chain?
Use DNSViz (dnsviz.net) to identify the broken link. Expired RRSIG, re-sign the zone. Missing DS record, resubmit it to your registrar. Missing DNSKEY, re-enable signing in your DNS provider. Then verify with HasheTools DNS Lookup and allow up to 48 hours for propagation.
Is DNSSEC required by regulations?
Yes, in several frameworks. US OMB mandates it for all .gov domains. The EU’s NIS2 Directive requires it for critical infrastructure operators. PCI-DSS v4.0 includes relevant DNS security controls. Many government procurement contracts now extend this requirement to vendor domains.
Conclusion
DNSSEC fixes a fundamental flaw in the Internet’s infrastructure, one that no amount of application-layer security can patch. Without it, your DNS records, including SPF, DKIM, and DMARC, can be silently forged against vulnerable resolvers.
The operational barrier is lower than ever. Major providers like Cloudflare, AWS Route 53, and Google Cloud DNS automate key management and signature renewal entirely. Enabling DNSSEC can take under five minutes.
In 2026, it shouldn’t be optional. Pair it with DoH/DoT for transport privacy, DANE for mail server certificate pinning, and continuous monitoring, because when DNS is compromised, everything built on top of it is at risk.
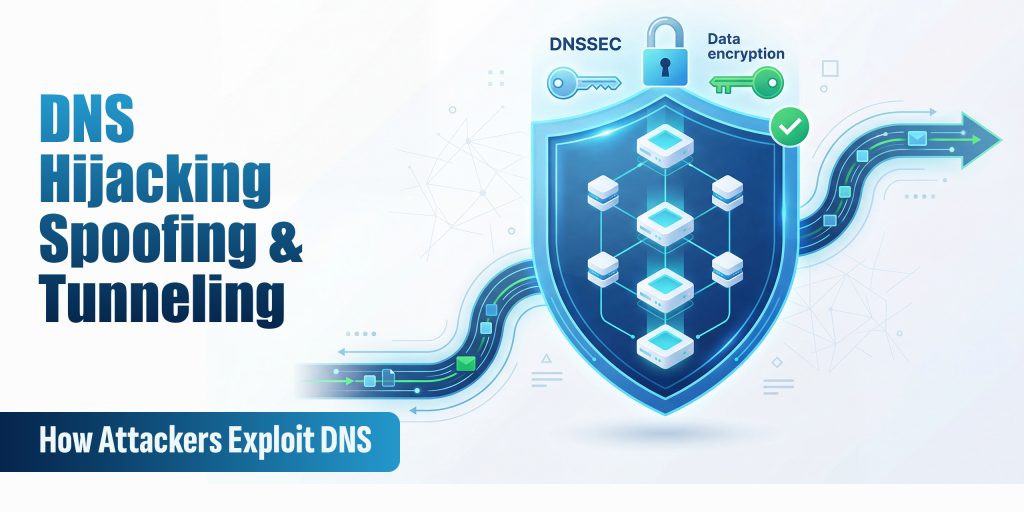
DNS Hijacking, Spoofing & Tunneling: How Attackers Exploit DNS in 2026
DNS hijacking, spoofing, and tunneling are cyberattack techniques that exploit the Domain Name System, the internet’s directory service, to redirect users to malicious sites, intercept traffic, or secretly exfiltrate data. Because virtually all network traffic relies on DNS, attackers who can manipulate DNS responses gain powerful control over what a user or system actually connects to.
Why DNS Is a Prime Target
DNS was designed in the 1980s for a small academic network. Security was never a priority. Most DNS traffic travels unencrypted over UDP port 53, making it observable, interceptable, and manipulable by anyone on the network path between your device and the DNS server.
What makes it especially dangerous:
- Unencrypted by default: DNS queries are transmitted in plaintext, visible to any observer
- Trust-based and stateless: resolvers accept the first matching response; they don’t verify the sender’s identity
- Cached responses: a poisoned cache entry persists for its full TTL, affecting every user on that resolver
- Rarely monitored: most organisations actively watch HTTP/HTTPS traffic but treat DNS as invisible infrastructure
DNS is exploited at every stage of a modern attack: reconnaissance, phishing, command-and-control, and data exfiltration, all hiding inside a protocol that firewalls seldom block.
DNS Hijacking: The Redirect Attack
DNS hijacking alters DNS resolution so that a domain resolves to an IP address controlled by an attacker. Unlike spoofing, hijacking involves persistent modifications to DNS infrastructure, making it harder to detect and longer-lasting.
Types of DNS Hijacking
| Type | How It Works |
| Router hijacking | An attacker compromises your router and changes its DNS server settings to a rogue resolver |
| Local hijacking | Malware modifies the local hosts file or DNS client settings on your device |
| Registrar hijacking | An attacker gains access to your registrar account and changes your authoritative nameservers |
| Authoritative NS hijack | Attacker compromises the nameserver itself; changes affect every resolver worldwide |
Real-World Example: DNSpionage
The DNSpionage campaign (2018–2019, attributed to Iranian threat actors) compromised domain registrar accounts for government and commercial targets across the Middle East, redirecting traffic through attacker-controlled servers and capturing credentials for months before detection. Nation-state actors continue to use registrar-level hijacking as a primary espionage technique in 2026.
Signs Your Domain May Be Hijacked
- DNS propagation checkers show different IPs across global resolvers
- Your registrar sends unexpected NS record change notifications
- SSL/TLS certificate monitoring fires unexpectedly for your domain
- Users report being redirected to login pages that look like yours
- Unexpected DMARC reports show unfamiliar sending sources
DNS Spoofing & Cache Poisoning
DNS cache poisoning injects a fraudulent DNS record into a recursive resolver’s cache. Once poisoned, the resolver serves the attacker’s forged answer to every client that queries for that domain, until the cache entry expires.
How It Works
DNS resolvers accept UDP responses that match the query’s transaction ID (a 16-bit number). If an attacker can guess or brute-force that ID and send a forged response before the legitimate nameserver replies, the resolver accepts and caches the fake answer.
In 2008, researcher Dan Kaminsky demonstrated a devastating variant that could poison a resolver in seconds, forcing emergency patching of nearly all DNS software worldwide. In 2026, modern variants combine Kaminsky-style flooding with IP fragmentation exploitation and side-channel timing attacks.
Hijacking vs. Spoofing: Key Differences
| Attribute | DNS Spoofing / Cache Poisoning | DNS Hijacking |
| Target | Recursive resolver cache | DNS infrastructure (registrar, NS, router) |
| Persistence | Temporary (until TTL expires) | Persistent until discovered |
| Requires system access? | No, network-level attack | Yes, account/system compromise |
| Affected users | All users of the poisoned resolver | All users of the domain globally |
| Primary defence | DNSSEC, DNS-over-HTTPS | Registrar lock, MFA, NS monitoring |
DNSSEC: The Technical Defence
DNSSEC cryptographically signs DNS records. A resolver that validates DNSSEC signatures can detect a forged response, even one with the correct transaction ID, because the signature won’t match. Despite being standardised in 2005, DNSSEC adoption remains below 30% globally, leaving the majority of DNS traffic vulnerable.
Check if your domain has DNSSEC enabled:
dig yourdomain.com DNSKEY +dnssec
# A valid response includes RRSIG records.
# If no RRSIG records appear, DNSSEC is not enabled.
DNS Tunneling: Hiding Data in Plain Sight
DNS tunneling encodes arbitrary data, commands, stolen files, malware payloads, inside DNS queries and responses. It exploits the fact that DNS traffic is almost universally permitted through firewalls, even in highly locked-down environments.
Firewalls block unusual outbound ports. But DNS on UDP port 53 is rarely blocked; doing so would break internet access entirely. Attackers build covert channels over a protocol that security teams rarely inspect.
What Gets Tunneled
- Command & control (C2): Malware receives attacker instructions via DNS TXT records, bypassing corporate firewalls entirely
- Data exfiltration: Sensitive files are base64-encoded and split across hundreds of DNS queries; the attacker’s nameserver reassembles them
- VPN bypass: Tools like iodine and dns2tcp create functional IP tunnels over DNS, enabling full internet access through captive portals
- Malware staging: Payloads are downloaded through DNS, bypassing HTTP/HTTPS filtering
What Tunneled Traffic Looks Like
# LEGITIMATE: Short subdomain, common record type
dig hashetools.com A
# hashetools.com. 300 IN A 104.21.45.67
# TUNNELED: Long encoded subdomain, TXT record
dig aGVsbG8gd29ybGQgdGhpcyBpcyBzdG9sZW4gZGF0YQ.evil.com TXT
# Red flags: long base64 subdomain + TXT query + unknown domain
DNS Tunneling Red Flags
| Indicator | Why It’s Suspicious |
| Subdomain length > 50 characters | Legitimate subdomains are short; long base64 labels indicate data encoding |
| High query rate to a single domain | Tunneling tools make rapid-fire queries abnormal for legitimate use |
| Unusual record types (TXT, NULL) | Tunneling tools favour TXT records to carry payload data |
| Unknown or newly registered domains | Attacker infrastructure is often freshly registered |
| Large DNS response sizes | TXT records carrying C2 commands are far larger than typical responses |
DNS Rebinding Attacks
DNS rebinding tricks a victim’s browser into treating an attacker-controlled server as if it were on the victim’s local network, bypassing the same-origin policy and exposing internal services.
How it works:
- Victim visits attacker’s domain (via phishing or malicious ad)
- Domain resolves to the attacker’s real server with a very short TTL (1 second)
- TTL expires; next DNS lookup returns a private IP (192.168.x.x or 10.x.x.x)
- The browser now treats the attacker’s domain as a local network address
- JavaScript can now read responses from routers, NAS devices, internal panels, and IoT devices, with no authentication required.
Most home routers rely on “protected by not being on the internet” as their only security. DNS rebinding destroys that assumption.
DNS Amplification: DDoS via DNS
DNS amplification exploits open DNS resolvers to amplify attack traffic by 50–100x. The attacker sends a small query spoofing the victim’s IP, and the resolver sends a much larger response to that victim, overwhelming their bandwidth without requiring significant botnet resources.
A single DNS ANY query (~40 bytes) can generate a 3,000+ byte response. Multiplied across thousands of open resolvers, the result is a massive volumetric DDoS.
Defences:
- Never run an open DNS resolver
- Implement BCP38 source address validation at the network edge
- Enable DNS Response Rate Limiting (RRL)
- Disable or minimise responses to ANY queries (RFC 8482)
AI-Driven DNS Attacks in 2026
The most significant shift in 2026 is the convergence of AI with DNS exploitation.
- AI-generated phishing infrastructure: ML models generate hundreds of near-identical lookalike domains that pass traditional brand-similarity checks
- Staged pre-positioning: Attackers register domain infrastructure weeks or months before activation. Spikes in newly observed domains precede phishing campaigns by 2-6 weeks.
- ML-evasive DGAs: Deep learning domain generation algorithms produce names statistically indistinguishable from legitimate traffic, defeating entropy-based detection
- Automated reconnaissance: AI scans DNS records at scale to identify misconfigured zones, forgotten subdomains, and exposed internal services faster than any human analyst
The defender’s response requires ML-powered DNS monitoring that evaluates domains in full context, query frequency, registration age, certificate transparency logs, and geographic patterns, rather than simple blocklists.
How to Detect DNS Attacks
Command-Line Checks
# Check your authoritative nameservers for unexpected changes
dig yourdomain.com NS +short
# Compare responses across global resolvers — inconsistency signals poisoning
dig @8.8.8.8 yourdomain.com A +short
dig @1.1.1.1 yourdomain.com A +short
dig @208.67.222.222 yourdomain.com A +short
# Detect tunneling — look for anomalously long subdomain queries in logs
grep -E ‘query: [a-zA-Z0-9+/]{50,}\.’ /var/log/named/query.log
Anomaly Reference Table
| Anomaly | Likely Attack |
| Sudden NS record change | Registrar/domain hijacking |
| Domain resolves to different IPs across resolvers | Cache poisoning |
| Spike in NXDomain responses | DGA malware C2 search |
| Base64-encoded subdomain queries | DNS tunneling/data exfiltration |
| Very short TTL (1–5 seconds) on your records | DNS rebinding preparation |
| High-volume TXT queries to an unknown domain | DNS tunneling C2 channel |
| Internal hosts querying external resolvers directly | Malware bypassing internal DNS |
DNS Security Checklist
Domain & Registrar
- Enable registrar lock (transfer lock) on all domains
- Enable MFA on your registrar account, use an authenticator app, not SMS
- Set up registrar alerts for any NS, A, or MX record changes
- Monitor NS records continuously and verify they match expected values
DNSSEC & Encrypted DNS
- Enable DNSSEC on all domains
- Verify DNSSEC validation: dig yourdomain.com A +dnssec
- Enable DNS-over-HTTPS (DoH) or DNS-over-TLS (DoT) on endpoints
- Use a validating resolver: Cloudflare 1.1.1.1, Google 8.8.8.8, or Quad9 9.9.9.9
Email Authentication
- Publish SPF record for all sending domains
- Configure DKIM signing on outgoing mail
- Enforce DMARC at p=reject
- Implement BIMI for verified logo display in Gmail and Yahoo
Network & Resolver Hardening
- Never run an open DNS resolver
- Implement DNS Response Rate Limiting (RRL)
- Enable BCP38 source address validation at the network edge
- Block outbound DNS from endpoints to anything except your authorised resolvers
- Subscribe to certificate transparency monitoring for your domain
Conclusion
DNS remains one of the most critical and most overlooked components of internet security. In 2026, attackers exploit it through hijacking, spoofing, tunneling, rebinding, amplification, and, increasingly, AI-enhanced techniques that evade traditional detection.
The good news is that most of these attacks are detectable and preventable with the right foundations. Enable DNSSEC. Use DNS-over-HTTPS. Lock your registrar. Monitor your records. Enforce email authentication. And treat DNS logs as a frontline security signal, not background noise.
DNS security is not a set-and-forget task. It requires continuous vigilance, layered defences, and awareness of how the threat landscape evolves, starting with understanding the attacks described here.
What is BIMI? How to Add Your Brand Logo to Gmail & Yahoo Inboxes
BIMI (Brand Indicators for Message Identification) is an email standard that lets you display your brand’s verified logo directly in the inbox, next to your email subject line, in Gmail, Yahoo Mail, Apple Mail, and other supporting providers. It requires DMARC enforcement (p=quarantine or p=reject) and, for Gmail and Apple Mail, a Verified Mark Certificate (VMC). BIMI turns email authentication into a visible trust signal that boosts open rates and protects your brand from impersonation.
What is BIMI?
BIMI stands for Brand Indicators for Message Identification. It is an open email specification published by the AuthIndicators Working Group that allows organizations to display a verified brand logo in the inbox avatar slot, the small image next to the sender name and subject line.
In plain terms: BIMI puts your logo in the inbox before your email is even opened. Instead of seeing a generic initial or a grey placeholder, your recipients see your real brand logo, verified and authenticated.
BIMI sits at the top of the email authentication stack. It builds on three lower-level protocols, SPF, DKIM, and DMARC, and adds a visual, human-readable layer of trust on top of them.
| Protocol | Checks | Visible to Recipients? | Required for BIMI? |
|---|---|---|---|
| SPF | Sender IP authorization | No | Yes (indirectly via DMARC) |
| DKIM | Message integrity signature | No | Yes (indirectly via DMARC) |
| DMARC | From: domain alignment + policy | No | Yes, must be enforced |
| BIMI | Brand logo display | Yes, logo in inbox | The reward layer |
The key insight: BIMI is not a standalone tool. It is the visible payoff for correctly implementing the full email authentication stack. You cannot shortcut to BIMI; the foundation must be solid first.
BIMI vs. Google Profile Photos: You may have seen sender avatars in Gmail that come from Google account profile photos or company logos set through Google Workspace. These are different from BIMI. BIMI logos are cryptographically verified against your domain via a Verified Mark Certificate; they cannot be faked or impersonated by another sender.
Why BIMI Matters in 2026
Email inboxes are more crowded and more dangerous than ever. AI-generated phishing emails now closely mimic legitimate brand communications. Recipients are increasingly skeptical of emails from brands they don’t immediately recognize visually.
BIMI addresses this from multiple angles simultaneously:
For Brand Trust & Recognition
- Instant visual recognition: Your logo appears before the email is opened, and recipients know it’s really you at a glance
- Verified authenticity: The VMC proves the logo belongs to your trademarked brand; it cannot be spoofed
- Reduced inbox anxiety: 53% of consumers say they’ve received legitimate brand emails they didn’t trust (Sinch). BIMI eliminates that doubt
For Email Performance
- Open rate lift: Research shows an average 10% increase in open rates for BIMI-enabled senders
- Inbox differentiation: Your email stands out visually against competitors who haven’t implemented BIMI
- Spam filter confidence: BIMI-enabled domains signal strong authentication hygiene, which can positively affect deliverability scoring
For Security
- Anti-impersonation: Attackers cannot display your verified logo without your VMC private key
- DMARC enforcement prerequisite: Getting to BIMI forces you to fully implement DMARC at p=reject, which protects your domain from spoofing entirely
- Domain reputation signal: Inbox providers treat BIMI-enabled domains as high-trust senders
2026 Competitive Reality: Fortune 500 companies are at 81.2% BIMI readiness. If your competitors’ logos show up in Gmail and yours don’t, that’s a visible trust gap. BIMI is moving from early-adopter advantage to table-stakes expectation for professional email senders.
DNS Records for ns1.dns-parking.com
How BIMI Works: Step by Step
When you send an email to a BIMI-supporting inbox provider, this is what happens behind the scenes:
- You send an email from your authenticated domain
- The receiving mail server checks SPF and DKIM; both must pass for your domain
- The server evaluates your DMARC policy; it must be p=quarantine or p=reject
- If DMARC passes, the server looks up your BIMI record at default._bimi.yourdomain.com
- The BIMI record contains a URL to your SVG logo and, optionally, your VMC certificate URL
- The inbox provider fetches your SVG logo from the URL in your BIMI record
- If a VMC is present, it is validated against your domain to confirm the logo is legitimately yours
- Your logo appears in the inbox next to your email, verified and authenticated
Why Providers Check DMARC First: Without DMARC enforcement, any attacker could publish a BIMI record claiming your logo. DMARC enforcement is the gate that proves you control the domain and all email from it is authenticated. BIMI without DMARC would be a spoofing attack vector; that’s why the requirement exists.
Which Inbox Providers Support BIMI?
BIMI support has expanded significantly since 2022. Here is the current state as of 2026:
| Inbox Provider | VMC Required? | DMARC Policy Needed | Notes |
| Gmail | Required | p=quarantine or p=reject | Requires VMC from DigiCert or Entrust. Largest user base, highest BIMI value. |
| Yahoo Mail | Optional | p=quarantine or p=reject | Supports self-asserted BIMI without VMC if the domain reputation is sufficient. |
| Apple Mail | Required | p=quarantine or p=reject | Requires VMC. Supported since iOS 16 / macOS Ventura. |
| Fastmail | Optional | p=quarantine or p=reject | Supports BIMI without VMC. |
| Cloudmark | Optional | p=quarantine or p=reject | Supports BIMI, VMC optional. |
| La Poste | Optional | p=quarantine or p=reject | French provider, BIMI, supported since Aug 2022. |
| Zone Webmail | Required | p=quarantine or p=reject | VMC required for logo display. |
| Outlook/M365 | Pending | N/A | Microsoft has announced BIMI support, but full rollout is still limited as of 2026. |
Practical priority: Focus on Gmail first, it has the largest user base and the clearest requirements. Yahoo is a strong second because you can display logos there without a VMC while you pursue Gmail support.
BIMI Requirements: What You Need Before You Start
BIMI has a clear prerequisite chain. Think of it as a checklist you work through from bottom to top:
- SPF record published: all sending services authorized on your root domain
- DKIM configured: every platform sending as your domain signs messages with DKIM
- DMARC published: and escalated to p=quarantine or p=reject (p=none does not qualify)
- DMARC pass rate consistently above 98%: check your aggregate reports
- SVG logo in SVG Tiny PS format: hosted at a permanent HTTPS URL
- VMC obtained (for Gmail & Apple Mail): from DigiCert or Entrust
- BIMI DNS TXT record published at default._bimi.yourdomain.com
Common Mistake: Jumping to BIMI Too Early: The most common BIMI setup failure is attempting it before DMARC is fully enforced. If your DMARC is at p=none, or your pass rate is below 95%, BIMI logos will not display in Gmail, even with a valid VMC. Complete the DMARC escalation path first, then pursue BIMI.
How to Run a Traceroute (tracert) Command
The Verified Mark Certificate (VMC) Explained
What is a VMC?
A Verified Mark Certificate (VMC) is a digital certificate, similar in concept to an SSL certificate, that cryptographically verifies that a logo belongs to the trademarked owner of a domain. It is issued by authorized Certificate Authorities (CAs) after validating your trademark registration.
The VMC is what makes BIMI trusted. Without it, any domain could claim any logo. The VMC proves that the logo in your BIMI record belongs to your organization’s registered trademark.
VMC Requirements
- Registered trademark: You must have a registered trademark (not just a pending application) for your logo in at least one major trademark jurisdiction (USPTO, EUIPO, UKIPO, CIPO, IP Australia, INPI, or NIPO)
- SVG Tiny PS logo: The logo must exactly match your trademarked image and be in SVG Tiny PS format
- Authorized CA: VMCs are currently issued by DigiCert (digicert.com/verified-mark-certificates) and Entrust (entrust.com)
- Domain ownership: You must prove control of the domain for which the VMC is issued
VMC Cost & Renewal
VMC certificates typically cost between $1,200–$1,500 USD per year from DigiCert or Entrust. They must be renewed annually. For organizations sending meaningful email volume, the open rate and brand trust improvements make this cost-effective, but for very small senders (under a few thousand emails/month), the ROI may not yet justify it.
What is a CMC?
CMC (Common Mark Certificate) is a newer alternative to VMC that does not require a registered trademark. It is supported by some providers (notably Apple Mail) and verifies brand identity through other means. As of 2026, CMC adoption among inbox providers is still growing. VMC remains the primary standard for Gmail support.
Strategy: Start with Yahoo, While Getting Your VMC: If you don’t have a VMC yet, don’t wait. Publish your BIMI record without the VMC certificate URL (omit the a= tag). Yahoo Mail and Fastmail will display your logo based on domain reputation alone. This gives you immediate BIMI benefits while your VMC application is in progress.
How to Prepare Your SVG Logo for BIMI
One of the most common BIMI failures comes from using an incorrect SVG format. BIMI doesn’t accept just any SVG; it requires a specific subset called SVG Tiny PS (Portable Secure). Here’s exactly what that means and how to get it right.
SVG Tiny PS Requirements
- Format: SVG Tiny 1.2, Portable/Secure profile (SVG Tiny PS)
- Shape: Must be a perfect square with equal width and height (e.g., 300×300 viewBox)
- Background: Must have a solid, opaque background; transparent backgrounds are not allowed
- No external references: No linked images, external fonts, JavaScript, animations, or raster images embedded inside
- Single file: Fully self-contained, all paths and shapes defined within the SVG file
- File size: Keep under 32KB for best compatibility
- MIME type: Must be served with Content-Type: image/svg+xml (not text/plain or application/xml)
What is NOT Allowed in BIMI SVGs
- Transparent or semi-transparent backgrounds
- Raster images (PNG, JPG) embedded inside the SVG
- JavaScript or scripting of any kind
- Animations (including CSS animations)
- External font references (@font-face with external URLs)
- Filters and effects (blur, drop-shadow, etc.)
- Linked external resources (xlink:href to external files)
How to Create a BIMI-Compliant SVG
Option 1: Adobe Illustrator:
- Create or open your Square logo in Illustrator
- Ensure the artboard is perfectly square
- Add a solid background rectangle if none exists
- Go to File → Save As → SVG → click More Options → set Profile to SVG Tiny 1.2
- Validate the output with a BIMI SVG validator
Option 2: Inkscape (free):
- Open your logo in Inkscape
- Set Document Properties to a square canvas
- Add a solid background rectangle
- File → Save As → SVG Tiny 1.2
- Manually review the XML to remove any disallowed attributes
Option 3: Professional BIMI SVG services:
Services like BIMI Inspector (bimigroup.org/creating-bimi-svg-logo-files) provide validation tools and guidelines. Some VMC providers (DigiCert, Entrust) offer SVG conversion assistance as part of the certificate process.
Hosting Your BIMI SVG
- URL must be HTTPS: plain HTTP will cause BIMI to fail silently
- No authentication required: the file must be publicly accessible without login or redirect
- No redirects: serve the SVG directly at the URL in your BIMI record
- Correct Content-Type header: Content-Type: image/svg+xml
- No hotlink protection: inbox providers’ servers must be able to fetch the file
- Stable URL: if you move the file, update your BIMI record. Broken logo URLs = no BIMI display
Step-by-Step: Add BIMI to Gmail
Confirm you have: (1) DMARC at p=quarantine or p=reject with pct=100, (2) DMARC pass rate consistently above 98%, check your DMARC aggregate reports, (3) SVG logo in SVG Tiny PS format hosted at an HTTPS URL, (4) VMC from DigiCert or Entrust with the .pem certificate file hosted at an HTTPS URL.
Step 1: Obtain Your VMC
- Go to DigiCert (digicert.com) or Entrust (entrust.com)
- Select ‘Verified Mark Certificate’ and begin the application
- Submit your trademark registration details (jurisdiction + registration number)
- Upload your SVG Tiny PS logo file for validation
- Complete domain validation (DigiCert will verify you control the domain)
- Wait for certificate issuance, typically 3–10 business days
- Download the .pem certificate file
Step 2: Host Your Certificate
- Upload your VMC .pem file to a stable HTTPS URL on your website
- Example: https://yourdomain.com/bimi/vmc.pem
- Ensure the file is publicly accessible with no authentication or redirect
- Confirm Content-Type is application/x-pem-file
Step 3: Host Your SVG Logo
- Upload your BIMI-compliant SVG logo to a stable HTTPS URL
- Example: https://yourdomain.com/bimi/logo.svg
- Test that the URL is publicly accessible in an incognito browser window
- Confirm Content-Type header is image/svg+xml
Step 4: Publish Your BIMI DNS Record
- Log in to your DNS provider (Cloudflare, Route 53, GoDaddy, Namecheap, etc.)
- Create a new TXT record with:
| Field | Value |
|---|---|
| Name / Host | default._bimi (some providers add your domain automatically; check their docs) |
| Type | TXT |
| Value | v=BIMI1; l=https://yourdomain.com/bimi/logo.svg; a=https://yourdomain.com/bimi/vmc.pem |
| TTL | 3600 (1 hour) or your provider’s default |
| DNS TXT record: default._bimi.yourdomain.com |
| v=BIMI1; l=https://yourdomain.com/bimi/logo.svg; a=https://yourdomain.com/bimi/vmc.pem |
Step 5: Verify with HasheTools
- Go to hashetools.com and open the BIMI Lookup tool
- Enter your domain name and click Check BIMI
- The tool will retrieve and validate: BIMI record syntax, SVG URL accessibility, VMC certificate validity, DMARC compliance
- Address any warnings or errors before sending a test email
Step 6: Send a Test Email to Gmail
- Send an email from your domain to a Gmail account you control
- Check the inbox; your logo should appear in the avatar circle next to the sender’s name
- Allow up to 24–48 hours for Gmail’s systems to pick up and cache your BIMI record
- If the logo doesn’t appear: use Gmail’s Postmaster Tools to check your domain reputation; low-reputation domains may not qualify even with a valid VMC
Step-by-Step: Add BIMI to Yahoo Mail
Yahoo Mail is the easiest path to BIMI because it supports logo display without a VMC, provided your domain has sufficient sending reputation with Yahoo’s filter systems.
Yahoo BIMI Without a VMC: You can display your logo in Yahoo inboxes by publishing a BIMI record with just the l= (logo URL) tag and no a= (VMC) tag. Yahoo evaluates your domain’s sending reputation and engagement history to decide whether to show the logo. This makes Yahoo the ideal first step in your BIMI rollout.
Step 1: Confirm DMARC Enforcement
Check your DMARC record using HasheTools DMARC Lookup. Confirm the policy is p=quarantine or p=reject. Yahoo will not show BIMI logos for domains at p=none.
Step 2: Prepare and Host Your SVG Logo
Follow the same SVG Tiny PS format requirements covered in Section 7. Host the SVG at a publicly accessible HTTPS URL with the correct Content-Type header.
Step 3: Publish Your BIMI Record (No VMC Required for Yahoo)
| DNS TXT record, default._bimi.yourdomain.com (Yahoo, no VMC) |
| v=BIMI1; l=https://yourdomain.com/bimi/logo.svg |
The a= tag (VMC URL) is optional for Yahoo. If you already have a VMC, include it; it won’t hurt. If you don’t have one yet, the record above is sufficient to request the Yahoo logo display.
Step 4: Build Yahoo Sending Reputation
Yahoo’s decision to display your BIMI logo is also influenced by your sending reputation with Yahoo’s filter systems. To build a strong reputation:
- Maintain low spam complaint rates (below 0.1% ideally)
- Send to engaged subscribers who open and click
- Honor unsubscribes promptly
- Use consistent sending volumes and patterns
- Warm up new sending IPs gradually
Step 5: Test and Monitor
- Send a test email from your domain to a Yahoo Mail account you control
- Check whether your logo appears next to your sender name
- If it doesn’t appear immediately, give it 7–14 days. Yahoo caches BIMI lookups and reputation signals, which take time to accumulate
- Use Yahoo Sender Support (sendersupport.yahoo.com) to check for deliverability issues affecting logo display
CNAME Lookup: How to Check, Verify, and Understand CNAME Records
Your BIMI DNS Record: Syntax & Examples
Full BIMI Record Syntax
| DNS TXT, default._bimi.yourdomain.com |
| v=BIMI1; l=https://yourdomain.com/bimi/logo.svg; a=https://yourdomain.com/bimi/vmc.pem |
| Tag | Example | Meaning |
|---|---|---|
| v=BIMI1 | v=BIMI1 | Required. Declares this is a BIMI record. Must be first. |
| l= | l=https://domain.com/logo.svg | URL to your SVG Tiny PS logo. Must be HTTPS. No redirects. |
| a= | a=https://domain.com/vmc.pem | URL to your VMC .pem file. Required for Gmail & Apple Mail. Omit for Yahoo-only. |
BIMI Record Examples
Full BIMI with VMC (Gmail + Yahoo + Apple Mail):
| DNS TXT: default._bimi.yourdomain.com |
| v=BIMI1; l=https://yourdomain.com/bimi/logo.svg; a=https://yourdomain.com/bimi/vmc.pem |
Yahoo-only BIMI (no VMC):
| DNS TXT: default._bimi.yourdomain.com |
| v=BIMI1; l=https://yourdomain.com/bimi/logo.svg |
Subdomain-specific BIMI (for newsletters sent from newsletter.yourdomain.com):
| DNS TXT: default._bimi.newsletter.yourdomain.com |
| v=BIMI1; l=https://yourdomain.com/bimi/newsletter-logo.svg; a=https://yourdomain.com/bimi/vmc.pem |
Temporarily disabling BIMI (while updating logo/VMC):
| DNS TXT: default._bimi.yourdomain.com |
| v=BIMI1; l= |
BIMI Record Name Format: The BIMI record must be published at exactly default._bimi.yourdomain.com, where ‘default’ is the selector (like DKIM selectors). Most deployments use ‘default’. Some DNS providers auto-append your domain; enter just ‘default._bimi’ as the host in that case. Check your DNS provider’s documentation.
How to Verify Your BIMI Record with HasheTools
After publishing your BIMI record, use HasheTools’ free tools to confirm everything is correctly configured:
| HasheTools Tool | What It Checks for BIMI |
|---|---|
| BIMI Lookup | Retrieves your BIMI DNS record. Validates l= and a= URLs are accessible. Checks VMC validity. Shows how the logo will appear. Flags errors. |
| DMARC Lookup | Confirms your DMARC policy is at p=quarantine or p=reject, the mandatory BIMI prerequisite. |
| DNS Lookup → TXT | View all TXT records on your domain to confirm the BIMI record is published and correctly formatted. |
| DKIM Lookup | Verifies DKIM is configured, required for DMARC to pass, which is required for BIMI to activate. |
| Blacklist Check | Confirms your sending IPs are not on spam blocklists, critical for maintaining the reputation that BIMI requires. |
| MTA-STS Lookup | Validates secure email transport, part of a complete email authentication setup that supports BIMI. |
Manual Verification Commands
You can also verify your BIMI record using command-line tools:
| Terminal: Check BIMI record with dig |
| dig TXT default._bimi.yourdomain.com +short |
| Terminal: Check BIMI record with nslookup |
| nslookup -type=TXT default._bimi.yourdomain.com |
Troubleshooting Common BIMI Problems
Logo Not Showing in Gmail
| Cause | Fix |
|---|---|
| DMARC is not in enforcement | Escalate DMARC from p=none to p=quarantine or p=reject. This is mandatory for Gmail. |
| No VMC or invalid VMC | Obtain a VMC from DigiCert or Entrust. Ensure the .pem file is hosted at the URL in your a= tag. |
| SVG not in SVG Tiny PS format | Re-export your SVG using the SVG Tiny PS profile. Use Adobe Illustrator or Inkscape. Validate with BIMI Inspector. |
| SVG served with the wrong MIME type | Check your web server config. The SVG must be served with Content-Type: image/svg+xml. |
| SVG URL requires authentication | Make the SVG URL publicly accessible without login, cookies, or redirects. |
| Domain reputation too low | Check Google Postmaster Tools. Build reputation by improving engagement and reducing spam complaints. |
| BIMI record not propagated | Wait up to 48 hours after publishing. Use HasheTools DNS Lookup to confirm propagation. |
Logo Not Showing in Yahoo
| Cause | Fix |
|---|---|
| DMARC is not in enforcement | Same as Gmail, p=none will not work. |
| Insufficient sending reputation | Send to engaged Yahoo users consistently over time. Keep spam complaints very low. |
| SVG format issues | Use the same SVG Tiny PS format requirements as Gmail. |
| BIMI record syntax error | Use HasheTools BIMI Lookup to check for syntax issues in your DNS record. |
VMC Validation Errors
- ‘Certificate not found at URL’: Ensure the a= URL in your BIMI record points directly to the .pem file with no redirect.
- ‘Certificate expired’: VMCs must be renewed annually. Check your expiry date and renew with DigiCert or Entrust
- ‘Logo does not match certificate’: The SVG logo in your l= tag must exactly match the logo embedded in your VMC. Reissue the VMC if the logo has changed
- ‘Domain not covered’: The VMC must be issued for the exact domain in your From: address. Wildcard coverage varies by CA
Use BIMI Inspector for Deep Validation: The BIMI Group (bimigroup.org) provides a free BIMI Inspector tool that validates your full BIMI setup, SVG format, DNS record, VMC, and DMARC in one check. Use it alongside HasheTools BIMI Lookup for comprehensive verification before launch.
BIMI FAQs
Do I absolutely need a VMC for BIMI?
You need a VMC to display your logo in Gmail and Apple Mail. Yahoo Mail and Fastmail support BIMI without a VMC, based on domain reputation. If you don’t have a trademark registration, you can still benefit from Yahoo BIMI while working toward VMC eligibility.
How long does BIMI setup take from start to finish?
If you already have DMARC at p=reject, the technical BIMI setup (SVG + DNS record) can be done in a day. Obtaining a VMC typically takes 3–10 business days, depending on trademark verification. If you need to escalate DMARC first, plan for 4–12 weeks for the full authentication journey.
Will BIMI affect my email deliverability?
BIMI itself doesn’t directly change deliverability scoring, but the DMARC enforcement required to enable it does. Fully enforced DMARC at p=reject, combined with proper SPF and DKIM alignment, significantly improves how inbox providers perceive your domain’s trustworthiness, which can positively impact inbox placement over time.
Can I use BIMI on subdomains?
Yes. Publish a BIMI TXT record at default._bimi.subdomain.yourdomain.com for emails sent from that subdomain. Each subdomain needs its own BIMI record and its own DMARC policy (unless the parent domain policy covers subdomains via the sp= tag).
What is the difference between BIMI and a Google Avatar?
Google Workspace profile photos and manually set sender avatars are informal; they can be set by anyone. BIMI logos are cryptographically verified through a VMC and can only be displayed when the domain passes DMARC authentication. A BIMI logo carries a trust verification that an avatar does not.
Can multiple domains use the same VMC?
No. A VMC is issued for a specific domain and covers exactly that domain (or optionally a wildcard). Each domain that sends BIMI-authenticated email needs its own VMC.
Do I need to do anything special in Gmail to enable BIMI?
No action is needed on the Gmail side. Gmail automatically checks for BIMI records when evaluating incoming emails from domains that pass DMARC. The setup is entirely on your domain’s DNS and certificate side.
How often do I need to update my BIMI record?
Only when something changes: if you update your logo, change the SVG URL, renew your VMC (annually), or switch VMC providers. BIMI records themselves don’t expire; only the VMC certificate does.
Conclusion
BIMI (Brand Indicators for Message Identification) is no longer just a “nice-to-have”; it’s becoming a standard for trusted email communication in 2026. By displaying your verified logo in inboxes like Gmail, Yahoo Mail, and Apple Mail, BIMI boosts brand recognition, improves open rates, and protects your domain from spoofing and phishing.
However, BIMI is the reward for a properly authenticated email setup: SPF, DKIM, and DMARC must be correctly configured and enforced before your logo can appear. For Gmail and Apple Mail, a Verified Mark Certificate (VMC) ensures your logo is cryptographically verified, while Yahoo and Fastmail allow BIMI without a VMC based on domain reputation.
In short, implementing BIMI signals to recipients and inbox providers that your emails are authentic and trustworthy, giving your brand a visible edge in crowded inboxes. Start with DMARC enforcement, prepare your SVG Tiny PS logo, obtain a VMC if needed, and publish your BIMI DNS record. The payoff is a stronger brand presence and a safer email experience for your audience.
Stay Updated
Get the latest articles and tutorials delivered to your inbox