An IP address, short for Internet Protocol address, is a unique number used to identify a device or network on the internet. Every time you open a website, send an email, use an app, or connect to an online service, your device uses an IP address to communicate.
Think of an IP address like a digital return address. It tells websites and online services where to send information back after you request it.
For example, when you visit a website, your browser sends a request from your network’s IP address. The website then sends the page data back to that address so it can load on your screen.
According to ICANN, IPv4 addresses are usually written as four numbers separated by dots, while IPv6 addresses use a longer format designed to support the continued growth of the internet.
What Is My IP Address?
When people search for “what is my IP address?”, they usually want to see their public IP address.
Your public IP address is the address visible to websites, apps, servers, and online tools when you connect to the internet. It is usually assigned by your internet service provider, mobile network, office network, or VPN provider.
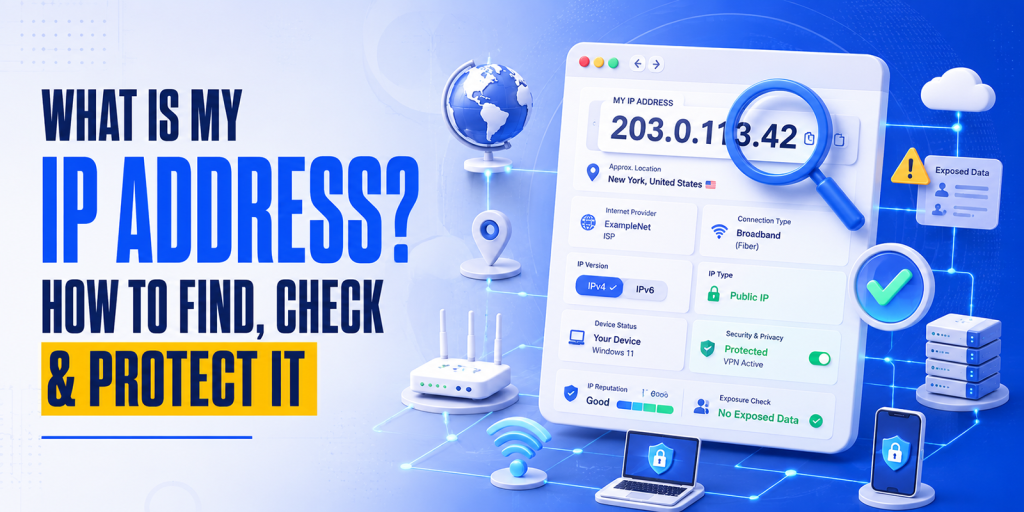
The easiest way to check it is to use the HasheTools My IP Address Lookup Tool. It automatically detects your public IP address and can show details such as IPv4 or IPv6 address, ISP, location, and VPN or proxy detection where available.
How to Check Your IP Address
You can check your IP address in just a few seconds.
Open the HasheTools My IP Address Lookup Tool, and the tool will automatically show your current public IP address. You do not need to log in, install software, or manually enter anything.
A good IP checker may show:
Your public IPv4 address
Your public IPv6 address, if available
Internet service provider
Approximate location
Browser or device-related connection details
VPN or proxy status, if detected
This is useful when troubleshooting websites, checking VPN connections, verifying server access rules, or confirming which IP address is visible to the internet.
Public IP Address vs Private IP Address
There are two common types of IP addresses: public IP addresses and private IP addresses.
Public IP Address
A public IP address is the address visible on the internet. Websites, apps, and online services can usually see this address when you connect to them.
Your public IP may belong to:
Your home internet connection
Your mobile data provider
Your office network
A VPN server
A proxy service
A cloud server
This is the IP address most online tools display when you search “what is my IP?”
Private IP Address
A private IP address is used inside a local network, such as your home Wi-Fi or office network. Your phone, laptop, printer, smart TV, and router may all have private IP addresses.
Common private IP ranges include:
10.0.0.0 to 10.255.255.255
172.16.0.0 to 172.31.255.255
192.168.0.0 to 192.168.255.255
These private ranges are reserved for internal networks under RFC 1918.
In simple terms, your private IP identifies your device inside your local network, while your public IP identifies your network on the internet.
IPv4 vs IPv6: What Is the Difference?
There are two main versions of IP addresses: IPv4 and IPv6.
IPv4 Address
An IPv4 address uses four sets of numbers separated by dots.
Example:
192.0.2.53
IPv4 is still widely used, but it has a limited number of possible addresses.
IPv6 Address
An IPv6 address is longer and uses letters and numbers separated by colons.
Example:
2001:db8:85a3::8a2e:370:7334
IPv6 was created to support far more devices and networks than IPv4. ICANN describes IPv6 as the successor to IPv4, designed to support the next generation of internet growth.
Which One Should You Care About?
Most users do not need to choose between IPv4 and IPv6 manually. Your internet provider, router, operating system, and websites usually handle this automatically.
However, checking whether your connection shows IPv4, IPv6, or both can help with:
Website access issues
Server firewall rules
VPN testing
Hosting configuration
Network diagnostics
What Can Someone Learn From Your IP Address?
Your IP address can reveal some basic information about your internet connection, but it does not usually reveal your exact home address.
An IP lookup may show:
Approximate city or region
Country
Internet service provider
Network type
Time zone estimate
Whether the IP belongs to a data center, VPN, proxy, or residential ISP
However, IP location data is not always exact. It may show the location of your ISP, mobile carrier, VPN server, or nearby network hub instead of your real physical location.
Still, your IP address is important because it can be used for tracking, security filtering, fraud detection, analytics, access control, and troubleshooting.
Why Should You Check Your IP Address?
Checking your IP address can help in many everyday and technical situations.
1. To Confirm Your VPN Is Working
If you are using a VPN, your visible public IP should usually change. An IP checker helps confirm whether websites are seeing your real ISP IP or your VPN IP.
2. To Troubleshoot Website Access
Some websites, servers, firewalls, or hosting platforms block or allow traffic based on IP addresses. Knowing your current IP makes it easier to debug access problems.
3. To Set Up Server Whitelisting
Developers, website owners, and agencies often whitelist IP addresses for:
Admin dashboards
Hosting panels
Staging websites
Databases
APIs
Security plugins
SSH or SFTP access
Before whitelisting, you need to know your current public IP address.
4. To Check Your Internet Provider
An IP lookup can show which ISP or network your connection is using. This is useful if you are switching between home Wi-Fi, mobile data, office internet, or VPN.
5. To Improve Online Privacy
Checking your IP helps you understand what basic network information is visible when you browse online.
Is It Dangerous If Someone Knows My IP Address?
In most cases, simply knowing your IP address is not enough for someone to hack you. Websites, apps, email services, and servers see IP addresses all the time.
However, your IP address can still be misused in some situations.
Potential risks include:
Tracking your approximate location
Restricting or targeting access based on your network
Attempting port scans against exposed devices
Launching denial-of-service attacks against a network
Associating online activity with the same connection
Identifying your ISP or organization
The risk is higher if your router, server, camera, remote desktop, or other internet-facing service is poorly secured.
That is why IP privacy and network security both matter.
How to Protect Your IP Address
You cannot use the internet without some kind of IP address, but you can reduce unnecessary exposure and improve your privacy.
1. Use a Trusted VPN When Needed
A VPN can mask your real public IP address by routing your traffic through a VPN server. This means websites may see the VPN server’s IP instead of your ISP-assigned IP.
A VPN is especially useful when using public Wi-Fi, traveling, or accessing sensitive work systems. Washington Technology Solutions notes that a VPN encrypts data between your device and the network and acts as a protective tunnel on public Wi-Fi.
Choose a reputable VPN provider. Avoid unknown free VPNs that may log or sell browsing data.
2. Use HTTPS Websites
When visiting websites, look for secure HTTPS connections. The FTC recommends entering personal information only on secure sites that use encryption, especially when using public Wi-Fi.
HTTPS does not hide your IP address, but it helps protect the information sent between your browser and the website.
3. Secure Your Router
Your router is one of the most important devices in your network. To protect it:
Change the default admin password
Keep router firmware updated
Disable remote admin access unless required
Use WPA2 or WPA3 Wi-Fi encryption
Use a strong Wi-Fi password
Turn off WPS if you do not need it
Restart or replace outdated routers when necessary
A poorly secured router can expose your entire network.
4. Avoid Exposing Devices Directly to the Internet
Do not expose cameras, printers, NAS devices, smart home devices, or remote desktop services directly to the internet unless you fully understand the security risks.
If remote access is required, use:
VPN access
Strong authentication
Firewall rules
Updated firmware
Non-default passwords
Limited user permissions
5. Be Careful on Public Wi-Fi
Public Wi-Fi networks at airports, hotels, restaurants, and cafés can be convenient, but they should be used carefully.
When using public Wi-Fi:
Avoid entering sensitive information on non-HTTPS websites
Use a VPN when possible
Disable automatic Wi-Fi connections
Avoid file sharing
Log out of accounts after use
Keep your device updated
6. Keep Your System Updated
Operating system, browser, router, and app updates often include important security patches. Keeping devices updated reduces the chance that attackers can exploit known vulnerabilities.
7. Use a Firewall
A firewall helps block unwanted incoming traffic. Most operating systems include built-in firewall features. Make sure they are enabled, especially on laptops used outside your home or office network.
8. Check for IP Leaks
If you use a VPN, periodically check your IP address to confirm that your real IP is not exposed.
You should check:
Public IPv4 address
Public IPv6 address
DNS leak status
WebRTC leak behavior
VPN connection status
If your real IP still appears while connected to a VPN, your VPN or browser settings may need adjustment.
Static IP vs Dynamic IP
Your public IP address may be static or dynamic.
Static IP Address
A static IP usually stays the same over time. Businesses often use static IPs for servers, remote access, VPNs, email systems, and firewall rules.
Static IPs are useful for reliability, but they may also make tracking easier because the same IP remains associated with the same network.
Dynamic IP Address
A dynamic IP can change periodically. Many home internet connections use dynamic IP addresses assigned by the ISP.
Dynamic IPs are common and usually fine for everyday browsing, streaming, gaming, and general internet use.
Shared IP vs Dedicated IP
Some users have a shared IP, while others use a dedicated IP.
Shared IP
A shared IP is used by multiple users, websites, or customers. This is common with residential ISPs, mobile networks, shared hosting, and VPN services.
Dedicated IP
A dedicated IP is assigned to one user, server, or service. Businesses may use dedicated IPs for hosting, email reputation, secure access, or firewall control.
For most users, a shared IP is normal. For business systems, a dedicated or static IP may be useful.
Can You Change Your IP Address?
Yes, in many cases, you can change your visible IP address.
Common ways include:
Restarting your router
Switching from Wi-Fi to mobile data
Using a VPN
Connecting from a different network
Asking your ISP for a new IP
Using a proxy service
Upgrading to a static or dedicated IP plan
However, changing your IP does not automatically make you anonymous. Websites can still use cookies, browser fingerprints, account logins, device identifiers, and other tracking methods.
What Is an IP Address Used For?
IP addresses are used for many internet and security functions, including:
Routing internet traffic
Loading websites
Sending and receiving data
Email delivery
Server access control
Fraud detection
Website analytics
Network troubleshooting
Firewall rules
CDN routing
Geolocation-based content
VPN and proxy detection
For website owners, IP addresses also help with log analysis, spam prevention, rate limiting, and cybersecurity investigations.
Common IP Address Problems
“My IP Address Is Blocked”
Your IP may be blocked by a website, firewall, email server, or security system. This can happen because of suspicious activity, failed login attempts, spam history, shared VPN abuse, or incorrect firewall rules.
“My Location Is Wrong”
IP location is approximate. It may show your ISP’s location, VPN server location, mobile network gateway, or regional routing point instead of your real location.
“My IP Keeps Changing”
This usually means your ISP uses dynamic IP assignment. It is normal for many residential connections.
“My VPN Is Not Hiding My IP”
Your VPN may be disconnected, misconfigured, leaking IPv6, or affected by browser WebRTC leaks. Use an IP checker after connecting to confirm what IP is visible.
“I Need to Whitelist My IP”
Use an IP address checker to find your current public IP, then add that IP to your firewall, hosting panel, security plugin, or server access list.
Quick IP Address Safety Checklist
Use this checklist to protect your IP address and network:
| Task | Why It Matters |
| Check your public IP regularly | Helps confirm what websites can see |
| Use a VPN on public Wi-Fi | Reduces exposure on untrusted networks |
| Keep your router updated | Protects your home or office network |
| Use strong Wi-Fi security | Prevents unauthorized network access |
| Avoid exposing devices online | Reduces attack surface |
| Use HTTPS websites | Protects data in transit |
| Enable firewall protection | Blocks unwanted incoming traffic |
| Check for VPN leaks | Confirms your real IP is hidden |
| Use strong passwords | Protects accounts and devices |
| Monitor suspicious activity | Helps detect security issues early |
How HasheTools Helps You Check Your IP
HasheTools makes it simple to check your public IP address instantly. The My IP Address Lookup Tool can automatically detect your IP from your browser and show useful connection details such as IPv4, IPv6, ISP, location, and VPN or proxy status where available.
You can use it when:
Checking your current public IP
Testing a VPN
Troubleshooting website access
Setting up firewall rules
Verifying server whitelist access
Checking IPv4 or IPv6 connectivity
Reviewing basic network information
It is a fast, browser-based way to understand what your internet connection is showing to the outside world.
FAQs
How do I check my IP address?
The easiest way is to use an online IP address checker such as the HasheTools My IP Address Lookup Tool. It automatically detects your public IP address from your browser.
Can my IP address show my exact location?
Usually, no. Your IP address may reveal an approximate city, region, country, or ISP, but it normally does not reveal your exact home address.
Is my IP address private?
Your public IP address is visible to websites and online services you connect to. Your private IP address is used inside your local network and is not normally visible on the public internet.
Can someone hack me with my IP address?
Knowing your IP address alone is usually not enough to hack you. However, if your network or devices are poorly secured, attackers may try to scan or target exposed services.
How can I hide my IP address?
You can hide or mask your real public IP by using a trusted VPN, proxy, or privacy-focused network. A VPN is one of the most common options for everyday users.
Why does my IP address change?
Many internet service providers assign dynamic IP addresses, which can change when your router reconnects or after a certain period.
What is the difference between IPv4 and IPv6?
IPv4 is the older format that uses four numbers separated by dots. IPv6 is a newer, longer format designed to provide many more available addresses for modern internet growth.
Should I use a VPN to protect my IP address?
A VPN can help mask your real IP address and protect traffic on untrusted networks. It is especially useful on public Wi-Fi, while traveling, or when you want more privacy from websites and networks.
Why does my IP checker show a different city?
IP location databases are not always exact. They may show your ISP’s location, VPN server, mobile network gateway, or regional routing location instead of your actual location.
Can two devices have the same public IP address?
Yes. Devices on the same home or office network often share a single public IP address through Network Address Translation (NAT), while each device has its own private IP address.
Final Thoughts
Your IP address is a basic but important part of how the internet works. It helps websites, apps, and online services communicate with your device or network.
Knowing your IP address can help you troubleshoot connection issues, configure server access, check VPN protection, and better understand your online privacy.
The key is not to panic about your IP address being visible. Instead, use smart protections: secure your router, use HTTPS, avoid unsafe public Wi-Fi behavior, keep devices updated, and use a trusted VPN when privacy matters.
If you want to quickly check your current public IP address, use the HasheTools My IP Address Lookup Tool and review what your connection is showing online.