Blog
Insights, tutorials, and best practices for network administrators and developers.
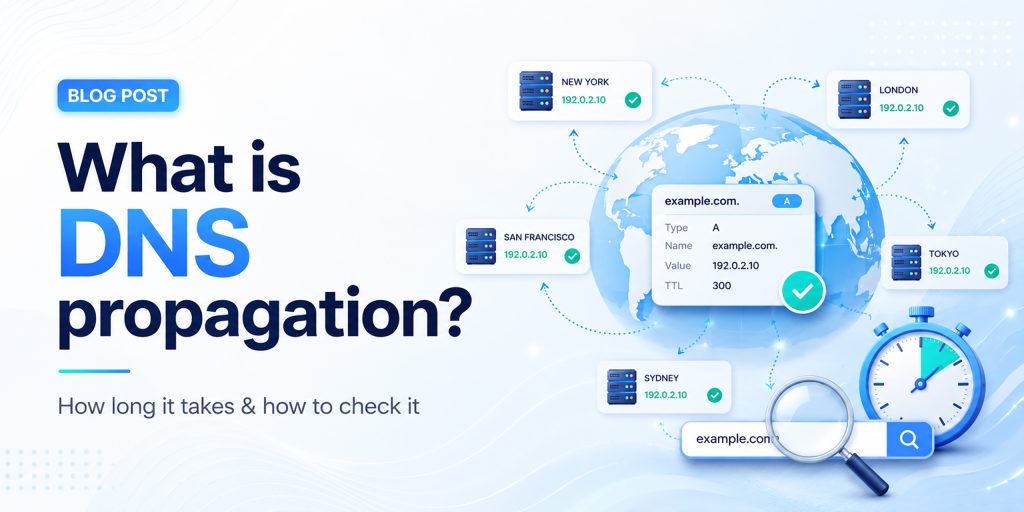
You’ve just updated your nameservers, pointed your domain to a new host, or changed a DNS record, and now you’re waiting. Your website might be showing the old version, or visitors in different countries see something different from you. This is DNS propagation in action. In this complete guide, we explain everything: what DNS propagation is, why it takes time, how long it takes worldwide, and the fastest ways to check and troubleshoot it.
What is DNS Propagation?
DNS propagation is the process by which updates to your domain’s DNS records spread across all DNS servers worldwide after you make a change. When you update your DNS settings, such as changing your nameservers, modifying an A record, or updating your MX records, those changes do not appear instantly for everyone on the internet. Instead, they travel gradually from server to server across the global DNS network. This global DNS propagation time can range from a few minutes to 72 hours.
Think of the internet as a massive phone book system. Your domain name (like example.com) is the name in the book, and the DNS record is the phone number. When you “change your number,” every phone operator (DNS server) around the world needs to update their local copy of the book. Until they do, some people will still be calling the old number.
DNS Propagation Flow
| Your Domain (DNS Updated) |
→ | Root DNS Server |
→ | TLD Server (.com/.net) |
→ | ISP Resolver (Cache) |
→ | End User (Sees New IP) |
How DNS Works (and Why Propagation Happens)
To understand DNS propagation, you first need to understand how the Domain Name System works. DNS translates human-readable domain names into machine-readable IP addresses that servers use to communicate. Here’s the step-by-step DNS lookup process:
- Step 1 – Browser checks its local cache: Your browser stores recently visited DNS records. If it has the record cached (and it hasn’t expired), it uses that directly without any external request.
- Step 2 – OS checks its DNS cache: If the browser has no cached entry, it asks your operating system, which maintains its own DNS cache.
- Step 3 – Query sent to ISP’s recursive resolver: Your Internet Service Provider operates DNS resolver servers. These receive your DNS query and check their cache. This is where most propagation delays occur. ISP resolvers cache records aggressively.
- Step 4 – Resolver contacts root and authoritative servers: If the resolver doesn’t have a cached answer, it queries the root DNS servers, then TLD servers, then the authoritative nameserver for your domain, which has the latest record.
- Step 5 – Answer is cached and returned: The resolver stores the answer based on the TTL value and sends it back to your browser. The next request within the TTL window is answered from cache, which is why DNS propagation takes time.
How Long Does DNS Propagation Take?
How long does DNS propagation take? It varies, but here’s a practical breakdown of global DNS propagation time:
| Scenario | Typical Propagation Time | Speed |
| Low TTL records (300s / 5 min) | 5 – 30 minutes | Fast |
| Standard TTL records (3600s) | 1 – 4 hours | Moderate |
| A record / CNAME changes | 1 – 24 hours | Variable |
| MX record (email) changes | 4 – 24 hours | Variable |
| Nameserver changes | 12 – 48 hours | Slow |
| Domain transfer | 24 – 72 hours | Slowest |
| Full global propagation | Up to 72 hours | Maximum |
Key Factors That Affect DNS Propagation Time
TTL (Time to Live) Value
The TTL is the most important factor in DNS propagation time. It tells resolvers how long they should cache a record before checking for a fresh copy. A TTL of 86400 means 24 hours; a TTL of 300 means 5 minutes. If your TTL was 24 hours before your change, resolvers will serve the old record for up to 24 hours after your update.
ISP DNS Cache Behavior
Different ISPs refresh their DNS caches at different rates. Some respect the TTL exactly; others refresh less frequently. This means users on different ISPs may see your new DNS records at different times, creating inconsistent propagation across the globe.
Type of DNS Record Changed
Not all DNS records propagate at the same speed. A and CNAME changes propagate faster, while MX and nameserver updates take longer because they involve more layers of the DNS hierarchy.
Domain Registrar and Hosting Provider
Some registrars push nameserver updates to root servers faster than others. DNS hosting providers like Cloudflare or AWS Route 53 have infrastructure optimized for faster propagation.
Geographic Location
DNS propagation speed varies by location. Major internet hubs in North America and Western Europe typically see changes faster, while some regions in Asia and Africa may experience longer delays.
How to Check DNS Propagation Status
Knowing how to check DNS propagation is essential after making any DNS change. The goal is to verify that your new DNS records are being returned by resolvers around the world, not just on your local network.
Method 1: Use an Online DNS Propagation Checker
The easiest method is to use a dedicated DNS propagation checker tool that queries multiple DNS servers from locations worldwide and shows you the current record values from each. HasheTools offers a free online DNS propagation checker at hashetools.com that checks your domain against dozens of global resolvers simultaneously.
Method 2: Use Command Line Tools
For developers and sysadmins, command-line tools offer precise DNS lookup results:
• Windows (nslookup): nslookup example.com 8.8.8.8
• Mac/Linux (dig): dig @8.8.8.8 example.com A
Query different resolvers (8.8.8.8 = Google, 1.1.1.1 = Cloudflare, 9.9.9.9 = Quad9) to check propagation across multiple providers.
Method 3: Use Multiple Devices and Networks
Try accessing your website from different devices, your phone on mobile data, a friend’s computer, or a VPN, to see if different networks are serving the new or old DNS records.
Method 4: Clear Your Local DNS Cache
Before checking anything, clear your local DNS cache so you’re not seeing an outdated cached result:
- Windows: ipconfig /flushdns
- Mac: sudo dscacheutil -flushcache; sudo killall -HUP mDNSResponder
- Linux: sudo systemd-resolve –flush-caches
- Chrome: Visit chrome://net-internals/#dns and click ‘Clear host cache.’
DNS Propagation Troubleshooting
If your DNS changes are not reflecting, here are the most common causes and solutions:
| Problem | Likely Cause | Fix |
| The website shows old content | Local DNS or browser cache | Flush DNS cache; clear browser cache |
| Some users see new, others don’t | Propagation is still in progress | Wait for the full TTL to expire |
| DNS is correct, but the site won’t load | Firewall, SSL, or server config | Check server logs and SSL certificate |
| Email not working after MX change | MX propagation is still in progress | Wait 24 hrs; verify MX with dig |
| Nameserver change not taking effect | Registrar delay or wrong NS records | Confirm NS at registrar; wait 48 hrs |
| DNS propagated, but SSL error | SSL cert not yet on new host | Provision SSL cert on new server |
COMMON MISTAKE
Many users assume that because their DNS change is correct in the registrar panel, it has already propagated. This is wrong. The registrar is only the authoritative source; all caching resolvers in between need to expire their old cache before picking up the new record. Always check propagation with an external tool like HasheTools DNS Checker.
How to Speed Up DNS Propagation
While you cannot force instant global propagation, these proven strategies minimize DNS propagation delay and help your changes go live as quickly as possible:
- Lower your TTL before making changes: 48 hours before your planned DNS change, reduce your TTL to 300 seconds (5 minutes). Resolvers worldwide will cache the old record for only 5 minutes, drastically reducing propagation wait time when you make the actual change.
- Use a premium DNS provider with global anycast: Providers like Cloudflare, AWS Route 53, and Google Cloud DNS use anycast networks with nodes in hundreds of cities. Their DNS infrastructure propagates changes much faster than traditional shared hosting DNS.
- Clear your local DNS cache immediately: Flush the DNS cache on your machine and browser right after making changes. This lets you verify the new records are live without waiting for your local cache to expire.
- Switch to Google or Cloudflare DNS resolvers: Change your network’s DNS servers to 8.8.8.8 (Google) or 1.1.1.1 (Cloudflare). These resolvers typically refresh their caches faster than ISP resolvers.
- Plan migrations during low-traffic periods: Schedule DNS changes during off-peak hours (nights or weekends) so fewer users are affected during the transition period when some see the old site and others see the new one.
DNS Record Types and Their Propagation Times
Different DNS records (A, CNAME, MX, and others) have different propagation characteristics. Understanding these helps you set realistic expectations for each type of change:
| Record Type | Purpose | Typical Propagation | Impact |
| A Record | Maps the domain to an IPv4 address | 1 – 24 hours | Website accessibility |
| AAAA Record | Maps the domain to an IPv6 address | 1 – 24 hours | IPv6 accessibility |
| CNAME | Alias from one domain to another | 1 – 8 hours | Subdomains, CDN pointing |
| MX Record | Email server routing | 4 – 24 hours | Email delivery |
| TXT Record | SPF, DKIM, domain verification | 1 – 12 hours | Email authentication |
| NS Record | Defines authoritative nameservers | 12 – 48 hours | Entire DNS authority |
| SOA Record | Zone authority information | 24 – 72 hours | Zone administration |
| PTR Record | Reverse DNS lookup | 24 – 48 hours | Email reputation, security |
Frequently Asked Questions
What is DNS propagation and why does it happen?
DNS propagation is the time it takes for updated DNS records to spread across the Internet. It happens because DNS servers cache old records and only update them after the TTL (time to live) expires.
How long does DNS propagation take?
DNS propagation usually takes 24–72 hours worldwide, but many users see updates within a few hours. Timing depends on TTL, ISP caching, and location.
How can I check DNS propagation?
You can use tools like HasheTools DNS Checker or commands like nslookup and dig to see how your domain resolves in different locations.
Can DNS propagation be instant?
No, it cannot be fully instant worldwide. However, lowering your TTL before making changes can make updates much faster.
Why is my website not updating after DNS changes?
Your ISP or browser may still be using cached DNS data. Try clearing your cache, switching networks, or waiting for propagation to complete.
Does DNS propagation affect email?
Yes. Changes to MX records can temporarily affect email delivery. Keep your old mail server active for 48-72 hours to avoid issues.
Does clearing the DNS cache speed up propagation?
No, it only updates DNS on your device. It does not affect global propagation.
How can I verify DNS changes are correct?
Check your domain’s authoritative nameserver using tools like dig. If it shows the updated record, the change is correct and propagating.
Conclusion
DNS propagation is one of those technical realities of the internet that affects everyone who manages a website, email system, or online service. It’s not a bug or a failure; it’s simply how the distributed, cached DNS system keeps billions of lookups fast and efficient worldwide.

SPF, DKIM, DMARC & BIMI: Complete 2026 Setup Guide
Google, Yahoo, and Microsoft now enforce email authentication for bulk senders. 83.9% of domains still have no DMARC record, making them prime targets for spoofing, phishing, and spam. This step-by-step guide covers every protocol you need: SPF, DKIM, DMARC, and BIMI.
What is Email Authentication?
Every time you send an email, receiving mail servers ask a simple question: Is this message really from who it claims to be? Without authentication, anyone can forge your domain in the From: field; this is how most phishing and business email compromise (BEC) attacks work.
Four DNS-based protocols work together to answer that question definitively:
| Protocol | What It Does | Where It Checks | Enforced By |
|---|---|---|---|
| SPF | Lists authorized sending IPs for your domain | Return-Path / envelope | Receiving mail server |
| DKIM | Cryptographically signs every outgoing message | DKIM-Signature header | Receiving mail server |
| DMARC | Ties SPF/DKIM to visible From: domain + reports | From: header alignment | Inbox providers (Gmail, etc.) |
| BIMI | Displays your brand logo in the inbox | BIMI DNS record + VMC | Gmail, Yahoo, Apple Mail |
Think of these as a security stack: SPF and DKIM authenticate the message, DMARC enforces a policy when they fail, and BIMI is the trust signal that rewards you for doing it right.
2026 Enforcement Update: Google & Yahoo require SPF + DKIM + DMARC for all senders of 5,000+ emails/day. Microsoft enforced similar rules from early 2025. Non-compliant messages are rejected at the SMTP level, not just filtered to spam.
SPF: Sender Policy Framework
What is SPF?
SPF is a DNS TXT record that publishes a list of IP addresses and servers authorized to send email on behalf of your domain. When a message arrives, the receiving server checks the sender’s IP against your SPF record. If the IP isn’t on the list, SPF fails.
Important limitation: SPF only checks the Return-Path / envelope sender, not the visible From: address your recipient sees. That’s why SPF alone doesn’t prevent spoofing. You need DMARC for full alignment.
How to Write an SPF Record
SPF records are DNS TXT records published on your root domain. Here’s the anatomy:
| DNS TXT record: @ (your root domain) |
| v=spf1 include:_spf.google.com include:sendgrid.net ip4:203.0.113.10 -all |
| Mechanism | Example | Meaning |
|---|---|---|
| v=spf1 | v=spf1 | Required, declares this is an SPF record |
| include: | include:_spf.google.com | Authorizes all IPs listed in that domain’s SPF record |
| ip4: | ip4:203.0.113.10 | Authorizes a specific IPv4 address or CIDR range |
| ip6: | ip6:2001:db8::/32 | Authorizes a specific IPv6 address or range |
| a | a:mail.example.com | Authorizes the A record IP of the given domain |
| mx | mx | Authorizes the MX record IPs of your domain |
| -all | -all | FAIL, reject all senders not listed (recommended) |
| ~all | ~all | SOFTFAIL, mark suspicious but deliver (use while testing) |
| ?all | ?all | NEUTRAL, no policy (avoid in production) |
SPF Setup Step-by-Step
- Log in to your DNS provider (Cloudflare, GoDaddy, Route 53, Namecheap, etc.)
- Create a new TXT record on your root domain (@)
- Set the value to: v=spf1 [your sending sources] -all
- List every service that sends email as your domain (your mail server, email marketing platform, CRM, support desk, etc.)
- Save and wait for DNS propagation (up to 48 hours)
- Verify using the HasheTools SPF Lookup tool
The 10-Lookup Limit: SPF records may not trigger more than 10 DNS lookups during evaluation. Each ‘include:’ counts as one lookup, and those includes often have their own includes. If you exceed 10, SPF fails with a PermError. Use SPF flattening tools to consolidate if needed.
Read Also: DNS Records for ns1.dns-parking.com
Common SPF Record Examples
Google Workspace users:
| DNS TXT: @ |
| v=spf1 include:_spf.google.com ~all |
Microsoft 365 users:
| DNS TXT: @ |
| v=spf1 include:spf.protection.outlook.com ~all |
Google Workspace + Mailchimp + custom mail server:
| DNS TXT: @ |
| v=spf1 include:_spf.google.com include:servers.mcsv.net ip4:203.0.113.10 -all |
DKIM: DomainKeys Identified Mail
What is DKIM?
DKIM adds a cryptographic digital signature to every outgoing email. The signature is added to the DKIM-Signature header and is verified by the receiving server using a public key stored in your DNS.
Unlike SPF, DKIM proves that the message content hasn’t been tampered with in transit. Even if an email passes through a mail relay or forwarding service, the DKIM signature remains valid, making it more resilient than SPF for complex mail flows.
How DKIM Works
- Your mail server signs each outgoing email using a private key stored on the server
- The signature is added to the DKIM-Signature email header
- The receiving server looks up your public key from a DNS TXT record at selector._domainkey.yourdomain.com
- The public key verifies the signature; if it matches, DKIM passes
- If the message was altered in transit, the signature won’t match, and DKIM fails
Your DKIM DNS Record
DKIM records follow this format:
| DNS TXT: selector._domainkey.yourdomain.com |
| v=DKIM1; k=rsa; p=MIIBIjANBgkqhkiG9w0BAQEFAAOCAQ8AMIIBCgKCAQEA… |
| Field | Meaning |
|---|---|
| v=DKIM1 | Version, always DKIM1 |
| k=rsa | Key type, RSA (default) or ed25519 for modern servers |
| p=… | The base64-encoded public key, generated by your mail server or email provider |
| selector | A name you choose (e.g, ‘google’, ‘mail’, ‘s1’). Allows multiple DKIM keys per domain. |
DKIM Setup Step-by-Step
- Generate your DKIM key pair in your email service’s dashboard (Google Workspace, Microsoft 365, SendGrid, Mailchimp, etc.). They provide the public key and the selector name.
- Create a DNS TXT record at selector._domainkey.yourdomain.com and paste in the public key value they provide.
- Use 2048-bit RSA keys (recommended over 1024-bit for security).
- Save the DNS record and wait for propagation.
- Verify using the HasheTools DKIM Lookup tool by entering your domain and selector.
Security Best Practice: Rotate Your DKIM Keys: DKIM keys should be rotated every 6–12 months. This limits the window of exposure if a private key is ever compromised. Your email provider’s dashboard usually has a key rotation option. After rotation, update the DNS TXT record with the new public key and retire the old selector.
Read Also: How to Run a Traceroute (tracert) Command
DMARC: Domain-based Message Authentication
What is DMARC?
DMARC (Domain-based Message Authentication, Reporting, and Conformance) is the protocol that ties SPF and DKIM together and actually checks the visible From: address your recipient sees.
SPF and DKIM authenticate the message, DMARC enforces alignment. It tells receiving servers: if this message fails authentication, here’s what to do with it. And it sends you reports about every email sent from your domain, so you can see who’s using it.
DMARC Alignment Explained
DMARC passes when at least one of these is true:
- SPF alignment: The domain in the Return-Path (envelope sender) matches the visible From: domain
- DKIM alignment: The domain in the DKIM signature (d= tag) matches the visible From: domain
DMARC Record Structure
| DNS TXT: _dmarc.yourdomain.com |
| v=DMARC1; p=reject; rua=mailto:dmarc-reports@yourdomain.com; ruf=mailto:forensic@yourdomain.com; pct=100; adkim=s; aspf=s |
| Tag | Example | Meaning |
|---|---|---|
| v=DMARC1 | v=DMARC1 | Required, declares this is a DMARC record |
| p= | p=none / quarantine / reject | Policy: what to do with messages that fail DMARC |
| rua= | rua=mailto:reports@domain.com | Address for aggregate XML reports (daily summaries) |
| ruf= | ruf=mailto:forensic@domain.com | Address for forensic/failure reports (per-message) |
| pct= | pct=100 | Percentage of failing mail the policy applies to (100 = all) |
| adkim= | adkim=r or adkim=s | DKIM alignment: r = relaxed (default), s = strict |
| aspf= | aspf=r or aspf=s | SPF alignment: r = relaxed (default), s = strict |
| sp= | sp=reject | Policy for subdomains (if different from main domain) |
DMARC Policy Escalation: The Right Path
Never jump straight to p=reject. Follow this phased approach:
| Phase | DMARC Record | What Happens / When to Move On |
| Phase 1 (Weeks 1–4) | p=none | Monitor mode. Emails are delivered normally. Collect aggregate reports. Identify all sending sources. Move on when you understand your mail flow. |
| Phase 2 (Weeks 5–8) | p=quarantine; pct=25 | 25% of failing mail goes to spam. Gradually increase pct to 50 → 100 over 2–4 weeks. Move on when legitimate mail passes consistently. |
| Phase 3 (Weeks 9–12) | p=quarantine; pct=100 | All failing mail goes to spam. Monitor for 1–2 weeks. If no legitimate mail is affected, escalate. |
| Phase 4 (Final) | p=reject; pct=100 | Full enforcement. Failing mail is rejected at the SMTP level. Add sp=reject for subdomain coverage. You’re protected. |
Reading DMARC Aggregate Reports: DMARC sends you daily XML reports (rua) showing every IP address that sent email as your domain, how many messages passed or failed SPF/DKIM, and from which countries. Tools like HasheTools DMARC Lookup, or dedicated platforms like Postmark, EasyDMARC, or dmarcian, parse these into readable dashboards.
Read Also: What Is a DNS PTR Record?
BIMI: Brand Indicators for Message Identification
What is BIMI?
BIMI is the reward for doing email authentication right. Once your domain reaches DMARC enforcement (p=quarantine or p=reject), you can publish a BIMI DNS record that tells supporting inbox providers to display your brand logo next to your emails.
Supported by Gmail, Yahoo Mail, Apple Mail, Fastmail, and Cloudmark, BIMI gives your emails a verified checkmark-style visual trust signal before the recipient even opens them.
BIMI Requirements
- DMARC enforcement: p=quarantine or p=reject with pct=100, p=none does not qualify
- SVG logo: Your brand logo in SVG Tiny PS format, hosted at a stable HTTPS URL
- VMC (Verified Mark Certificate): Required by Gmail and Apple Mail. Optional for Yahoo, Fastmail. A VMC is issued by DigiCert or Entrust and validates your logo against your trademarked brand.
BIMI Record Structure
| DNS TXT: default._bimi.yourdomain.com |
| v=BIMI1; l=https://yourdomain.com/logo.svg; a=https://yourdomain.com/vmc.pem |
| Tag | Meaning |
|---|---|
| v=BIMI1 | Required, version tag |
| l= | URL to your SVG Tiny PS logo (must be HTTPS, correct MIME type: image/svg+xml) |
| a= | URL to your Verified Mark Certificate (.pem file), required for Gmail/Apple Mail |
BIMI Setup Step-by-Step
- Reach DMARC p=reject with consistent pass rates above 98%, BIMI is the final reward, not a shortcut
- Prepare your SVG logo in SVG Tiny PS format (specific SVG subset, use tools like Adobe Illustrator or Inkscape with the SVG Tiny PS export profile)
- Host the SVG at a permanent HTTPS URL with Content-Type: image/svg+xml. Redirects and authentication will cause failures.
- Obtain a VMC from DigiCert (digicert.com) or Entrust if you want Gmail support. Requires a registered trademark.
- Publish the BIMI TXT record at default._bimi.yourdomain.com
- Verify using the HasheTools BIMI Lookup tool
No Trademark? No VMC? Start with Yahoo. Yahoo Mail supports BIMI without a Verified Mark Certificate, provided your domain has sufficient sending reputation. If you don’t have a registered trademark yet, you can still benefit from BIMI in Yahoo inboxes while pursuing VMC for Gmail support.
Complete DNS Records Cheat Sheet
Here is a complete summary of all DNS records you need to publish, with format and location for each:
| Record | Name / Host | Type | Value / Format |
| SPF | @ (root) | TXT | v=spf1 include:your-provider ~all |
| DKIM | selector._domainkey | TXT | v=DKIM1; k=rsa; p=YOUR_PUBLIC_KEY |
| DMARC | _dmarc | TXT | v=DMARC1; p=reject; rua=mailto:you@domain.com |
| BIMI | default._bimi | TXT | v=BIMI1; l=https://domain.com/logo.svg; a=https://domain.com/vmc.pem |
| MTA-STS | _mta-sts | TXT | v=STSv1; id=20260401 |
| TLS-RPT | _smtp._tls | TXT | v=TLSRPTv1; rua=mailto:tls-reports@domain.com |
Troubleshooting Common Errors
SPF Errors
PermError: too many DNS lookups
Cause: More than 10 include: directives (counting nested lookups). Fix: Use SPF flattening to replace include: with direct IP4: ranges. Or reduce the number of sending services you authorize.
SPF Fails for Forwarded Emails
Cause: Email forwarding changes the envelope sender, breaking SPF alignment. Fix: This is expected behavior. DKIM survives forwarding, make sure DKIM is configured, and DMARC allows DKIM-only alignment.
SPF Record Not Found
Cause: The TXT record hasn’t propagated yet, or was published on the wrong host. Fix: Wait up to 48 hours. Verify you published on @ (root domain), not a subdomain.
DKIM Errors
DKIM Signature Verification Failed
Cause: Message body was modified in transit (by a mailing list, forwarding service, or anti-virus scanner). Fix: Ensure your mail server doesn’t modify messages after signing. Consider using l= tag to sign only part of the body.
No DKIM Signature Found
Cause: Your mail server isn’t signing outgoing messages. Fix: Check your email provider’s settings and ensure the DKIM signing option is enabled for your domain.
DMARC Errors
DMARC Fails Despite SPF and DKIM Passing
Cause: Alignment failure. SPF or DKIM pass, but the authenticated domain doesn’t match the visible From: domain. Fix: Ensure the d= tag in your DKIM signature matches your From: domain exactly. Use relaxed alignment (adkim=r) if using subdomains.
Legitimate Email Going to Spam After p=reject
Cause: A sending service (newsletter tool, CRM, support desk) isn’t aligned. Fix: Go back to p=none, review your DMARC aggregate reports, find the unauthorized source, and add it to your SPF record and configure DKIM signing through that service.
BIMI Errors
Logo Not Displaying in Gmail
Cause: No VMC, DMARC not in enforcement, or SVG format issues. Fix: Ensure DMARC is p=quarantine or p=reject. Get a VMC from DigiCert or Entrust. Validate SVG is in SVG Tiny PS format and hosted at an HTTPS URL with the correct MIME type.
Frequently Asked Questions
Do I need all four protocols (SPF, DKIM, DMARC, BIMI)?
For basic email security, SPF + DKIM + DMARC are essential. BIMI is optional but increasingly valuable for brand trust. Google and Yahoo require at least SPF + DKIM + DMARC for bulk senders. We recommend implementing all four in sequence.
How long does DNS propagation take?
Changes typically propagate globally within 15 minutes to 48 hours, depending on your TTL settings. Use HasheTools DNS Lookup to check live propagation status from multiple global resolvers.
Will p=reject break legitimate email?
Only if some of your sending services aren’t properly authenticated. That’s why the phased approach (starting at p=none) is critical. Never jump to reject without reviewing your DMARC reports first.
Can I have multiple DKIM keys?
Yes. Each DKIM key is identified by a selector prefix (e.g., google._domainkey, sendgrid._domainkey). You can have as many selectors as needed, one per sending service.
Does SPF protect against spoofing?
SPF alone does not prevent display-name spoofing (the visible From: address). SPF only checks the envelope sender. You need DMARC to enforce alignment between the envelope sender and the visible From: domain.
What is the difference between rua and ruf DMARC tags?
rua receives daily aggregate reports (XML summaries of all mail sources). Ruf receives forensic/failure reports (copies of individual messages that failed DMARC). RUF reports are more privacy-sensitive and not supported by all receivers.
Do subdomains inherit DMARC policy?
By default, the parent domain policy applies to subdomains. Use the sp= tag to set a separate subdomain policy (e.g., sp=reject). Subdomains used for sending also need their own SPF and DKIM records.
Conclusion
Email authentication is no longer optional; it’s a requirement. With Google, Yahoo, and Microsoft enforcing strict rules, domains without proper authentication are not just at risk of landing in spam; they’re being rejected before they even reach the inbox.
The solution is clear:
- SPF verifies who can send emails for your domain
- DKIM ensures your messages haven’t been tampered with
- DMARC enforces rules and protects your domain from spoofing
- BIMI rewards your setup with visible brand trust in the inbox
Together, these protocols create a complete email security and trust framework.
But the real takeaway is this:
Start with SPF and DKIM, move to DMARC enforcement, and then unlock BIMI as the final step.
Most domains still haven’t completed this journey, which means implementing it now gives you a massive advantage in deliverability, security, and brand visibility.

DNS Records for ns1.dns-parking.com: Complete Guide to DNS Parking & Nameservers
If you have looked up a domain’s nameservers and seen ns1.dns-parking.com in the results, you are in the right place. Maybe you are troubleshooting why a website is not loading, trying to understand what your Hostinger account is doing, or just curious what “DNS parking” actually means. This guide explains everything, from what ns1.dns-parking.com is to the actual DNS records behind it, how DNS parking works, why domains get parked, and exactly what steps to take if you need to move away from it.
What is ns1.dns-parking.com?
ns1.dns-parking.com is a nameserver, specifically the primary nameserver in a nameserver pair operated by Hostinger, one of the world’s largest web hosting companies. Its partner nameserver is ns2.dns-parking.com.
Together, ns1.dns-parking.com and ns2.dns-parking.com form Hostinger’s DNS parking service. When a domain’s nameservers are set to this pair, Hostinger’s DNS infrastructure takes control of that domain’s DNS zone, but instead of directing visitors to an active website, the domain is placed in a “parked” state, typically displaying a placeholder page.
You will encounter this nameserver in these common scenarios:
- You registered a domain through Hostinger, but have not yet connected it to a website
- A domain you are investigating has been recently purchased and not yet configured
- A Hostinger customer has let their hosting plan lapse, but kept the domain registered
- You are checking nameservers for troubleshooting purposes and want to know who controls the DNS
Key technical facts about ns1.dns-parking.com:
| Detail | Value |
| Hostname | ns1.dns-parking.com |
| IPv4 Address | 162.159.24.201 |
| IPv6 Address | 2400:cb00:2049:1::a29f:18c9 |
| Operator | Hostinger Operations, UAB |
| Partner NS | ns2.dns-parking.com (162.159.25.42) |
| Infrastructure | Cloudflare network (Anycast routing) |
| TTL | 172800 seconds (48 hours) |
Who owns dns-parking.com? (Hostinger)
The domain dns-parking.com is registered and operated by Hostinger Operations, UAB, a Lithuanian company and one of the largest web hosting providers globally, serving over 3 million customers across 150 countries.
WHOIS records confirm the following:
| WHOIS Field | Details |
| Registrar | HOSTINGER operations, UAB |
| IANA ID | 1636 |
| Registered On | August 6, 2019 |
| Expires On | August 6, 2026 |
| Status | Client Transfer Prohibited |
| Abuse Contact | abuse-tracker@hostinger.com |
| DNS Contact | dns@hostinger.com |
The nameservers themselves run on Cloudflare’s Anycast network, which is why the IP addresses (162.159.24.201 and 162.159.25.42) belong to Cloudflare’s IP range. Hostinger uses Cloudflare’s infrastructure to deliver high-performance, globally distributed DNS resolution for the millions of domains it manages.
This is the same relationship used by many large providers; Cloudflare provides the underlying network, while Hostinger operates the DNS zones under its own branded nameserver names.
Actual DNS Records for ns1.dns-parking.com
When you run a full DNS lookup on ns1.dns-parking.com or its parent domain, dns-parking.com, here are the records you will find:
NS Records (Nameserver Records)
dns-parking.com. NS ns1.dns-parking.com.
dns-parking.com. NS ns2.dns-parking.com.
These NS records define the authoritative nameservers for the dns-parking.com zone itself. The domain is self-referential; it uses its own nameservers.
A Records (IPv4 Addresses)
ns1.dns-parking.com. A 162.159.24.201
ns2.dns-parking.com. A 162.159.25.42
These are the glue records, IPv4 address records for each nameserver. Glue records are necessary when a domain uses nameservers that are subdomains of itself. Without these A records, DNS resolvers would face a circular dependency (they would need to look up ns1.dns-parking.com to find dns-parking.com, but would need dns-parking.com’s nameservers to look up ns1.dns-parking.com).
AAAA Records (IPv6 Addresses)
ns1.dns-parking.com. AAAA 2400:cb00:2049:1::a29f:18c9
ns2.dns-parking.com. AAAA 2400:cb00:2049:1::a29f:192a
IPv6 glue records that allow the nameservers to be reached over IPv6 connections. Both nameservers fully support IPv6, making them compatible with modern dual-stack network environments.
SOA Record (Start of Authority)
dns-parking.com. SOA ns1.dns-parking.com. dns.hostinger.com. (
Serial: [current]
Refresh: 14400
Retry: 3600
Expire: 604800
Minimum TTL: 300 )
The SOA record identifies ns1.dns-parking.com as the primary master nameserver for the dns-parking.com zone. The administrative contact email encoded in the RNAME field resolves to dns@hostinger.com, confirming Hostinger’s ownership. The refresh interval of 14,400 seconds (4 hours) means secondary nameservers check for zone updates every 4 hours.
Network Dispersal
The two nameservers are hosted on different C-class networks:
- ns1.dns-parking.com → 162.159.24.x network
- ns2.dns-parking.com → 162.159.25.x network
This geographic and network dispersal is a best practice (per RFC 2182) that prevents a single point of failure; if one nameserver or its network experiences an outage, the other continues to answer DNS queries.
What Is DNS Parking?
DNS parking (also called domain parking) is the practice of registering a domain name and placing it in a temporary, inactive state, pointing its nameservers to a parking service rather than to a live web server.
Think of it like buying a piece of land and putting up a “Reserved” sign. The land is yours; no one else can use it, but nothing has been built on it yet. In the internet world, your domain is “yours” the moment you register it, but DNS parking is the sign you put up while deciding what to build.
When a domain is parked using ns1.dns-parking.com:
- The domain is fully registered and owned
- No active website is being served at the domain
- Visitors typically see a placeholder page (a “coming soon” page, a simple holding page, or sometimes advertisements)
- The domain’s DNS zone is managed by Hostinger’s parking service
- Email may or may not be configured, depending on the MX records in the zone
DNS parking is extremely common. At any given moment, a large percentage of all registered domains on the internet are in some form of parked state.
How DNS Parking Works: Step by Step
Here is exactly what happens when a domain is parked at ns1.dns-parking.com:
Step 1: Domain Registration: A user registers a domain (e.g., mysite.com) through Hostinger or another registrar. Hostinger automatically sets the nameservers to ns1.dns-parking.com and ns2.dns-parking.com.
Step 2: DNS Delegation: The domain’s registry (for .com domains, this is Verisign’s servers) stores glue records pointing to Hostinger’s parking nameservers. When anyone queries mysite.com, the global DNS system directs them to ns1.dns-parking.com for answers.
Step 3: DNS Zone Created: Hostinger’s parking nameservers create a default DNS zone for mysite.com. This zone contains minimal records, typically just the NS and SOA records, and possibly an A record pointing to a Hostinger parking page IP.
Step 4: Placeholder Page Served: Any visitor who types mysite.com into their browser is directed to Hostinger’s parking page server. A generic placeholder page is displayed; the domain is “parked.”
Step 5: Domain Owner Activates: When the domain owner purchases a hosting plan, sets up their website, and points the domain to their server (either by changing nameservers or updating A records), the domain moves out of the parked state.
Why Is My Domain Pointing to ns1.dns-parking.com?
There are several common reasons you might find a domain using ns1.dns-parking.com:
- Newly registered domain, not yet connected to hosting. This is the most common reason. When you register a domain with Hostinger and have not yet set up hosting or pointed it to a server, Hostinger parks it by default. This is standard practice across the industry.
- Hosting plan expired or cancelled. If an active Hostinger hosting plan lapses and the domain registration continues, Hostinger may revert the domain’s nameservers to the parking configuration until the hosting is renewed or the domain is pointed elsewhere.
- Domain transferred to Hostinger management. If you moved a domain’s DNS management to Hostinger (without necessarily hosting a website there), the domain may be placed under the parking nameservers.
- Purchased a domain as a brand protection measure. Companies and individuals often register multiple domain variations (e.g., both .com and .net versions of their name) and park the extras to prevent cybersquatting. These secondary domains naturally end up parked.
- Domain awaiting development. The website is still being designed or built. Rather than display an error, the domain sits on the parking nameservers until the site is ready to launch.
What Does a Parked Domain Look Like?
When you visit a domain parked at ns1.dns-parking.com, you will typically see one of these pages:
Hostinger “Coming Soon” or Placeholder Page: A simple branded page indicating that the domain is registered with Hostinger and the website is not yet set up. This is the most common result for newly registered domains.
“Domain for Sale” Page: Some parked domains display a page indicating the domain is available for purchase, with contact details for the current owner.
Blank Page or DNS Error: If the DNS zone has no A record configured for the parked domain, browsers may display a “This site can’t be reached” error rather than a placeholder page, even though the domain itself is registered.
Advertisement Page: Some parking services monetise parked domains by displaying pay-per-click ads related to the domain name keywords. This is less common with Hostinger’s default parking, but it can be enabled.
Is ns1.dns-parking.com Safe?
Yes, ns1.dns-parking.com is a legitimate, trusted nameserver operated by Hostinger, one of the world’s most established web hosting companies. Seeing this nameserver when looking up a domain does not indicate anything malicious.
However, here are a few nuances worth understanding:
From a trust perspective, A domain parked at ns1.dns-parking.com is inactive. If you are considering doing business with a company whose website resolves to a parking page, that is worth investigating further; it may mean the business has not set up its website yet, or it could indicate the site has been taken down.
From a security perspective, the nameservers themselves are operated on Cloudflare’s infrastructure, which provides robust DDoS protection and reliable uptime. There is no inherent security risk from the nameserver configuration.
From an email perspective: If a domain is parked without MX records configured, emails sent to that domain will bounce. If you are trying to reach someone at an email address hosted on a parked domain, the messages may not be delivered. (See the email section below for more details.)
What to be cautious of: Phishing attacks sometimes use newly registered, parked-looking domains as a cover. Always verify the full context of a domain, its registration age, ownership, and content, before trusting it for sensitive communications.
DNS Parking vs. Domain Forwarding vs. Active Hosting
These three terms are often confused. Here is a clear comparison:
| Feature | DNS Parking | Domain Forwarding | Active Hosting |
| Website displayed | Placeholder/parking page | Redirects to another URL | Your actual website |
| Nameserver | Parking NS (e.g., ns1.dns-parking.com) | Can vary | Your hosting provider’s NS |
| Purpose | Hold domain, no active site | Redirect traffic elsewhere | Serve a live website |
| Email support | Possible but limited | Depends on setup | Full email support |
| DNS records needed | Minimal (NS, SOA, optional A) | A or CNAME + redirect rule | Full DNS zone (A, MX, TXT, etc.) |
| Typical cost | Domain registration fee only | Domain registration fee + redirect | Domain + hosting fees |
Domain forwarding is when a parked domain automatically redirects visitors to another URL, for example, forwarding myolddomain.com to mynewdomain.com. This differs from parking because there is an active redirect in place, not just a placeholder page.
How to Check If Your Domain Is Using ns1.dns-parking.com
There are several quick ways to check whether a domain is parked at ns1.dns-parking.com:
Method 1: Use HasheTools DNS Lookup
The fastest method is to use the HasheTools DNS Lookup Tool:
- Go to hashetools.com/tools/dns-lookup
- Enter the domain name you want to check
- Select NS as the record type (or use “All Records” to see everything)
- Click Lookup. If the NS records show ns1.dns-parking.com and ns2.dns-parking.com, the domain is parked with Hostinger.
Method 2: Use HasheTools All Records Tool
For a complete picture of all DNS records associated with a domain, use the HasheTools All Records Tool, which returns every record type (A, AAAA, NS, MX, TXT, SOA, CNAME) in a single lookup.
Method 3: Use nslookup (Command Line)
On any operating system, open a terminal or command prompt and run:
nslookup -type=NS yourdomain.com
Look for the NS record values in the output. If you see ns1.dns-parking.com, the domain is parked.
Method 4: Use dig (Linux/macOS)
dig NS yourdomain.com
Check the ANSWER SECTION for the NS record values.
Method 5: Use HasheTools WHOIS
The HasheTools WHOIS Lookup will show the domain’s registered nameservers, registration date, expiry date, and registrar, giving you a full picture of the domain’s current status.
How to Move Away from DNS Parking: Point Your Domain to a Website
If your domain is parked at ns1.dns-parking.com and you want to connect it to an active website, follow these steps.
Option A: Change Your Nameservers (Recommended for Hostinger Hosting)
This is the cleanest option if you are hosting your website with Hostinger or another provider.
Step 1: Log in to your Hostinger account (or wherever your domain is registered).
Step 2: Navigate to Domains > Manage and select the domain you want to update.
Step 3: Find the Nameservers section and click “Change Nameservers.”
Step 4: Enter the nameservers provided by your hosting provider. For example:
- Hostinger hosting: ns1.hostinger.com and ns2.hostinger.com
- Cloudflare: your assigned Cloudflare nameservers
- Other providers: use the nameservers they give you when you set up your hosting
Step 5: Save the changes. DNS propagation typically takes between 15 minutes and 48 hours. During this time, some visitors may still see the parked page while others see your new site, depending on which DNS servers they query.
Option B: Update A Records (Keep Using dns-parking.com Nameservers)
If you want to keep Hostinger’s parking nameservers but just update where the domain points, you can update the A record in the DNS zone:
Step 1: Log in to your Hostinger account and go to Domains > DNS / Nameservers.
Step 2: Find the A record for @ (your root domain) and edit it.
Step 3: Change the IP address to your web server’s IP address.
Step 4: Save the changes and wait for propagation.
Related read: Website IP Lookup
Common Problems with Parked Domains and How to Fix Them
Problem 1: Website shows parking page even after changing nameservers
Cause: DNS propagation has not completed yet, or your browser/ISP has cached the old DNS response.
Fix: Wait up to 48 hours for full propagation. In the meantime, try flushing your local DNS cache to force your computer to fetch the latest records.
Related read: How to Flush DNS and Clear DNS Cache
Problem 2: Domain shows “This site can’t be reached” instead of a parking page
Cause: The DNS zone for the domain has no A record configured, not even for the parking page.
Fix: Log in to Hostinger’s DNS management and verify that an A record exists for the root (@) of the domain. If not, add one pointing to your server IP, or contact Hostinger support to restore the default parking page configuration.
Problem 3: Email stopped working after the domain was parked
Cause: The parking DNS zone may not have the correct MX records configured, causing email delivery to fail.
Fix: Log in to Hostinger’s DNS management and check the MX records for your domain. Add or restore the correct MX records for your email provider. See the email section below for full details.
Problem 4: Nameservers changed, but nothing was updated
Cause: Nameserver changes require propagation time, and some DNS resolvers cache NS records aggressively due to high TTL values (48 hours in this case).
Fix: Use the HasheTools DNS Lookup Tool to check the current NS records being returned. If they have updated, the issue is local DNS caching; flush your cache and try again.
Problem 5: Someone else registered a similar domain, and it is parked
Cause: Domain name squatting or cybersquatting, someone registered a domain similar to yours for resale or other purposes.
Fix: Check the WHOIS data using HasheTools WHOIS Lookup to identify the owner and registration date. You may be able to contact the owner through WHOIS contact details or pursue a UDRP (Uniform Domain-Name Dispute-Resolution Policy) complaint if trademark infringement is involved.
DNS Parking and Email: What You Need to Know
DNS parking and email do not always mix well. Here is what to watch out for:
MX Records on Parked Domains
A domain’s MX records determine where emails sent to that domain are delivered. When a domain is parked at ns1.dns-parking.com, Hostinger may or may not configure default MX records in the parking zone.
If no MX records exist in the parking zone, emails sent to any address @yourparkeddomain.com will bounce, and the sending mail server will receive a “no mail exchanger” error.
Checking MX Records
Use the HasheTools DNS Lookup Tool with record type set to MX to check whether your parked domain has mail exchanger records configured.
Adding MX Records While Parked
If you need email to work while your domain is parked (for example, using Google Workspace or another email provider), you can add MX records to the Hostinger DNS zone without changing the nameservers:
- Log in to Hostinger and go to DNS management for your domain
- Add the MX records provided by your email provider (Google Workspace, Microsoft 365, Zoho, etc.)
- Add the corresponding SPF TXT record
- Save and allow propagation
Related read: Reverse DNS Does Not Match SMTP Banner
Benefits and Drawbacks of DNS Parking
Benefits of DNS Parking
Protect your brand: Registering and parking domain variations (e.g., .net, .org, .co versions of your .com domain) prevents competitors or bad actors from acquiring them for phishing, cybersquatting, or brand confusion.
Secure your domain while building: Park a domain while your website is being designed or developed, so the name is not taken by someone else in the meantime.
Low cost: Parked domains only require the annual domain registration fee, no hosting costs, and no server maintenance.
Passive income potential: Some parking services display relevant pay-per-click advertisements on parked domains, generating small amounts of revenue from organic traffic.
Flexibility: A parked domain can be redirected to an active website, pointed to a new server, transferred to a different registrar, or sold at any time. Parking gives you options.
Drawbacks of DNS Parking
No active website: Visitors see only a placeholder page, which provides no value and can give a poor impression of your brand.
Email limitations: Without MX records, email is non-functional. If you need email on the domain, you must configure MX records manually, even while parked.
Lost traffic and SEO value: If the domain previously had organic traffic or search engine rankings, parking it causes those rankings to disappear over time, as search engines index a placeholder page with no content.
Potential spam filter issues: Domains with no active website or configured email infrastructure can sometimes be associated with poor sender reputation, relevant if you plan to use the domain for email marketing in the future.
False sense of activity: Cybercriminals occasionally use freshly registered, parked-looking domains to create a veneer of legitimacy before activating a phishing campaign. Seeing a parked page is not always innocent.
Frequently Asked Questions
What does it mean when a domain uses ns1.dns-parking.com?
It means the domain is managed by Hostinger’s DNS parking service. The domain is registered and owned by someone, but it is not connected to an active website. Hostinger displays a placeholder page for any visitor who types the domain into a browser.
Is ns1.dns-parking.com the same as Hostinger’s regular nameservers?
No. Hostinger’s active hosting nameservers are typically ns1.hostinger.com and ns2.hostinger.com. The ns1.dns-parking.com nameservers are specifically for Hostinger’s domain parking service; they hold domains that are not yet connected to active hosting.
Can I use ns1.dns-parking.com and still have a working website?
Yes, but you need to manually update the DNS records. If you add a valid A record in the Hostinger DNS zone pointing to your web server’s IP address, your website will work even while the nameservers remain ns1.dns-parking.com. However, switching to your hosting provider’s dedicated nameservers is generally cleaner and more reliable.
How long does it take to unpark a domain?
Changing nameservers or updating DNS records typically takes between 15 minutes and 48 hours to propagate globally. The TTL on the parking nameservers’ NS records is 172,800 seconds (48 hours), so in the worst case, you may need to wait the full 48 hours for all DNS resolvers worldwide to pick up the change.
Why do ns1.dns-parking.com IP addresses belong to Cloudflare?
Hostinger operates its DNS parking service on top of Cloudflare’s Anycast network infrastructure. This means the physical servers handling DNS queries are part of Cloudflare’s global network, while Hostinger manages the DNS zones and configurations. This is a common and legitimate arrangement; many providers use Cloudflare’s infrastructure as the backbone for their DNS services.
Can I run email on a parked domain?
Yes, by configuring MX records in the parking zone. Log in to Hostinger’s DNS management, add the MX records for your email provider, and add the SPF TXT record. Email will work independently of whether the domain has an active website.
What is ns2.dns-parking.com?
ns2.dns-parking.com is the secondary nameserver in Hostinger’s parking nameserver pair. It works alongside ns1.dns-parking.com for redundancy. Its IPv4 address is 162.159.25.42. Both nameservers must be set for the parking configuration to work correctly; you should never set just one of the two.
Will parking a domain hurt my SEO?
If you are parking a previously active domain with existing search engine rankings, parking it will hurt your SEO over time, search engines will index a thin placeholder page with no content, and your existing rankings will gradually disappear. If you are parking a brand new domain that has never had a website, there is no SEO impact yet.
Conclusion
ns1.dns-parking.com is Hostinger’s primary parking nameserver, a reliable, Cloudflare-backed piece of DNS infrastructure that holds domains in a managed, inactive state until their owners are ready to connect them to active websites.
Understanding what it means when you see this nameserver is essential for:
- Domain troubleshooting: knowing why a website is not loading
- Email deliverability: understanding why emails to a domain may bounce
- Security investigations: assessing the status and ownership of a domain
- Website migration: knowing exactly what steps to take to move away from parking
Whether you are a Hostinger customer who needs to activate your domain, a developer investigating an unfamiliar nameserver, or a business owner protecting your brand with parked domains, this guide has given you the complete picture.
Ready to look up DNS records right now? Use the tools below to investigate any domain in seconds.

How to Run a Traceroute (tracert) Command: Complete Guide for Windows, Mac & Linux
If a website is loading slowly, your connection keeps dropping, or emails are not reaching their destination, a traceroute (or tracert on Windows) is one of the first tools any network administrator or IT professional reaches for. It shows you exactly which path your data takes across the internet, hop by hop, and pinpoints where problems occur.
This guide covers everything you need to know: what traceroute is, how it works, how to run it on Windows, Mac, and Linux, how to read the results, what all the common flags do, and how to troubleshoot the most frequent issues.
What Is Traceroute (tracert)?
Traceroute is a built-in network diagnostic command available on virtually every operating system. It traces the path that data packets take from your device to a destination, such as a website, server, or IP address, and shows you every router (or “hop”) those packets pass through along the way.
For each hop, traceroute reports:
- The hostname or IP address of that router
- The round-trip time (RTT) is measured in milliseconds, which is the time it took a packet to reach that hop and return.
Think of traceroute as a GPS tracker for your internet traffic. Instead of just telling you whether you reached your destination (which ping does), traceroute shows you the entire journey, every road, every intersection, and how long you spent at each one.
This makes it an invaluable tool for diagnosing:
- Slow website loading times
- Network bottlenecks and high latency
- Routing problems and suboptimal paths
- Packet loss at specific network points
- Whether a problem is on your end, your ISP’s end, or the destination server’s network
Traceroute vs. Tracert: What Is the Difference?
The short answer: they are the same tool with different names on different operating systems.
| Name | Operating System | Protocol Used by Default |
| tracert | Windows | ICMP (Internet Control Message Protocol) |
| traceroute | Linux | UDP (User Datagram Protocol) |
| traceroute | macOS | UDP (User Datagram Protocol) |
Both tools accomplish the same goal, mapping the hop-by-hop route from your device to a destination, but they differ slightly in the underlying network packets they send. Windows tracert uses ICMP Echo Requests (similar to the ping command), while Linux and macOS traceroute use UDP packets by default, though this can be changed with flags.
The practical impact is minimal for most troubleshooting scenarios, but it matters when dealing with firewalls: some networks block UDP packets used by Linux/macOS traceroute, while others block ICMP used by Windows tracert. If one fails, you can often switch protocols using command flags (covered below).
How Does Traceroute Work? (TTL and ICMP Explained)
Traceroute uses a clever technique built on a networking concept called Time-to-Live (TTL).
Every IP packet sent across the Internet contains a TTL value, a number that limits how many routers (hops) the packet is allowed to pass through before it is discarded. Each router that handles a packet decrements the TTL by 1. When the TTL reaches zero, the router discards the packet and sends back an ICMP “Time Exceeded” error message to the sender.
Traceroute exploits this mechanism to map each hop, one at a time:
Step 1: Traceroute sends a packet with TTL = 1. The very first router in the path decrements TTL to 0, discards the packet, and sends back a “Time Exceeded” message, revealing the first hop’s IP address and response time.
Step 2: Traceroute sends a packet with TTL = 2. The first router passes it through (TTL drops to 1), the second router decrements it to 0, discards it, and sends back its “Time Exceeded” message, revealing the second hop.
Step 3 onward: This continues, incrementing TTL by 1 each time, until the packet finally reaches the destination, which sends back a “Port Unreachable” or ICMP Echo Reply message, signalling the trace is complete.
By collecting the ICMP “Time Exceeded” responses from each router along the path, traceroute builds a complete, ordered map of every hop between your device and the destination, along with the round-trip time for each one.
When Should You Run a Traceroute?
Traceroute is most useful in these situations:
Website or application loading slowly: A traceroute to the server’s IP address will show you which hop is adding the most latency, whether it is your local network, your ISP, a transit provider, or the destination’s own network.
Connection intermittently dropping: Running traceroutes over time can reveal a specific hop where packet loss is occurring, pointing to a problematic router or link.
Cannot reach a website or server at all: Traceroute can show you exactly where in the path connectivity breaks down; the last successful hop before the trace stops is usually where the problem lies.
Emails being rejected or flagged: Network routing issues between your mail server and the recipient’s server can sometimes be diagnosed with a traceroute to the destination mail server’s IP.
ISP troubleshooting: Your ISP’s support team will often ask you to run a traceroute to their servers to help diagnose problems on their end.
Security investigations: Network and security professionals use traceroutes as part of reconnaissance and network mapping to understand the infrastructure between two points.
Related read: Reverse IP Address Lookup
How to Run Traceroute on Windows (tracert)
On Windows, the command is called tracert (not traceroute). It is built into every version of Windows, no installation required.
Method 1: Using Command Prompt
Step 1: Press Windows Key + R on your keyboard to open the Run dialog box.
Step 2: Type cmd and press Enter. The Command Prompt window will open.
Step 3: In the Command Prompt, type the tracert command followed by the domain name or IP address you want to trace:
tracert example.com
or using an IP address:
tracert 8.8.8.8
Step 4: Press Enter. The trace will begin immediately and output results line by line.
Step 5: Wait for the trace to complete. You will see a Trace complete. message when it finishes. It may take between 30 seconds and a few minutes, depending on the number of hops involved.
Method 2: Using Windows Search
Step 1: Click the Start button and type cmd in the search bar.
Step 2: Right-click on “Command Prompt” and select “Run as administrator” for full access.
Step 3: Type your tracert command and press Enter.
Sample Windows tracert Output
Tracing route to example.com [93.184.216.34]
over a maximum of 30 hops:
1 2 ms 1 ms 1 ms 192.168.1.1
2 12 ms 10 ms 11 ms 10.20.30.1
3 15 ms 14 ms 15 ms isp-gateway.net [96.120.40.245]
4 22 ms 20 ms 21 ms core-router.isp.net [96.110.175.85]
5 35 ms 34 ms 35 ms 93.184.216.34
Trace complete.
Pro tip: Run tracert 8.8.8.8 to check your path to Google’s DNS server; it is a reliable, always-online destination for testing your network path. See our guide to 8.8.8.8 for more.
How to Run Traceroute on macOS
On macOS, the command is traceroute, and it runs from the Terminal application.
Method 1: Using Terminal
Step 1: Open Terminal. The fastest way is to press Command + Space to open Spotlight, type Terminal, and press Enter.
Step 2: In the Terminal window, type:
traceroute example.com
or using an IP address:
traceroute 8.8.8.8
Step 3: Press Enter. Hops will appear one by one as the trace progresses.
Method 2: Using Network Utility (macOS Monterey and earlier)
On older versions of macOS:
Step 1: Open Applications > Utilities > Network Utility.
Step 2: Click the Traceroute tab.
Step 3: Enter the domain name or IP address in the text field.
Step 4: Click the Trace button.
Note: Network Utility was removed in macOS Monterey (12.x). Use the Terminal method instead.
macOS Traceroute Note on sudo
On some macOS configurations, traceroute may need administrator privileges to use certain protocols:
sudo traceroute example.com
Enter your Mac password when prompted.
How to Run Traceroute on Linux {#traceroute-linux}
On Linux, the command is traceroute. It may or may not be pre-installed depending on your distribution.
Step 1: Check if traceroute is installed
Open a terminal and type:
traceroute –version
If you see a version number, it is already installed. If you see “command not found,” proceed to Step 2.
Step 2: Install traceroute (if not installed)
Ubuntu / Debian:
sudo apt-get install traceroute
CentOS / RHEL / Fedora:
sudo yum install traceroute
Arch Linux:
sudo pacman -S traceroute
Step 3: Run the traceroute command
traceroute example.com
or:
traceroute 8.8.8.8
On some Linux distributions, raw socket operations may require root privileges:
sudo traceroute example.com
Linux ICMP mode (same as Windows tracert)
By default, Linux traceroute uses UDP. To switch to ICMP mode (matching Windows tracert behaviour):
sudo traceroute -I example.com
How to Run Traceroute on Android and iOS
Mobile devices do not have a built-in terminal for traceroute by default, but free apps make it easy.
Android
Install a free network utility app from the Google Play Store, such as “Network Analyzer” or “Ping & Net”. These apps include a traceroute function; simply enter the domain or IP address and tap the traceroute button.
iOS (iPhone / iPad)
Install a free app from the App Store, such as “Network Analyzer” or “HE.NET Network Tools”. Both include a visual traceroute function that maps hops on a world map alongside the traditional output.
Traceroute Command Flags and Options Explained
Both tracert (Windows) and traceroute (Linux/macOS) support additional flags that modify how the command runs.
Windows tracert Flags
| Flag | Description | Example |
| -d | Skips DNS resolution, shows IP addresses only, which speeds up the trace | tracert -d example.com |
| -h <MaxHops> | Sets the maximum number of hops (default: 30) | tracert -h 50 example.com |
| -w <timeout> | Sets the wait time in milliseconds before a hop times out (default: 4000ms) | tracert -w 1000 example.com |
| -4 | Forces IPv4 | tracert -4 example.com |
| -6 | Forces IPv6 | tracert -6 example.com |
Full Windows tracert syntax:
tracert [-d] [-h MaximumHops] [-w timeout] [-4] [-6] target
Linux/macOS traceroute Flags
| Flag | Description | Example |
| -n | No DNS resolution, shows IPs only, faster trace | traceroute -n example.com |
| -m <hops> | Sets the maximum number of hops (default: 30) | traceroute -m 50 example.com |
| -w <seconds> | Wait time before timeout at each hop | traceroute -w 5 example.com |
| -I | Uses ICMP instead of UDP (same as Windows tracert) | sudo traceroute -I example.com |
| -T | Uses TCP SYN packets, useful for bypassing firewalls | sudo traceroute -T example.com |
| -p <port> | Specifies destination port | traceroute -p 80 example.com |
| -q <queries> | Number of probes per hop (default: 3) | traceroute -q 5 example.com |
| -4 / -6 | Force IPv4 or IPv6 | traceroute -4 example.com |
How to Read Traceroute Output
Once the trace completes, you will see output that can look overwhelming at first glance. Here is how to interpret every part of it.
Sample Output
Tracing route to hashetools.com [104.21.30.125]
over a maximum of 30 hops:
1 2 ms 1 ms 2 ms 192.168.1.1
2 10 ms 9 ms 11 ms 10.20.0.1
3 15 ms 14 ms 15 ms isp-gateway.example.com [96.120.40.245]
4 22 ms 21 ms 23 ms core1.isp.net [96.110.175.85]
5 45 ms 44 ms 47 ms ae-3.r21.nycmny01.us.bb.gin.ntt.net [129.250.6.97]
6 * * * Request timed out.
7 55 ms 54 ms 56 ms 104.21.30.125
Trace complete.
Column-by-Column Breakdown
Column 1 – Hop Number: The sequential number of each router in the path. Hop 1 is almost always your local router (gateway). The final hop is the destination server.
Columns 2, 3, 4 – Response Times (ms): Three separate round-trip time measurements in milliseconds. Traceroute sends three packets to each hop for reliability. These three values tell you:
- If all three are similar, that hop’s latency is stable
- If values vary wildly, there may be congestion or instability at that hop
- Lower is better; under 100ms is generally good, over 200ms is high
Column 5 – Hostname / IP Address: The domain name (if DNS resolved it) and/or the IP address of the router at that hop.
What Different Latency Values Mean
| Response Time | Interpretation |
| 1–20 ms | Excellent, local network or very nearby |
| 20–100 ms | Normal for domestic routing |
| 100–200 ms | Acceptable for international routes |
| 200–400 ms | High latency, investigate this hop |
| 400ms+ | Very high, likely a problem or geographic distance |
Identifying a Problem Hop
The key to reading traceroute output for troubleshooting is watching for a sudden jump in latency. If hops 1–5 show 20ms and hop 6 suddenly shows 200ms, and stays high for all subsequent hops, hop 6 is where the problem is occurring.
If latency is high at one hop but drops back to normal at the next hop, that particular router simply de-prioritises ICMP responses, and the delay is not a real problem.
What Do Asterisks (* * *) Mean in Traceroute?
You will often see rows of three asterisks in traceroute output:
6 * * * Request timed out.
Asterisks mean that no response was received from that hop within the timeout period. This does not always indicate a problem. Here is what different asterisk patterns mean:
Asterisks at one hop, then normal results resume: The router at that hop is configured to not respond to ICMP or UDP probe packets (firewalls and security-hardened routers commonly do this). The path is still working normally, the router is just silent.
Asterisks at every hop from a certain point onwards: This is the serious case. It usually means:
- The path is broken at or after the last successful hop
- A firewall is blocking all further responses
- The destination server or network is unreachable
Asterisks only at the last hop: The destination server itself may be blocking ICMP responses while still serving traffic normally on other ports (HTTP/HTTPS). Try accessing the website. If it loads, the asterisks are just firewall-filtered probes, not a real issue.
What to check based on where asterisks appear:
- Hops 1-3: The problem is likely on your local network or with your router
- Hops 4-8: Your ISP’s network may be having issues
- Hops 9 onward: The problem is either with a transit provider or with the destination’s network
- Final hop only: The destination server is likely filtering ICMP
Traceroute vs. Ping: What Is the Difference?
Ping and traceroute are both network diagnostic tools, and they complement each other well.
| Feature | Ping | Traceroute |
| What it tests | Whether the destination is reachable | The full path to the destination, hop by hop |
| Information returned | Round-trip time, packet loss | Each router in the path has per-hop latency |
| Identifies bottleneck location | No | Yes |
| Typical use case | Quick connectivity check | Diagnosing where exactly a problem occurs |
| Speed | Very fast | Slower (traces every hop) |
When to use ping: When you want to quickly check if a server is online and measure basic latency.
When to use traceroute: When you know there is a problem, and you need to identify exactly where in the network path it is happening.
Related read: Website IP Lookup
Common Traceroute Problems and What They Mean
Problem 1: Trace stops at hop 1 (your local router)
What it means: Your device cannot reach even the first hop, your own gateway/router. The problem is on your local network.
What to check: Reboot your router, check your network cable or Wi-Fi connection, and verify your local IP configuration.
Problem 2: Trace stops after a few hops at your ISP
What it means: Your traffic is reaching your ISP but not going any further. This is typically an ISP-side routing issue.
What to do: Contact your ISP with the traceroute output as evidence. The output clearly shows where the path breaks.
Problem 3: Extremely high latency at a specific hop
What it means: A router in the path is overloaded, geographically distant, or de-prioritizing probe packets.
What to check: If latency remains high at all subsequent hops, too, that hop is genuinely problematic. If subsequent hops are normal, the router is simply deprioritising ICMP, and it is not a real problem.
Problem 4: Destination unreachable / trace never completes
What it means: The destination is offline, has a firewall blocking the protocol, or the route does not exist.
What to check: Try the trace with a different protocol (use -I flag on Linux to switch to ICMP, or -T for TCP). Also, check if the destination website loads in a browser; if it does, the server just filters ICMP probes.
Problem 5: “Destination net unreachable” at hop 1
What it means: Your default gateway (router) has no route to the destination network.
What to check: This often indicates a routing table issue. Check your router’s configuration or contact your ISP.
Problem 6: Trace works from your device but not from the destination
What it means: The path may be asymmetric; internet traffic does not always take the same route in both directions. Issues may only appear in one direction.
What to do: Run a traceroute from the destination server back to your IP (this is what a reverse traceroute does). Some online tools offer this capability.
Related read: Reverse IP Address Lookup
How to Save Traceroute Results to a File
When troubleshooting network issues, especially when sharing results with your ISP, hosting provider, or IT team, you will want to save the output to a text file.
Windows: Save the tracert to a File
tracert example.com > C:\tracert-results.txt
This saves the results to a file called tracert-results.txt on the C: drive. You can open this file in Notepad or any text editor.
To save AND see the results in real time at the same time:
tracert example.com | tee C:\tracert-results.txt
macOS / Linux: Save traceroute to a File
traceroute example.com > traceroute-results.txt
The file will be saved in whichever directory your terminal is currently in. To see where that is, type pwd before running the command.
Sharing Traceroute Results
When sending results to your ISP or support team, include:
- The tracert/traceroute output (full text)
- Your public IP address
- The destination you traced to
- The date and time the trace was run
- A brief description of the problem you are experiencing
You can quickly check your public IP using the HasheTools My IP Address Tool and get detailed information about any IP using the HasheTools IP Lookup Tool.
Frequently Asked Questions
Is traceroute the same as tracert?
Yes, they are the same diagnostic tool. Tracert is the name Microsoft uses on Windows, while traceroute is the name used on Linux and macOS. Both map the hop-by-hop path your data takes to a destination.
How many hops is normal for a traceroute?
A typical domestic traceroute to a nearby server shows between 5 and 15 hops. International routes can show 20–30 hops. If you reach the default maximum of 30 hops without arriving at the destination, it usually means the destination is unreachable or heavily firewalled.
Why does my traceroute show asterisks (* * *)?
Asterisks mean a particular hop did not respond within the timeout period. This is often caused by firewalls or routers that are configured not to respond to ICMP/UDP probe packets. If subsequent hops respond normally, the asterisks are generally not a problem.
Can traceroute damage or harm a network?
No. Traceroute sends very small, standard network packets and does not harm networks in any way. It is a completely safe, read-only diagnostic tool.
Why does traceroute show different results each time I run it?
Internet routing is dynamic. Routers constantly adjust paths based on traffic load, network conditions, and routing table updates. Running a traceroute twice in quick succession may show slightly different paths; this is normal. For accurate troubleshooting, run multiple traces and look for consistent patterns.
What does “Request timed out” mean at every hop?
If every single hop after a certain point shows “Request timed out,” the path is broken at that point. The last responsive hop is where the problem likely originates. If all hops from the very beginning time out, you may have a local network or firewall issue blocking the tool entirely.
Can I run a traceroute on a domain name or only an IP address?
Both work. You can use either a domain name (e.g., tracert example.com) or an IP address (e.g., tracert 8.8.8.8). When you use a domain name, traceroute automatically resolves it to an IP address first.
What is a visual traceroute?
A visual traceroute is a graphical representation of the standard traceroute output, often showing hops plotted on a world map with geographic locations derived from IP geolocation data. It makes it easier to visualise the physical routing path your data takes across the internet.
Why does the latency suddenly drop in the middle of my traceroute?
Some routers prioritise traffic forwarding over generating ICMP responses. This means a router might appear to have high latency in a traceroute output even though it is actually forwarding traffic efficiently. If latency drops back down at subsequent hops, the apparent spike at that hop is not a real problem; it is just a router that responds to probe packets slowly while processing real traffic quickly.
Conclusion
The traceroute (or tracert on Windows) command is one of the most powerful and practical tools in any network troubleshooter’s toolkit. Whether you are investigating a slow website, hunting down packet loss, diagnosing email delivery issues, or simply curious about how your data travels across the internet, traceroute gives you a clear, hop-by-hop map of the path your data takes.
The key things to remember:
- Windows uses tracert, Linux and macOS use traceroute
- Each line of output = one router (hop) in the path
- The three numbers per hop are round-trip times in milliseconds
- Asterisks mean a hop did not respond, which is not always a problem
- A sudden spike in latency that stays high across subsequent hops = real issue
- Save your output to a file when sharing with support teams
Ready to go deeper? Use the HasheTools DNS Lookup Tool to check DNS records for any domain you are tracing, or use the HasheTools IP Lookup Tool to get detailed information about any IP address that appears in your traceroute output.

What Is a DNS PTR Record? Complete Guide to Reverse DNS Lookup
If you’ve ever wondered why your perfectly written emails end up in a spam folder, or why your mail server gets flagged during an SMTP test, there’s a good chance a DNS PTR record is at the heart of the issue. This guide breaks down everything you need to know about PTR records: what they are, how they work, why they matter, and how to check, create, and troubleshoot them.
What Is a DNS PTR Record?
A DNS PTR record (short for Pointer record) is a type of DNS record that maps an IP address back to a domain name. It is essentially the reverse of an A record, which maps a domain name to an IP address.
Think of it this way: the regular DNS system works like a phonebook where you look up a name to find a number. A PTR record works like a reverse phonebook; you start with the number (IP address) and look up who it belongs to (domain name). This process is called a reverse DNS lookup (or rDNS).
Simple definition: A DNS PTR record answers the question: “What domain name is associated with this IP address?”
PTR records are not used for general website browsing. Instead, they play a critical behind-the-scenes role in email delivery, network security, server logging, and spam prevention.
PTR Record vs. A Record: What Is the Difference?
Understanding a PTR record becomes easy once you compare it with the DNS A record, which most website owners are already familiar with.
| Feature | A Record | PTR Record |
| Direction | Domain → IP address | IP address → Domain |
| Lookup type | Forward DNS lookup | Reverse DNS lookup |
| Where it’s stored | Your domain’s DNS zone | Reverse DNS zone (.in-addr.arpa) |
| Who controls it | Domain owner | IP address owner (ISP or hosting provider) |
| Primary use | Website resolution | Email verification, logging, and security |
Example:
- A record: mail.example.com → 192.0.2.10
- PTR record: 192.0.2.10 → mail.example.com
Both records should point to each other. When they do, this is called Forward-Confirmed reverse DNS (FCrDNS), and it is a key trust signal for email servers.
How Does a DNS PTR Record Work?
Here is a step-by-step breakdown of how a PTR record lookup works:
- A mail server receives an incoming email from IP address 192.0.2.10.
- To verify the sender’s identity, the receiving server performs a reverse DNS lookup on 192.0.2.10.
- The DNS system looks up the PTR record for the reverse IP address 10.2.0.192.in-addr.arpa.
- The PTR record returns the associated domain name: mail.example.com.
- The receiving server then does a forward DNS lookup on mail.example.com to confirm it points back to 192.0.2.10.
- If both lookups match, the server accepts the email as coming from a legitimate, verified source.
If the PTR record is missing, mismatched, or misconfigured, the receiving server may reject or flag the email as spam.
What Is a Reverse DNS Lookup?
A reverse DNS lookup is the process of resolving an IP address into its associated domain name, using the PTR record stored in the DNS system.
It is the exact opposite of a standard (forward) DNS lookup:
- Forward DNS lookup: You type example.com into your browser → DNS returns 192.0.2.1
- Reverse DNS lookup: You query IP 192.0.2.1 → DNS returns example.com
Reverse DNS lookups are used for:
- Email verification: to confirm the identity of a sending mail server
- Security auditing: to map IP addresses found in network logs to human-readable domain names
- Spam filtering: to check whether the sending IP is associated with a known, legitimate domain
- Network troubleshooting: to identify the source of traffic or connections in server logs
You can run a reverse DNS lookup instantly using the HasheTools DNS Reverse Lookup Tool. Just enter any IP address and get the PTR record result in seconds.
PTR Record Format Explained (IPv4 and IPv6)
The way PTR records are stored in DNS is a bit different from how you might expect. The IP address is written backwards, and a special domain suffix is appended.
IPv4 PTR Record Format
For an IPv4 address like 192.0.2.255, the PTR record is stored as:
255.2.0.192.in-addr.arpa
The IP octets are reversed, and .in-addr.arpa is appended. This naming convention exists because DNS domains are organized from most specific (left) to most general (right), and reversing the IP address preserves this hierarchical structure.
IPv6 PTR Record Format
IPv6 PTR records work the same way but are more complex. For the IPv6 address 2001:db8::1, the PTR record is stored under:
1.0.0.0.0.0.0.0.0.0.0.0.0.0.0.0.0.0.0.0.0.0.0.0.8.b.d.0.1.0.0.2.ip6.arpa
The IPv6 address is fully expanded, reversed digit by digit, and .ip6.arpa is appended instead of .in-addr.arpa.
What Is .arpa and Why Is It Used?
The .arpa top-level domain is a special domain used for managing network infrastructure in DNS. It is the oldest top-level domain on the internet, named after ARPA (Advanced Research Projects Agency), which created ARPANET, the precursor to the modern internet. The subdomain in-addr. arpa is specifically reserved for reverse DNS lookups of IPv4 addresses.
What Is FCrDNS (Forward-Confirmed Reverse DNS)?
FCrDNS stands for Forward-Confirmed reverse DNS, sometimes also called Full-Circle reverse DNS. It is a verification process that checks whether a PTR record and an A record are consistent with each other.
Here is how FCrDNS verification works:
- A reverse DNS lookup is performed on an IP address – it returns a domain name via the PTR record.
- A forward DNS lookup is then performed on that domain name – it should return the original IP address.
- If both match, the FCrDNS check passes, and the IP and domain are legitimately associated.
Why does FCrDNS matter?
FCrDNS is used by many email servers and security systems as a trust signal. A passing FCrDNS check indicates that:
- The domain owner and IP address owner are the same entity (or at least aware of each other)
- The server is operating transparently and following internet best practices
- The email is much less likely to be spam
If your PTR record exists but your A record does not point back to the same IP, FCrDNS will fail, and your emails may still be treated as suspicious.
Why Does a PTR Record Matter?
You might be thinking: “I don’t run a mail server, do I even need a PTR record?” For most regular website owners and users, PTR records operate entirely in the background. But if you fall into any of the following categories, they are critical:
1. Email Deliverability
This is the biggest use case. Mail servers at Gmail, Outlook, Yahoo, and other providers routinely perform reverse DNS lookups on every incoming email. If your sending IP has no PTR record, or a mismatched one, your emails are at high risk of being rejected or routed straight to spam. This is especially true for businesses running their own mail servers.
2. Anti-Spam Filtering
Spam filters assign a “spam score” to incoming emails based on dozens of signals. A missing or mismatched PTR record is a significant negative signal. Most enterprise anti-spam systems (including SpamAssassin) actively penalize emails from IPs with no reverse DNS.
3. Server Logging and Network Monitoring
System logs often record only IP addresses. When administrators need to investigate traffic, security incidents, or network activity, PTR records allow them to translate those raw IP addresses into readable domain names, making troubleshooting and forensic analysis far easier.
4. Server Identity and Trust
When servers connect, not just for email, but for other protocols, PTR records are used to verify the identity of the connecting server. This is a fundamental layer of trust in the internet infrastructure.
5. Cybersecurity Investigations
Security researchers, penetration testers, and network analysts use PTR lookups as part of reconnaissance and investigation workflows. Knowing which domain is associated with a given IP helps identify malicious actors, trace attack origins, and map network infrastructure.
PTR Records and Email Deliverability
Email deliverability is where PTR records have the most direct, visible impact. Here is a detailed look at how they affect your email:
How Receiving Mail Servers Use PTR Records
When an email arrives, the receiving mail server performs the following sequence:
- It checks the sender’s IP address.
- It performs a reverse DNS lookup to find the PTR record for that IP.
- It checks whether the PTR record resolves to a domain name.
- It performs a forward lookup on that domain name to confirm it matches the original IP (FCrDNS check).
- It compares the result against the SMTP banner that the sending server presented.
If any of these steps fail, no PTR record, wrong domain, mismatched A record, or SMTP banner mismatch, the email may be rejected, quarantined, or marked as spam.
Related read: Reverse DNS Does Not Match SMTP Banner
PTR Records and Spam Filters
Many popular anti-spam systems, including those used by major email providers, use reverse DNS as a filtering criterion:
- No PTR record = high suspicion of spam
- Generic PTR (e.g., ip-192-0-2-10.hosting.example.com) = moderate suspicion
- Properly configured PTR pointing to your domain = trust signal
PTR Records and Email Authentication (SPF, DKIM, DMARC)
PTR records work alongside, but are separate from, SPF, DKIM, and DMARC. While those protocols authenticate the email content and domain, PTR records authenticate the sending server’s IP address. Together, they form a comprehensive email authentication stack.
PTR Records vs. Other DNS Record Types
Here is how PTR records compare to other common DNS record types:
| Record Type | Function | Direction |
| A record | Map the domain to an IPv4 address | Forward (domain → IP) |
| AAAA record | Maps the domain to an IPv6 address | Forward (domain → IPv6) |
| PTR record | Maps an IP address to a domain | Reverse (IP → domain) |
| CNAME record | Aliases one domain to another | Forward (domain → domain) |
| MX record | Specifies the mail server for a domain | Forward (domain → mail server) |
| TXT record | Stores text data (SPF, DKIM, DMARC, etc.) | N/A |
| SOA record | Stores administrative info about a DNS zone | N/A |
Related read: DNS Records for google.com Explained
How to Check a PTR Record
There are several ways to check the PTR record for an IP address.
Method 1: Use HasheTools DNS Reverse Lookup
The easiest method is to use the HasheTools DNS Reverse Lookup Tool:
- Go to hashetools.com/tools/dns-reverse
- Enter the IP address you want to look up
- Click “Lookup”
- The tool will return the PTR record (domain name) associated with that IP
Method 2: Use the nslookup Command
On Windows, macOS, or Linux, open a terminal or command prompt and run:
nslookup 192.0.2.10
Or for a more targeted reverse lookup:
nslookup -type=PTR 10.2.0.192.in-addr.arpa
Method 3: Use the dig Command (Linux/macOS)
dig -x 192.0.2.10
The -x flag tells dig to perform a reverse lookup automatically. Look for the ANSWER SECTION in the output; it will show the PTR record.
Method 4: Use HasheTools SMTP Test
If you want to check PTR records specifically for your mail server and verify FCrDNS, use the HasheTools SMTP Test Tool. It will flag any PTR mismatches and SMTP banner issues automatically.
How to Create or Set Up a PTR Record
This is where PTR records differ significantly from all other DNS records. You cannot create a PTR record in your domain’s DNS settings (e.g., in Cloudflare, Namecheap, or GoDaddy). PTR records are controlled by whoever owns the IP address block, typically your ISP or hosting provider.
Step-by-Step: Setting Up a PTR Record
Step 1: Find your mail server’s IP address
Log in to your hosting control panel or run nslookup mail.yourdomain.com to find the IP address of your mail server.
Step 2: Identify who controls that IP
- If you host on a VPS or dedicated server (e.g., AWS, DigitalOcean, Vultr, Linode), the cloud provider controls the reverse DNS.
- If you use a shared hosting plan, your hosting company controls it.
- If you have a direct ISP-allocated IP range, your ISP controls it.
Step 3: Contact your provider or use their control panel
Many modern cloud providers allow you to set PTR records directly:
- AWS: Go to EC2 > Elastic IPs > Edit reverse DNS
- DigitalOcean: Rename your Droplet to the full hostname. DigitalOcean automatically creates the PTR record
- Vultr: Go to your server’s settings and find “Reverse DNS.”
- Linode/Akamai: Network tab > Reverse DNS
- Shared hosting: Submit a support ticket with your hosting provider
Step 4: Enter the correct PTR value
The PTR record value should be the fully qualified domain name (FQDN) of your mail server, for example: mail.yourdomain.com
Step 5: Create the matching A record
Make sure that mail.yourdomain.com has an A record pointing back to the same IP address. This completes the FCrDNS configuration.
Step 6: Verify the PTR record
After the DNS propagation period (usually 15 minutes to a few hours), verify the PTR record using the HasheTools DNS Reverse Lookup or the dig -x command.
Common PTR Record Mistakes and How to Fix Them
Mistake 1: Missing PTR Record
Symptom: Emails are being rejected or going to spam. SMTP tests show “No PTR record found.”
Fix: Contact your hosting provider or ISP and request a PTR record for your mail server’s IP address.
Mistake 2: Generic or Default PTR Record
Symptom: Your PTR record resolves to something like ip-192-0-2-10.us-east-1.compute.internal instead of your domain.
Fix: Update the PTR record via your cloud provider’s control panel (see the setup steps above) to point to your actual mail server hostname.
Mistake 3: PTR Record and A Record Mismatch (FCrDNS Failure)
Symptom: PTR record exists but FCrDNS check fails. The domain in your PTR record does not have a matching A record pointing back to the IP.
Fix: Ensure that the domain name in your PTR record has a corresponding A record pointing to the correct IP. Both records must match.
Mistake 4: SMTP Banner Mismatch
Symptom: SMTP test shows “Reverse DNS does not match SMTP banner.”
Fix: Update your mail server’s hostname (the value in the SMTP greeting/banner) to match the domain in your PTR record. In Postfix, this is the myhostname setting in /etc/postfix/main.cf.
Related read: Reverse DNS Does Not Match SMTP Banner
Mistake 5: Multiple PTR Records for One IP
Symptom: Inconsistent reverse lookups; some tools return different results.
Fix: Only one PTR record should exist per IP address. Remove any duplicates.
Mistake 6: Using a Dynamic IP Address
Symptom: PTR record keeps becoming invalid as the IP changes.
Fix: PTR records should only be used with static IP addresses. If your server has a dynamic IP, request a static IP from your provider before configuring a PTR record.
PTR Record Best Practices
Follow these guidelines to ensure your PTR records are configured correctly and deliver maximum benefit:
- Always configure a PTR record for every mail server IP. This is considered a basic Internet standard for email servers. Missing PTR records are a major red flag for spam filters.
- Make the PTR record match your mail server’s SMTP banner. The hostname your mail server announces when connecting to other servers must match what your PTR record resolves to.
- Ensure FCrDNS passes. Your PTR record should resolve to a domain, and that domain’s A record must point back to the same IP. Both lookups must agree.
- Use a meaningful, domain-specific hostname. Instead of a generic hostname, use something like mail.yourdomain.com. This builds trust and is easier to recognize in logs.
- Use only one PTR record per IP. Multiple PTR records for a single IP create ambiguity and can cause inconsistent behavior.
- Only use static IPs for PTR records. Dynamic IP addresses change over time, making PTR records unreliable.
- Regularly audit your PTR records. Use tools like HasheTools DNS Reverse Lookup to periodically check that your PTR records are correct and still match your A records.
- Keep TTL values reasonable. A TTL of 300–3600 seconds is standard for PTR records. Too high a TTL means changes propagate slowly; too low may cause unnecessary DNS query load.
Frequently Asked Questions
Do I need a PTR record for my website?
Not necessarily. PTR records are primarily needed for mail servers. If you only run a website and use a third-party email provider (like Google Workspace or Microsoft 365), those providers handle PTR records on your behalf. You only need to configure PTR records yourself if you operate your own mail server.
Who controls PTR records?
PTR records are controlled by the owner of the IP address block, not the domain owner. This is typically your ISP, cloud provider, or hosting company. To set up a PTR record, you must contact whoever issued your IP address.
Can I have multiple PTR records for one IP?
It is technically possible but strongly discouraged. Best practice is to have exactly one PTR record per IP address. Multiple PTR records create ambiguity and can confuse mail servers and spam filters.
What happens if my PTR record is missing?
If your mail server has no PTR record, many receiving mail servers will reject your emails outright or deliver them to the spam folder. It is one of the most impactful configuration issues for email deliverability.
How long does it take for a PTR record to propagate?
PTR record changes typically propagate within 15 minutes to a few hours, depending on the TTL set by your provider and the caching behavior of DNS resolvers worldwide.
What is the difference between a PTR record and reverse DNS?
They are closely related. Reverse DNS is the process of resolving an IP address to a domain name. A PTR record is the specific DNS resource record that makes reverse DNS possible. In other words, PTR records are the mechanism by which reverse DNS lookups are answered.
Can I check someone else’s PTR record?
Yes. You can perform a reverse DNS lookup on any public IP address using HasheTools DNS Reverse Lookup or command-line tools like dig -x or nslookup.
Is a PTR record the same as an rDNS record?
Yes. PTR record and rDNS record are the same thing. “rDNS” stands for reverse DNS, and the PTR (Pointer) record is the DNS record type used to enable reverse DNS lookups.
Conclusion
A DNS PTR record is a small but powerful piece of internet infrastructure. While regular users never interact with it directly, it plays an essential role in email deliverability, spam prevention, server logging, and network security.
If you run a mail server, a missing or misconfigured PTR record can silently destroy your email deliverability, causing your messages to be rejected or flagged as spam by major providers like Gmail, Outlook, and Yahoo. Getting your PTR record right and ensuring FCrDNS passes is one of the most effective steps you can take to protect your sender reputation.
Ready to check your PTR record right now? Use the HasheTools DNS Reverse Lookup Tool to instantly look up the PTR record for any IP address and verify that your reverse DNS is configured correctly.

IP Addresses for Facebook.com: Complete Facebook IP Lookup & DNS Analysis Guide
In the modern internet era, understanding the IP addresses of popular websites like Facebook is essential for IT professionals, web developers, network administrators, and even curious internet users. Every website on the internet, including Facebook.com, is hosted on servers identified by unique IP addresses. These IP addresses can be IPv4, IPv6, or associated with CNAME (Canonical Name) records.
In this guide, we will walk you through everything you need to know about Facebook’s IP addresses, how to look them up, verify them, and use tools like HasheTools to perform accurate DNS analysis.
What Is an IP Address?
An IP (Internet Protocol) address is a unique string of numbers that identifies a device or server on the Internet. Every website has at least one IP address associated with its domain name, which enables computers and servers to communicate.
- IPv4: Standard IP format, e.g., 57.144.222.1.
- IPv6: A newer format that accommodates more addresses, e.g., 2a03:2880:f36f:1:face:b00c::25de.
Facebook, being one of the largest social media platforms in the world, uses multiple IP addresses to distribute traffic efficiently across its global server network.
Why Knowing Facebook’s IP Address Is Useful
Understanding the IP addresses of Facebook.com can be helpful in multiple scenarios:
- Network Troubleshooting: If Facebook is not loading, checking the IP address can help identify whether the issue is local, with the ISP, or with Facebook’s servers.
- DNS Analysis: IT administrators may need to verify DNS configurations or troubleshoot routing issues.
- Firewall and Security Setup: Organizations may need to allow or block specific IP ranges for access control.
- Performance Monitoring: Knowing the IP helps in monitoring latency and server response times.
How to Find Facebook’s IP Addresses
There are multiple ways to find the IP addresses of Facebook, ranging from online tools to command-line methods. One of the easiest methods is to use HasheTools, an all-in-one DNS lookup and IP analysis platform.
Using HasheTools for Facebook IP Lookup
HasheTools provides a fast and accurate way to check the IP addresses of any website, including Facebook.
Steps:
- Open HasheTools.com.
- Navigate to the Website to IP Lookup Tool.
- Enter facebook.com in the input field.
- Click Check or Lookup.
- HasheTools will display all IP addresses associated with Facebook, including IPv4, IPv6, and any relevant CNAME records.
This method is beginner-friendly and eliminates the need for command-line knowledge.
Using Command-Line Tools for Facebook IP Lookup
If you prefer using built-in tools, here are the steps for Windows, macOS, and Linux:
Windows
- Open Command Prompt.
- Run the command:
nslookup facebook.com
- The output will show Facebook’s IPv4 and, if available, IPv6 addresses.
macOS and Linux
- Open Terminal.
- Run the command:
dig facebook.com A
dig facebook.com AAAA
- These commands will return all the IPv4 (A records) and IPv6 (AAAA records) addresses for Facebook.com.
Example of Facebook IP Addresses
Here is a real-world example of Facebook IP addresses (as of recent DNS lookup):
IPv4 Addresses:
- 57.144.222.1
(This may vary depending on your location and DNS server.)
IPv6 Addresses:
- 2a03:2880:f36f:1:face:b00c::25de
Note: Facebook uses multiple IP addresses for load balancing, regional distribution, and redundancy. The exact IPs may vary when you check using HasheTools or other DNS lookup services.
Understanding DNS Records for Facebook
Besides IP addresses, Facebook.com also uses several DNS records to ensure smooth performance:
- A Record: Maps the domain to an IPv4 address.
- AAAA Record: Maps the domain to an IPv6 address.
- CNAME Record: Aliases one domain to another (used for subdomains or services).
- MX Record: Handles email routing.
- TXT Record: Provides verification or security information.
- NS Record: Lists the authoritative DNS servers for the domain.
Using HasheTools, you can easily perform a full DNS lookup for Facebook and check all associated records in one place.
Why Facebook Uses Multiple IP Addresses
Facebook serves billions of users across the globe, which requires a distributed infrastructure. Multiple IP addresses allowed:
- Load Balancing: Traffic is distributed among multiple servers to reduce latency and server overload.
- Geo-Targeting: Users are routed to the nearest data center for faster loading.
- Redundancy: If one server fails, others take over to ensure uninterrupted service.
Checking Facebook IP addresses periodically using tools like HasheTools helps IT admins and enthusiasts understand this global infrastructure.
Troubleshooting Facebook Connectivity Using IP Addresses
Sometimes, Facebook may fail to load due to DNS or network issues. Here’s how IP addresses help:
- Ping Test: Test connectivity to a specific Facebook IP.
- Traceroute: Identify network hops and latency issues.
- DNS Verification: Confirm that your ISP or network is correctly resolving Facebook.com.
With HasheTools, you can quickly check both IPs and DNS configuration to diagnose problems.
Frequently Asked Questions
1. What is the IP address of Facebook?
Facebook’s IP addresses are distributed. Common IPv4 example: 57.144.222.1. IPv6: 2a03:2880:f36f:1:face:b00c::25de. For the most accurate and up-to-date IPs, use HasheTools.
2. Can Facebook IP addresses change?
Yes, Facebook frequently updates IPs for load balancing, regional distribution, and maintenance. Always perform a fresh lookup for accurate results.
3. How can I use Facebook IP addresses safely?
IP addresses should only be used for network monitoring, troubleshooting, or security setups. Never attempt unauthorized access to Facebook servers.
4. Can I track users on Facebook using their IP address?
No. User privacy is protected by Facebook, and IP addresses visible from your network are only for server connectivity, not individual users.
Final Thoughts
Checking and understanding Facebook’s IP addresses is essential for network troubleshooting, security setups, and DNS analysis. Using reliable tools like HasheTools simplifies this process, allowing you to access up-to-date IPs, verify DNS records, and analyze CNAMEs efficiently.
Whether you are a network professional, developer, or internet enthusiast, regularly using HasheTools to look up Facebook IP addresses ensures you stay informed and can resolve connectivity issues quickly.
Start your Facebook IP lookup today with HasheTools and monitor DNS changes in real-time!

IP Addresses for www.youtube.com: Complete YouTube IP Lookup & DNS Analysis Guide
If you are searching for the IP addresses for www.youtube.com, you’re likely trying to understand how YouTube’s servers work, troubleshoot connectivity issues, analyze DNS behavior, or simply learn more about how large platforms like YouTube deliver content globally.
At HasheTools, we provide easy-to-use lookup tools that help you analyze domains, IP addresses, and DNS records without technical complexity. In this guide, we’ll explain everything you need to know about YouTube IP addresses clearly and practically.
Does www.youtube.com have a Single IP Address?
No, www.youtube.com does not have one fixed IP address.
Unlike small websites that may resolve to one or two IPs, YouTube uses:
- Multiple IPv4 addresses
- Multiple IPv6 addresses
- CNAME-based DNS routing
- Google’s global load-balancing infrastructure
This means the YouTube IP address you see today may be different tomorrow, or even different from what another user sees at the same time.
Why YouTube Uses Multiple IP Addresses
YouTube is one of the most heavily trafficked websites in the world. To handle billions of video requests daily, Google uses a highly distributed network.
YouTube uses multiple IP addresses to ensure:
- Fast video delivery worldwide
- Reduced latency based on user location
- High availability and uptime
- Automatic failover if servers go down
Instead of forcing all users to connect to one server, Google routes traffic to the nearest and healthiest server automatically.
Understanding YouTube’s DNS and CNAME Records
When you perform a DNS lookup for www.youtube.com, you’ll notice that it doesn’t directly return IP addresses at first.
Instead, it resolves like this:
www.youtube.com → CNAME → youtube-ui.l.google.com
What does this mean?
- www.youtube.com is an alias
- youtube-ui.l.google.com is the canonical domain
- IP addresses belong to Google’s infrastructure
This CNAME-based setup allows Google to change backend IP addresses without affecting users.
HasheTools DNS lookup tools clearly show this CNAME chain for better transparency.
IPv4 Addresses for www.youtube.com
Below are commonly returned IPv4 addresses when querying YouTube DNS records. These are examples and may vary depending on your location and DNS resolver.
Example IPv4 addresses:
- 142.251.209.238
- 142.250.180.14
- 172.217.23.206
- 172.217.17.206
- 142.250.179.174
- 142.251.39.142
- 142.251.142.206
- 172.217.168.206
Important Notes:
- These IP addresses are dynamic
- YouTube does not guarantee a fixed IP
- IPs may change within minutes or hours
IPv6 Addresses for www.youtube.com
YouTube fully supports IPv6, which helps with scalability and future-proofing the internet.
Example IPv6 addresses:
- 2a00:1450:400e:804::200e
- 2a00:1450:400e:80c::200e
- 2a00:1450:400e:802::200e
- 2a00:1450:400e:808::200e
If your network supports IPv6, YouTube may prefer IPv6 connections automatically.
How to Check YouTube IP Address Using HasheTools
The easiest way to find YouTube IP addresses is by using HasheTools Website to IP Lookup.
Steps:
- Open HasheTools Website to IP Lookup
- Enter www.youtube.com
- Click Lookup
- Instantly view:
- IPv4 addresses
- IPv6 addresses
- CNAME records
- DNS resolution details
This method works without command-line tools or technical experience.
How to Manually Lookup YouTube IP Address
Method 1: Using dig Command
Check IPv4 addresses
dig www.youtube.com A
Check IPv6 addresses
dig www.youtube.com AAAA
Method 2: Using nslookup
nslookup www.youtube.com
This command shows:
- CNAME records
- All resolved IP addresses
- DNS response behavior
Why YouTube IP Addresses Change Frequently
If you notice that YouTube’s IP address keeps changing, this is completely normal.
Reasons include:
- Load balancing across servers
- Regional routing optimization
- Network congestion management
- Server health monitoring
This system ensures smooth video playback even during peak traffic hours.
Can You Access YouTube Using Its IP Address?
Technically, you may be able to access YouTube using an IP address in some cases, but it is not recommended.
Reasons:
- SSL certificates require domain names
- IP-based access may fail
- IPs can change anytime
- Features may not work correctly
Always use the youtube.com domain name for proper access.
Can You Block YouTube Using IP Addresses?
Blocking YouTube by IP address is unreliable and ineffective.
Why?
- YouTube shares IP ranges with other Google services
- IPs change frequently
- Blocking one IP may break Gmail, Google Search, or Google APIs
Instead, network administrators usually block YouTube using:
- DNS filtering
- Domain-based firewalls
- Application-layer controls
Does YouTube Have a Fixed IP Range?
Many users search for the YouTube IP range, but Google does not provide a dedicated YouTube-only IP range.
Important points:
- YouTube IPs belong to Google’s global IP space
- IPs are shared across multiple Google services
- Ranges vary by country and network
For monitoring and analysis, DNS-based lookups (like those on HasheTools) are more reliable than IP-based rules.
Common Searches Related to YouTube IP Address
Users often search for:
- youtube ip address
- IP address of YouTube
- YouTube IP number
- YouTube IP range
- YouTube server address
- What is the ip address of youtube
All of these searches point to the same concept: dynamic DNS resolution of YouTube servers.
Use Cases for YouTube IP Lookup
A YouTube IP lookup can be useful for:
- Network diagnostics
- Learning DNS behavior
- Educational purposes
- Monitoring connectivity issues
- Understanding CDN and load balancing
However, IP lookup should never be used for unauthorized access or misuse.
Frequently Asked Questions (FAQs)
What is the IP address of www.youtube.com?
YouTube does not have a single IP address. It uses multiple dynamic IPs.
Why does YouTube use CNAME records?
CNAME records allow Google to manage server changes without user disruption.
Does YouTube support IPv6?
Yes, YouTube fully supports IPv6 connectivity.
Why do different users see different YouTube IPs?
Because Google routes traffic based on location, DNS resolver, and server availability.
Is YouTube hosted on Google servers?
Yes, YouTube runs entirely on Google’s infrastructure.
Final Thoughts
The IP addresses for www.youtube.com are dynamic, location-based, and managed through Google’s advanced DNS and server infrastructure. This design allows YouTube to deliver fast, reliable video streaming to users all over the world.
Instead of relying on fixed IPs, YouTube uses:
- CNAME records
- Multiple IPv4 and IPv6 addresses
- Global load balancing
If you want to check, verify, or analyze YouTube IP addresses, HasheTools provides simple and accurate lookup tools designed for both beginners and professionals.
Use the HasheTools Website to IP Lookup to get instant and reliable DNS insights.

CNAME Lookup: How to Check, Verify, and Understand CNAME Records
A CNAME lookup is a critical part of managing domains, especially when connecting subdomains or custom domains to third-party services, hosting platforms, CDNs, or SaaS tools. Using HasheTools, you can easily check, verify, and troubleshoot CNAME records without needing technical expertise.
In this detailed guide, we will cover:
- What CNAME records are and why they are important
- How to perform a CNAME lookup using online tools and command-line methods
- How to verify and troubleshoot CNAME records
- Common restrictions and mistakes to avoid
- The difference between CNAME and other DNS record types
By the end, you’ll understand how to manage and verify CNAME records efficiently using HasheTools.
What Is a CNAME Record?
A CNAME (Canonical Name) record is a DNS record that allows one domain name to act as an alias for another. Unlike an A record that points directly to an IP address, a CNAME points to another hostname. The destination hostname is referred to as the canonical name.
Example:
app.example.com → example.hostingplatform.com
Here:
- app.example.com is the alias
- example.hostingplatform.com is the canonical name
This setup is particularly useful when the target server IP may change, but you want your domain or subdomain to remain consistent.
Why Are CNAME Records Important?
CNAME records simplify DNS management and are widely used in scenarios like:
- Linking a custom domain to third-party services
- Using Content Delivery Networks (CDNs) to speed up website content
- Managing SaaS tools like email or marketing platforms
- Avoiding frequent DNS updates when the service provider changes IP addresses
By using a CNAME record, you can retain control of your domain while allowing service providers to manage server IP changes dynamically.
What Is a CNAME Lookup?
A CNAME lookup is the process of determining which canonical domain a domain or subdomain points to. Performing a lookup helps you:
- Verify DNS configuration
- Troubleshoot domain connection issues
- Confirm third-party service setup
- Debug SSL or hosting errors
Using HasheTools, you can perform a CNAME lookup instantly online, without command-line knowledge or complex software.
How to Check CNAME Records Online
The simplest way to perform a CNAME lookup is to use an online CNAME checker. HasheTools offers a user-friendly tool for this purpose.
Steps:
- Open HasheTools CNAME Lookup Tool
- Enter the domain or subdomain you want to check
- Click Check / Lookup
- View the canonical name and DNS record details in the results
Online tools are fast, accurate, and beginner-friendly. They also allow you to check multiple domains quickly for monitoring purposes.
How to Lookup CNAME Records Using Command-Line
For technical users or network administrators, you can also perform CNAME lookups directly from your computer.
On Windows:
- Open Command Prompt
- Type:
nslookup -q=cname example.com
- The CNAME record appears under Non-authoritative answer
On macOS:
- Open Terminal
- Type:
dig example.com cname
- Look for the ANSWER SECTION to see the canonical name
On Linux:
- Open Terminal
- Type:
dig example.com cname
- The CNAME result is displayed under the ANSWER SECTION
These commands are useful for verifying DNS configurations manually and troubleshooting errors.
Example of a CNAME Lookup Result
A typical CNAME lookup result may look like this:
example.com. 300 IN CNAME target.example.net.
This confirms that example.com is an alias of target.example.net. Using HasheTools, you can get similar results instantly for any domain or subdomain.
How to Verify a CNAME Record
To ensure a CNAME record is configured correctly:
- Canonical domain exists: Check that the target hostname is active and correct
- No conflicting DNS records: A, MX, or TXT records should not conflict with the CNAME
- Propagation completed: DNS changes may take a few minutes to 24 hours to propagate
HasheTools makes verification easy by showing real-time CNAME status across multiple DNS servers.
Common CNAME Record Restrictions
CNAME records have strict rules to prevent DNS errors:
- Only one CNAME record per hostname is allowed
- CNAME records cannot point to IP addresses
- If a CNAME exists, no other DNS records can exist for that hostname
- Root domains (example.com) should not use CNAME records
- MX and NS records must not point to a CNAME
Ignoring these rules often causes DNS failures or service interruptions.
Common CNAME Issues and Fixes
1. CNAME Record Not Working
- DNS changes not propagated yet
- Incorrect target hostname
- Conflicting A or MX records
2. CNAME Verification Failed
- Typo in canonical name
- CNAME added at the root domain
- Target service misconfigured
Tip: Always double-check spelling and allow for full DNS propagation before troubleshooting further. HasheTools can help confirm if changes have propagated successfully.
CNAME vs Other DNS Record Types
| Record Type | Purpose |
| A | Maps a domain to an IPv4 address |
| AAAA | Maps a domain to an IPv6 address |
| CNAME | Alias to another domain |
| MX | Email routing |
| TXT | Verification and security |
| NS | Name server details |
| SOA | DNS authority information |
When to use CNAME:
- Connecting a subdomain to hosting or a CDN
- Verifying ownership with third-party tools
- Managing scalable cloud services
- Avoid managing IP addresses manually
Avoid using CNAME for root domains unless your DNS provider explicitly supports it.
Why Use HasheTools for CNAME Lookup?
HasheTools offers fast, reliable, and beginner-friendly tools to manage DNS records:
- Instant CNAME verification
- Check multiple domains at once
- Real-time updates across global DNS servers
- No software installation required
- Free to use
Whether you are a beginner, developer, or IT administrator, HasheTools simplifies domain management.
Frequently Asked Questions (FAQs)
Q1: What is a CNAME lookup?
A CNAME lookup checks which canonical domain a hostname is pointing to.
Q2: How long does a CNAME record take to update?
Most DNS changes propagate within minutes, but full propagation may take up to 24 hours.
Q3: Can a domain have multiple CNAME records?
No, a domain can only have one CNAME record.
Q4: Is CNAME better than an A record?
CNAME is ideal for third-party services. A records are better when you control the server IP.
Q5: Can I verify a CNAME using HasheTools?
Yes, HasheTools shows canonical names, checks for conflicts, and verifies propagation.
Final Thoughts
A CNAME lookup is essential for anyone working with domains, hosting, or DNS configurations. Understanding how CNAME records work helps you:
- Avoid common mistakes
- Verify third-party services
- Debug hosting or SSL issues
- Maintain efficient and scalable DNS management
With HasheTools, you can check, verify, and monitor CNAME records easily and accurately, no technical skills required.
Regularly verifying your CNAME records ensures your domains and subdomains work seamlessly with third-party services, CDNs, and SaaS platforms.

Google.com IP Address: Find Google Server IPs (IPv4 & IPv6)
If you are looking for the IP address of Google.com, you’re not alone. Thousands of users search daily for terms like Google IP, Google.com IP address, and www google com ip to understand how Google’s servers work or to troubleshoot network issues.
In this guide, you’ll learn:
- What is the IP address of Google
- Why does Google uses multiple IPs
- How to find Google.com IP using DNS lookup
- Difference between IPv4 and IPv6 Google IPs
- How to find the IP address of any website
What Is the IP Address of Google.com?
Google does not use a single fixed IP address. Instead, it uses a large global network with multiple servers distributed worldwide.
Depending on:
- Your location
- Your DNS resolver
- Network routing
You may see different Google IP addresses.
Example Google.com IP Addresses
IPv4 address (example): 142.250.179.206
IPv6 address (example): 2a00:1450:400e:803::200e
These IPs can change over time due to load balancing and DNS optimization.
Why Does Google Have Multiple IP Addresses?
Google operates one of the largest infrastructures in the world. Multiple IPs help Google:
- Improve speed and performance
- Serve users from the nearest data center
- Handle massive traffic loads
- Increase security and reliability
That’s why searching “Google IP address” may return different results for different users.
How to Find Google.com IP Address Using DNS Lookup
While you can use Command Prompt (nslookup google.com) or Terminal (dig google.com), these methods can sometimes show cached (old) data.
For a real-time, authoritative result, use the HasheTools Website to IP Lookup.
Why HasheTools is better than CMD:
- Shows Both IPv4 & IPv6: Most command lines only show one by default.
- Detects CDNs: Instantly tells you whether a site uses Cloudflare or Akamai.
- No Technical Setup: Works on mobile and desktop without opening a terminal.
DNS Query Example (Google.com)
DNS Question: dig @one.one.one.one google.com A
DNS Answer: google.com. 139 A 142.250.179.206
For IPv6: google.com. 234 AAAA 2a00:1450:400e:803::200e
This confirms that Google.com resolves to multiple IP addresses.
IPv4 vs IPv6: Google IP Explained
| Type | Example | Description |
| IPv4 | 142.250.xxx.xxx | Older, widely supported |
| IPv6 | 2a00:1450:: | Newer, faster, future-ready |
Google fully supports IPv6, which is why many users now see IPv6 addresses when searching “google.com ip”.
How to Find the IP Address of Any Website
Using a website as an IP lookup tool, you can:
- Enter any domain name
- Check whether IPv4 or IPv6 records exist
- See how many IPs are associated with that domain
This is useful for:
- Network diagnostics
- SEO & hosting research
- Security analysis
- Server troubleshooting
Common Searches About Google IP Address
People often ask:
- What is the IP address of Google?
- What is www google com IP?
- What is Google’s server IP address?
- Why does Google’s IP change?
- How to check Google DNS IP?
All of these questions have the same answer: Google uses dynamic, location-based IP addresses.
Important Security Note: Domain vs IP Rules
In 2026, security experts recommend avoiding IP-based blocking in firewalls. Since Google frequently rotates its IP addresses, IP-based rules can unintentionally block legitimate traffic.
Instead, always use domain-based rules (for example, *.google.com) to ensure uninterrupted access to Google services.
Find Any Website’s IP Instantly
Not just Google, you can check the IP address of competitors or your own website for network diagnostics and SEO audits.
Use HasheTools for:
- Finding hidden server IPs.
- Checking if a site is using Cloudflare or CDN.
- Troubleshooting “Server Not Found” errors.
- Verifying DNS propagation.
DNS Records for Google.com: Complete Guide (NSLookup & DNS Lookup)
Google.com is one of the most widely used websites in the world, and its DNS infrastructure is designed for speed, reliability, and security. If you want to check DNS records for Google.com or understand how Google DNS works, this complete guide will help you.
In this article, you will learn:
- What DNS records are and why they matter
- How to perform an NSLookup for Google.com
- Details of Google.com A, AAAA, TXT, MX, NS, and SOA records
- Information about Google’s public DNS servers
This guide is useful for developers, system administrators, students, and SEO professionals.
What Are DNS Records?
DNS (Domain Name System) acts as the Internet’s phonebook. When a user types google.com into a browser, DNS records translate that domain name into IP addresses so the browser can connect to the correct server.
Common DNS record types include:
- A Record: Maps a domain to an IPv4 address
- AAAA Record: Maps a domain to an IPv6 address
- MX Record: Defines mail servers for a domain
- TXT Record: Used for verification and security
- NS Record: Identifies authoritative name servers
- SOA Record: Contains administrative DNS information
DNS Records for Google.com
DNS (Domain Name System) is the Internet’s translation layer. For a global entity like Google, DNS isn’t just a phonebook; it’s a load-balancing engine that routes traffic to the nearest data center.
A Record (IPv4 Address)
Google uses Anycast IP routing. When you perform a lookup, you don’t just get one IP; you get the IP of the server closest to your physical location.
Example:
- 216.58.208.110
A records play a key role in website availability, speed, and global load balancing.
AAAA Record (IPv6 Address)
The AAAA record shows the IPv6 address for Google.com, which supports modern networks and improves scalability.
Example:
- 2a00:1450:400e:806::200e
IPv6 helps future-proof Google’s global infrastructure.
MX Records (Mail Exchange)
MX records specify which mail servers are responsible for receiving emails for a domain.
Example:
- smtp.google.com (Priority 10)
These records ensure reliable email delivery for Gmail and Google Workspace.
TXT Records (Verification & Security)
TXT records are used for multiple purposes, including:
- Domain ownership verification
- Email authentication (SPF, DKIM, DMARC)
- Third-party service verification (Google, Microsoft, Apple, Facebook, etc.)
Google.com has multiple TXT records configured to maintain trust and security.
SPF Record for Google
SPF (Sender Policy Framework) records help prevent email spoofing.
Example SPF record:
v=spf1 include:_spf.google.com ~all
This means only authorized Google servers are allowed to send emails on behalf of the domain.
NS Records (Name Servers)
NS records indicate which servers manage the DNS records for a domain.
Google.com name servers:
- ns1.google.com
- ns2.google.com
- ns3.google.com
- ns4.google.com
These are Google’s authoritative name servers.
SOA Record (Start of Authority)
The SOA record contains important administrative details about the DNS zone, including:
- Primary name server
- DNS administrator email
- Serial number
- Refresh, retry, and expire values
The SOA record helps keep DNS data consistent across servers.
How to Check Google DNS Records Using NSLookup
You can check Google.com DNS records using command-line tools or online DNS lookup services.
NSLookup Command Example
nslookup google.com
This command returns basic DNS information such as IP addresses and name servers.
Online DNS Lookup Tools
Online tools allow you to quickly check:
- A and AAAA records
- MX records
- TXT records
- NS and CAA records
No technical setup is required.
Google Public DNS Servers Explained
Google also provides public DNS servers that are widely used for faster and more secure internet browsing.
Google DNS IP addresses:
Primary: 8.8.8.8
Secondary: 8.8.4.4
New for 2026: Google has fully integrated DoH (DNS over HTTPS) and DoT (DNS over TLS) into its public DNS, ensuring that your browsing queries are encrypted and private from ISP eavesdropping.
Benefits of Google DNS
- Fast DNS resolution
- High reliability
- Improved security
New Section: DNSSEC & CAA Records
Add this to outrank competitors who only cover basic records.
The Integrity Layer: DNSSEC
Google.com is signed with DNSSEC (DNS Security Extensions). This adds a digital signature to every record, ensuring that a “Man-in-the-Middle” attacker cannot spoof the IP address and send you to a fake version of Google.
The Certificate Layer: CAA
The CAA (Certificate Authority Authorization) record for Google specifies exactly which Certificate Authorities (like Google Trust Services) are allowed to issue SSL certificates for the domain. This is a critical defense against unauthorized certificate issuance.
Why Google DNS Records Matter
Google’s DNS records are important because they:
- Ensure website uptime and performance
- Support global traffic distribution
- Improve email security and delivery
- Enable secure domain verification
Google’s DNS infrastructure is often considered an industry benchmark.
Frequently Asked Questions (FAQs)
What is the DNS server for Google?
Google’s public DNS servers are 8.8.8.8 and 8.8.4.4.
Why does google.com return different IPs in different countries?
This is due to Geo-DNS and Anycast. Google detects your location and provides the IP of the nearest edge server to reduce “ping” time.
Can I use Google DNS to speed up my gaming?
Yes. By using 8.8.8.8, you often bypass slow ISP DNS resolvers, leading to faster “lookups,” though it doesn’t change your actual bandwidth.
What is Google’s SPF record?
It is v=spf1 include:_spf.google.com ~all. It ensures that only Google’s servers can send emails on behalf of @google.com.
How can I check Google DNS records?
You can use the NSLookup command or an online DNS lookup tool.
Is Google DNS safe to use?
Yes, Google DNS is fast, secure, and trusted worldwide.
What is Google’s SPF record?
Google uses _spf.google.com to define authorized email-sending servers.
Take Control of Your DNS Infrastructure
Google.com’s complex DNS records show exactly how global tech giants maintain 100% uptime and elite security. Understanding these records isn’t just for experts, it’s the key to better troubleshooting, faster loading speeds, and robust email security.
Stop relying on slow command lines. Whether you need to verify a new A Record, check your MX priorities, or audit your SPF/DMARC for email security, HasheTools Advanced DNS Lookup provides everything you need in one click.
Use HasheTools to instantly check:
- Full Record Stack: A, AAAA, MX, TXT, and CNAME records.
- Security Verification: Instant check for SPF, DKIM, and DMARC.
- Global Propagation: See if your DNS changes have reached the world.
- Speed & Accuracy: No-wait results directly from authoritative servers.
Stay Updated
Get the latest articles and tutorials delivered to your inbox